Writing Prometheus exporters – the Lazy Dev way

This article is part of the C# Advent Series. Christmas has a special place in our hearts and this event is also a wonderful way to help build up the C# community. Do check out awesome content from other authors!

There’s a couple of things about Christmas in Southern Hemisphere that tends to hit us pretty hard each year: first, the fact that it is summer and it’s scorching hot outside. And second – is a customary closedown of almost all businesses (which probably started as response to the first point). Some businesses, however, keep boxing on.

One of our clients is into cryptocurrency mining and they could not care less about staff wanting time off to spend with family. Their only workforce are GPUs, and these devices can work 24/7. However, with temperatures creeping up, efficiency takes a hit. Also, other sad things can happen:

Solution design

Our first suggestion was to use our trusty ELK+G and poll extra data from NVIDIA SMI tool, but we soon figured out that this problem has already been solved for us. Mining software nowadays got extremely sophisticated (and obfuscated) – it now comes with own webserver and API. So, we simplified a bit:

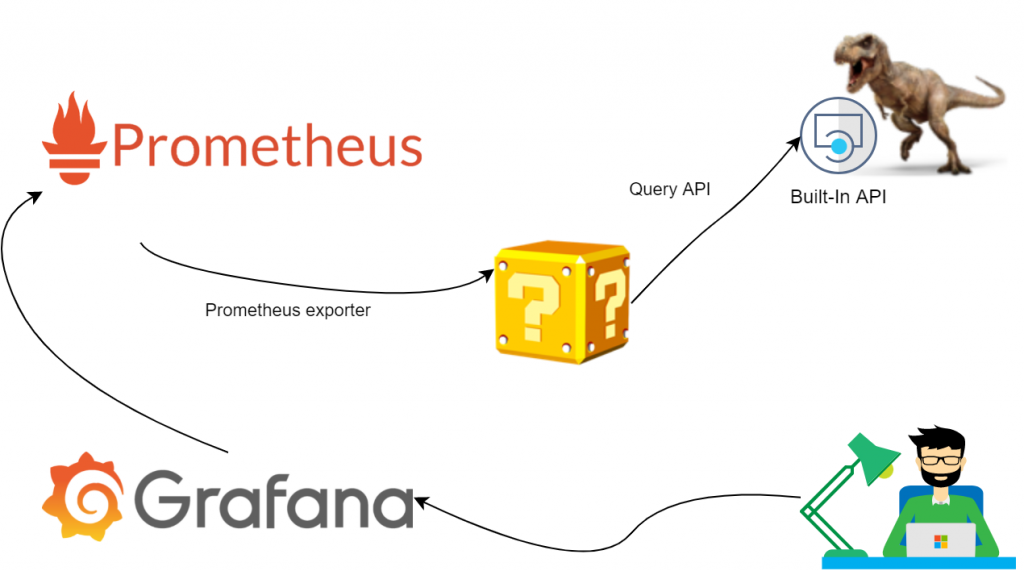
All we have to do here would be to stand up an exporter and set up a few dashboards. Easy.

Hosted Services

We essentially need to run two services: poll underlying API and expose metrics in Prometheus-friendly format. We felt .NET Core Generic host infrastructure would fit very well here. It allows us to bootstrap an app, add Hosted Services and leave plumbing to Docker. The program ended up looking like so:

class Program
    {
        private static async Task Main(string[] args)
        {
            using IHost host = CreatHostBuilder(args).Build();
            
            await host.RunAsync();
        }
        static IHostBuilder CreateHostBuilder(string[] args) =>
            Host.CreateDefaultBuilder(args)
                .ConfigureAppConfiguration((configuration) =>
                {
                    configuration.AddEnvironmentVariables("TREX")
; // can add more sources such as command line
                })
                .ConfigureServices(c =>
                {
                    c.AddSingleton<MetricCollection>(); // This is where we will keep all metrics state. hence singleton
                    c.AddHostedService<PrometheusExporter>(); // exposes MetricCollection
                    c.AddHostedService<TRexPoller>(); // periodically GETs status and updates MetricCollection
                });
    }

Defining services

The two parts of our applicatgion are TRexPoller and PrometheusExporter. Writing both is trivial and we won’t spend much time on the code there. Feel free to check it out on GitHub. The point to make here is it has never been easier to focus on business logic and leave heavy lifting to respective NuGet packages.

Crafting the models

The most important part of our application is of course telemetry. We grabbed a sample json response from the API and used an online tool to convert that into C# classes:

// generated code looks like this. A set of POCOs with each property decorated with JsonProperty that maps to api response
public partial class Gpu
{
    [JsonProperty("device_id")]
    public int DeviceId { get; set; }
    [JsonProperty("hashrate")]
    public int Hashrate { get; set; }
    [JsonProperty("hashrate_day")]
    public int HashrateDay { get; set; }
    [JsonProperty("hashrate_hour")]
    public int HashrateHour { get; set; }
...
}

Now we need to define metrics that Prometheus.Net can later discover and serve up:

// example taken from https://github.com/prometheus-net/prometheus-net#quick-start
private static readonly Counter ProcessedJobCount = Metrics
    .CreateCounter("myapp_jobs_processed_total", "Number of processed jobs.");
...
ProcessJob();
ProcessedJobCount.Inc();

Turning on lazy mode

This is where we’ve got so inspired by our “low code” solution that we didn’t want to get down to hand-crafting a bunch of class fields to describe every single value the API serves. Luckily, C#9 has a new feature just for us: Source Code Generators to the rescue! We’ve covered the basic setup before, so we’ll skip this part here and move on to the Christmas magic part.

Let Code Generators do the work for us

Before we hand everything over to robots, we need to set some basic rules to control the process. Custom attributes looked like a sensible way to keep all configuration local with the model POCOs:

[AddInstrumentation("gpus")] // the first attribute prompts the generator to loop through the properties and search for metrics 
public partial class Gpu
{
    [JsonProperty("device_id")]
    public int DeviceId { get; set; }
    [JsonProperty("hashrate")]
    /*
     * the second attribute controls which type the metric will have as well as what labels we want to store with it.
     * In this example, it's a Gauge with gpu_id, vendor and name being labels for grouping in Prometheus
     */
    [Metric("Gauge", "gpu_id", "vendor", "name")]
    public int Hashrate { get; set; }
    [JsonProperty("hashrate_day")]
    [Metric("Gauge", "gpu_id", "vendor", "name")]
    public int HashrateDay { get; set; }
    [JsonProperty("hashrate_hour")]
    [Metric("Gauge", "gpu_id", "vendor", "name")]
    public int HashrateHour { get; set; }

Finally, the generator itself hooks into ClassDeclarationSyntax and looks for well-known attributes:

public void OnVisitSyntaxNode(SyntaxNode syntaxNode)
    {
        if (syntaxNode is ClassDeclarationSyntax cds && cds.AttributeLists
            .SelectMany(al => al.Attributes)
            .Any(a => (a.Name as IdentifierNameSyntax)?.Identifier.ValueText == "AddInstrumentation"))
        {
            ClassesToProcess.Add(cds);
        }
    }

Once we’ve got our list, we loop through each property and generate a dictionary of Collector objects.

var text = new StringBuilder(@"public static Dictionary<string, Collector> GetMetrics(string prefix)
    {
        var result = new Dictionary<string, Collector>
        {").AppendLine();
foreach (PropertyDeclarationSyntax p in properties)
{
    var jsonPropertyAttr = p.GetAttr("JsonProperty");
    var metricAttr = p.GetAttr("Metric");
    if (metricAttr == null) continue;
    var propName = jsonPropertyAttr.GetFirstParameterValue();
    var metricName = metricAttr.GetFirstParameterValue(); // determine metric type
    if (metricAttr.ArgumentList.Arguments.Count > 1)
    {
        var labels = metricAttr.GetTailParameterValues(); // if we have extra labels to process - here's our chance 
        text.AppendLine(
            $"{{$\"{{prefix}}{attrPrefix}_{propName}\", Metrics.Create{metricName}($\"{{prefix}}{attrPrefix}_{propName}\", \"{propName}\", {commonLabels}, {labels}) }},");
    }
    else
    {
        text.AppendLine(
            $"{{$\"{{prefix}}{attrPrefix}_{propName}\", Metrics.Create{metricName}($\"{{prefix}}{attrPrefix}_{propName}\", \"{propName}\", {commonLabels}) }},");
    }
}
text.AppendLine(@"};
                return result;
            }");

In parallel to defining storage for metrics, we also need to generate code that will update values as soon as we’ve heard back from the API:

private StringBuilder UpdateMetrics(List<MemberDeclarationSyntax> properties, SyntaxToken classToProcess, string attrPrefix)
{
    var text = new StringBuilder($"public static void UpdateMetrics(string prefix, Dictionary<string, Collector> metrics, {classToProcess} data, string host, string slot, string algo, List<string> extraLabels = null) {{");
    text.AppendLine();
    text.AppendLine(@"if(extraLabels == null) { 
                            extraLabels = new List<string> {host, slot, algo};
                        }
                        else {
                            extraLabels.Insert(0, algo);
                            extraLabels.Insert(0, slot);
                            extraLabels.Insert(0, host);
                        }");
    foreach (PropertyDeclarationSyntax p in properties)
    {
        var jsonPropertyAttr = p.GetAttr("JsonProperty");
        var metricAttr = p.GetAttr("Metric");
        if (metricAttr == null) continue;
        var propName = jsonPropertyAttr.GetFirstParameterValue();
        var metricName = metricAttr.GetFirstParameterValue();
        var newValue = $"data.{p.Identifier.ValueText}";
        text.Append(
            $"(metrics[$\"{{prefix}}{attrPrefix}_{propName}\"] as {metricName}).WithLabels(extraLabels.ToArray())");
        switch (metricName)
        {
            case "Counter": text.AppendLine($".IncTo({newValue});"); break;
            case "Gauge": text.AppendLine($".Set({newValue});"); break;
        }
    }
    text.AppendLine("}").AppendLine();
    return text;
}

Bringing it all together with MetricCollection

Finally, we can use the generated code to bootstrap metrics on per-model basis and ensure we correctly handle updates:

internal class MetricCollection
{
    private readonly Dictionary<string, Collector> _metrics;
    private readonly string _prefix;
    private readonly string _host;
    public MetricCollection(IConfiguration configuration)
    {
        _prefix = configuration.GetValue<string>("exporterPrefix", "trex");
        _metrics = new Dictionary<string, Collector>();
        // this is where declaring particl classes and generating extra methods makes for seamless development experience
        foreach (var (key, value) in TRexResponse.GetMetrics(_prefix)) _metrics.Add(key, value);
        foreach (var (key, value) in DualStat.GetMetrics(_prefix)) _metrics.Add(key, value);
        foreach (var (key, value) in Gpu.GetMetrics(_prefix)) _metrics.Add(key, value);
        foreach (var (key, value) in Shares.GetMetrics(_prefix)) _metrics.Add(key, value);
    }
    public void Update(TRexResponse data)
    {
        TRexResponse.UpdateMetrics(_prefix, _metrics, data, _host, "main", data.Algorithm);
        DualStat.UpdateMetrics(_prefix, _metrics, data.DualStat, _host, "dual", data.DualStat.Algorithm);
        
        foreach (var dataGpu in data.Gpus)
        {
            Gpu.UpdateMetrics(_prefix, _metrics, dataGpu, _host, "main", data.Algorithm, new List<string>
            {
                dataGpu.DeviceId.ToString(),
                dataGpu.Vendor,
                dataGpu.Name
            });
            Shares.UpdateMetrics(_prefix, _metrics, dataGpu.Shares, _host, "main", data.Algorithm, new List<string>
            {
                dataGpu.GpuId.ToString(),
                dataGpu.Vendor,
                dataGpu.Name
            });
        }
    }
}

Peeking into generated code

Just to make sure we’re on the right track, we looked at generated code. It ain’t pretty but it’s honest work:

public partial class Shares {
public static Dictionary<string, Collector> GetMetrics(string prefix)
                {
                    var result = new Dictionary<string, Collector>
                    {
{$"{prefix}_shares_accepted_count", Metrics.CreateCounter($"{prefix}_shares_accepted_count", "accepted_count", "host", "slot", "algo", "gpu_id", "vendor", "name") },
{$"{prefix}_shares_invalid_count", Metrics.CreateCounter($"{prefix}_shares_invalid_count", "invalid_count", "host", "slot", "algo", "gpu_id", "vendor", "name") },
{$"{prefix}_shares_last_share_diff", Metrics.CreateGauge($"{prefix}_shares_last_share_diff", "last_share_diff", "host", "slot", "algo", "gpu_id", "vendor", "name") },
...
};
                            return result;
                        }
public static void UpdateMetrics(string prefix, Dictionary<string, Collector> metrics, Shares data, string host, string slot, string algo, List<string> extraLabels = null) {
if(extraLabels == null) { 
                                    extraLabels = new List<string> {host, slot, algo};
                                }
                                else {
                                    extraLabels.Insert(0, algo);
                                    extraLabels.Insert(0, slot);
                                    extraLabels.Insert(0, host);
                                }
(metrics[$"{prefix}_shares_accepted_count"] as Counter).WithLabels(extraLabels.ToArray()).IncTo(data.AcceptedCount);
(metrics[$"{prefix}_shares_invalid_count"] as Counter).WithLabels(extraLabels.ToArray()).IncTo(data.InvalidCount);
(metrics[$"{prefix}_shares_last_share_diff"] as Gauge).WithLabels(extraLabels.ToArray()).Set(data.LastShareDiff);
...
}
}

Conclusion

This example barely scratches the surface of what’s possible with this feature. Source code generators are extremely helpful when we deal with tedious and repetitive development tasks. It also helps reduce maintenance overheads by enabling us to switch to declarative approach. I’m sure we will see more projects coming up where this feature will become central to the solution.

If not already, do check out the source code in GitHub. And as for us, we would like to sign off with warmest greetings of this festive season and best wishes for happiness in the New Year.

Web API – Dev environment in 120 seconds

Quite a few recent engagements saw us developing APIs for clients. Setting these projects up is a lot of fun at first. After a few deployments, however, we felt there should be a way to optimise our workflow and bootstrap environments a bit quicker.

We wanted to craft a skeleton project that would provide structure and repeatability. After quick validation we decided that Weather Forecast project is probably good enough as API starting point. With that part out of the way we also needed to have a client application that we could use while developing and handing the API over to the client.

Our constraints

Given the purpose of our template we also had a few more limitations:

  • Clean desk policy – the only required tools are Docker and VS Code (and lots or RAM! but that would be another day’s problem). Everything else should be transient and should leave no residue on host system.
  • Offline friendly – demos and handovers can happen on-site, where we won’t necessarily have access to corporate WiFi or wired network
  • Open Source – not a constraint per se, but very nice to have

With that in mind, our first candidate Postman was out, and after scratching heads for a little while we stumbled upon Hoppscotch. A “light-weight, web-based API development suite” as it says on the tin, it seems to deliver most of the features we’d use.

Setting up with Docker

There are heaps of examples on how to use Hoppscotch, but we haven’t seen a lot regarding self-hosting. Probably, because it’s fairly straightforward to get started:

docker run -it --rm -p3000 hoppscotch/hoppscotch

After that we should be able to just visit localhost:3000 and see the sleek UI:

hoppscotch UI

Building containers

Before we get too far ahead, let’s codify the bits we already know. We start VS Code and browse through a catalog of available dev containers… This time round we needed to set up and orchestrate at least two: we’ve got our app as well as Hoppscotch sitting in the same virtual network. That led us to opt for docker-from-docker-compose container template. On top of that, we enhanced it with dotnet SDK installation like our AWS Lambda container.

Finally, the docker-compose.yml needs Hoppscotch service definition at the bottom:

  hoppscotch:
    image: hoppscotch/hoppscotch
    ports:
      - 3000:3000

Should be smooth sailing from here: reopen in container, create a web API project and test away! Right?

A few quirks to keep in mind

As soon as we fired up the UI and tried making simple requests, we realised that Hoppscotch is not immune to CORS restrictions. Developers offer a couple of ways to fix this:

  1. enable CORS in the API itself – that’s what we ended up doing for now
  2. set up browser extension, but we couldn’t go that route as it would moot our clean desk policy. It also it not yet available in Microsoft Edge extension store
  3. finally, we can use proxyscotch but that looked like a rabbit hole we may want to explore later.

Authentication mechanism support is hopefully coming, so we’ll watch that space.

There’s one more interesting behaviour that caught us off guard: the client would silently fail SSL certificate check until we manually trusted the host in another tab. There are other more technical solutions but the easiest for now is to avoid SSL in development.

Hoppscotch ssl trust error

Conclusion

Once again, we used our weapon of choice and produced an artifact that enables us to develop and test containerised APIs faster!

end to end setup flow

Setting up Basic Auth for Swashbuckle

Let us put the keywords up front: Swashbuckle Basic authentication setup that works for Swashbuckle.WebApi installed on WebAPI projects (.NET 4.x). It’s also much less common to need Basic auth nowadays where proper mechanisms are easily available in all shapes and sizes. However, it may just become useful for internal tools or existing integrations.

Why?

Most tutorials online would cover the next gen library aimed specifically at ASP.Net Core, which is great (we’re all in for tech advancement), but sometimes legacy needs a prop up. If you are looking to add Basic Auth to ASP.NET Core project – look up AddSecurityDefinition and go from there. If legacy is indeed the in trouble – read on.

Setting it up

The prescribed solution is two steps:
1. add authentication scheme on SwaggerDocsConfig class
2. attach authentication to endpoints as required with IDocumentFilter or IOperationFilter

Assuming the installer left us with App_Start/SwaggerConfig.cs file, we’d arrive at:

public class SwaggerConfig
{
	public static void Register()
	{
		var thisAssembly = typeof(SwaggerConfig).Assembly;

		GlobalConfiguration.Configuration
			.EnableSwagger(c =>
				{
					...
					c.BasicAuth("basic").Description("Basic HTTP Authentication");
					c.OperationFilter<BasicAuthOpFilter>();
					...
				});
	}
}

and the most basic IOperationFilter would look like so:

public class BasicAuthOpFilter : IOperationFilter
{
	public void Apply(Operation operation, SchemaRegistry schemaRegistry, ApiDescription apiDescription)
	{
		operation.security = operation.security ?? new List<IDictionary<string, IEnumerable<string>>>();
		operation.security.Add(new Dictionary<string, IEnumerable<string>>()
							   {
								   { "basic", new List<string>() }
							   });
	}
}

Calling WCF services from .NET Core clients

Imagine situation: company runs a business-critical application that was built when WCF was a hot topic. Over the years the code base has grown and became a hot mess. But now, finally, the development team got a go ahead to break it down into microservices. Yay? Calling WCF services from .NET Core clients can be a challenge.

Not so fast

We already discussed some high-level architectural approaches to integrate systems. But we didn’t touch upon the data exchange between monolith and microservice consumers: we could post complete object feed onto a message queue, but that’s not always fit for purpose as messages should be lightweight. Another way (keeping in mind our initial WCF premise), we could call the services as needed and make alterations inside microservices. And Core WCF is a fantastic way to do that. If only we used all stock standard service code.

What if custom is the way?

But sometimes our WCF implementation has evolved so much that it’s impossible to retrofit off the shelf tools. For example, one client we worked with, was stuck with binary formatting for performance reasons. And that meant that we needed to use same legacy .net 4.x assemblies to ensure full compatibility. Issue was – not all of references was supported by .net core anyway. So we had to get creative.

What if there was an API?

Surely, we could write an API that would adapt REST requests to WCF calls. We could probably just use Azure API Management and call it a day, but our assumption here was not all customers are going to do that. The question is how to minimize the amount of effort developers need to expose the endpoints.

A perfect case for C# Source Generators

C# Source Generators is a new C# compiler feature that lets C# developers inspect user code and generate new C# source files that can be added to a compilation. This is our chance to write code that will write more code when a project is built (think C# Code Inception).

The setup is going to be very simple: we’ll add a generator to our WCF project and get it to write our WebAPI controllers for us. Official blog post describes all steps necessary to enable this feature, so we’d skip this trivial bit.

We’ll look for WCF endpoints that developers have decorated with a custom attribute (we’re opt-in) and do the following:

  • Find all Operations marked with GenerateApiEndpoint attribute
  • Generate Proxy class for each ServiceContract we discovered
  • Generate API Controller for each ServiceContract that exposes at least one operation
  • Generate Data Transfer Objects for all exposed methods
  • Use generated DTOs to create WCF client and call required method, return data back

Proxy classes

For .net core to call legacy WCF, we have to either use svcutil to scaffold everything for us or we have to have a proxy class that inherits from ClientBase

namespace WcfService.BridgeControllers {
public class {proxyToGenerate.Name}Proxy: ClientBase<{proxyToGenerate}>, {proxyToGenerate} {
    foreach (var method in proxyToGenerate.GetMembers()) 
    {
        var parameters = // craft calling parameters; // need to make sure we build correct parameters here
        public {method.ReturnType} {method.Name}({parameters}) {
            return Channel.{method.Name}({parameters}); // calling respective WCF method
    }
}

DTO classes

We thought it’s easier to standardize calling convention so all methods in our API are always POST and all accept only one DTO on input (which in turn very much depends on callee sugnature):

public static string GenerateDtoCode(this MethodDeclarationSyntax method) 
{
    var methodName = method.Identifier.ValueText;
    var methodDtoCode = new StringBuilder($"public class {methodName}Dto {{").AppendLine(""); 
    foreach (var parameter in method.ParameterList.Parameters)
    {
        var isOut = parameter.IsOut();
        if (!isOut)
        {
            methodDtoCode.AppendLine($"public {parameter.Type} {parameter.Identifier} {{ get; set; }}");
        }
    }
    methodDtoCode.AppendLine("}");
    return methodDtoCode.ToString();
}

Controllers

And finally, controllers follow simple conventions to ensure we always know how to call them:

sourceCode.AppendLine()
   .AppendLine("namespace WcfService.BridgeControllers {").AppendLine()
   .AppendLine($"[RoutePrefix(\"api/{className}\")]public class {className}Controller: ApiController {{");
...
 var methodCode = new StringBuilder($"[HttpPost][Route(\"{methodName}\")]")
                  .AppendLine($"public Dictionary<string, object> {methodName}([FromBody] {methodName}Dto request) {{")
                  .AppendLine($"var proxy = new {clientProxy.Name}Proxy();")
                  .AppendLine($"var response = proxy.{methodName}({wcfCallParameterList});")
                  .AppendLine("return new Dictionary<string, object> {")
                  .AppendLine(" {\"response\", response },")
                  .AppendLine(outParameterResultList);

As a result

We should be able to wrap required calls into REST API and fully decouple our legacy data contracts from new data models. Working sample project is on GitHub.

Custom Routing in .NET WebAPI

We all need to do weird things sometimes. One assignment we’ve got was to implement an API that would totally obfuscate all parameters in a Base64 encoded string. This will clearly go against stock standard routing and action mapping that ASP.NET WebAPI comes with out of the box. But that got us thinking about ways we can achieve it nonetheless.

By default

Normally, the router will:

  1. get the request URI,
  2. match it against given templates (those "{controller}/{action}" things), and
  3. invoke an {action} on {controller} with whatever parameters happen to be passed along

Then we realise

We’re constrained to full .net framework on the project and fancy .net core middleware are not a thing yet. Luckily for us custom Message Handler is a thing so theoretically we could bootstrap ourselves through that and override IHttpControllerSelector (and potentially IHttpActionSelector).

Setup

Writing code directly in global.asax is an option, but as it calls through to WebApiConfig.Register() by default:

 GlobalConfiguration.Configure(WebApiConfig.Register);

it’s probably a better place for things to do with WebAPI.

App_Start/WebApiConfig.cs

    public static class WebApiConfig
    {
        public static void Register(HttpConfiguration config)
        {
            // Web API configuration and services
            // Web API routes
            config.MessageHandlers.Add(new TestHandler()); // if you define a handler here it will kick in for ALL requests coming into your WebAPI (this does not affect MVC pages though)
            config.MapHttpAttributeRoutes();
            config.Services.Replace(typeof(IHttpControllerSelector), new MyControllerSelector(config)); // you likely will want to override some more services to ensure your logic is supported, this is one example

            // your default routes
            config.Routes.MapHttpRoute(name: "DefaultApi", routeTemplate: "api/{controller}/{id}", defaults: new {id = RouteParameter.Optional});

            //a non-overlapping endpoint to distinguish between requests. you can limit your handler to only kick in to this pipeline
            config.Routes.MapHttpRoute(name: "Base64Api", routeTemplate: "apibase64/{query}", defaults: null, constraints: null
                //, handler: new TestHandler() { InnerHandler = new HttpControllerDispatcher(config) } // here's another option to define a handler
            );
        }
    }

and then define our handler:

TestHandler.cs

    public class TestHandler : DelegatingHandler
    {
        protected override async Task<HttpResponseMessage> SendAsync(HttpRequestMessage request, CancellationToken cancellationToken)
        {
            //suppose we've got a URL like so: http://localhost:60290/api/VmFsdWVzCg==
            var b64Encoded = request.RequestUri.AbsolutePath.Remove(0, "/apibase64/".Length);
            byte[] data = Convert.FromBase64String(b64Encoded);
            string decodedString = Encoding.UTF8.GetString(data); // this will decode to values
            request.Headers.Add("controllerToCall", decodedString); // let us say this is the controller we want to invoke
            HttpResponseMessage resp = await base.SendAsync(request, cancellationToken);
            return resp;
        }
    }

Depending on what exactly we want handler to do, we might also have to supply a custom ControllerSelector implementation:

WebApiConfig.cs

// add this line in your Register method
config.Services.Replace(typeof(IHttpControllerSelector), new MyControllerSelector(config));

MyControllerSelector.cs

    public class MyControllerSelector : DefaultHttpControllerSelector
    {
        public MyControllerSelector(HttpConfiguration configuration) : base(configuration)
        {
        }

        public override string GetControllerName(HttpRequestMessage request)
        {
            //this is pretty minimal implementation that examines a header set from TestHandler and returns correct value
            if (request.Headers.TryGetValues("controllerToCall", out var candidates))
                return candidates.First();
            else
            {
                return base.GetControllerName(request);
            }
        }
    }

Applying this in real life?

Pretty neat theory. We however couldn’t quite figure out a way to take it to our customers that wouldn’t raise a few questions on whether we’re doing something shady there.