Getting Blazor AuthorizeView to work with Azure Static Web App
Recently, we inherited an Azure Static Web App project with a Blazor WASM frontend. The previous developer had given up on configuring the built-in authentication that comes bundled with Static Web Apps and was about to ditch the whole platform and rewrite the API backend for ASP.NET and App Services. This would have meant we could use ASP.NET Membership and be in full control of the user lifecycle. At the same time, we would have implemented our own user management layer which would be redundant in our case. We would also have missed features like AzureAD Auth and a user invite system that we get for free with SWA.
Inventory inspection
Ultimately, we have two puzzle pieces here: Static Web Apps authentication and Blazor.
Azure Static Web Apps provide built-in authentication and authorization for web applications. This allows users to authenticate with their preferred identity provider such as Azure Active Directory, GitHub, Twitter, Facebook, and Google, to access resources on the app. When a user logs in, Azure Static Web Apps takes care of tokens and exposes an API that returns user information and authentication status in a simple JSON format:
All that we care about here is the fact that the userRoles property is provided for both the API and frontend via an /.auth/me endpoint.
Moving on to the consumer side, Blazor offers the AuthorizeViewcomponent to show content only to authorized users. When an unauthorized user tries to access a page, Blazor will render the contents of the NotAuthorized tag, which is likely going to point to a login page. Decision on whether a given user is authorized to see a page is delegated to the AuthenticationStateProvider service. Default implementation plugs into ASP.NET membership, which is exactly what we’re trying to avoid.
Making changes
Luckily, writing a custom Provider and injecting it instead of the stock one is a matter of configuring the DI container at startup:
var builder = WebAssemblyHostBuilder.CreateDefault(args);
builder.Services.AddAuthorizationCore();
builder.Services.AddScoped<AuthenticationStateProvider, CustomAuthStateProvider>();
The provider would then look something like this:
public class SwaPrincipalResponse
{
    public ClientPrincipal? ClientPrincipal { get; set; }
}

public class AuthStateProvider : AuthenticationStateProvider
{
    private readonly HttpClient _httpClient;
    private readonly AuthenticationState _anonymous;

    public AuthStateProvider(HttpClient httpClient)
    {
        _httpClient = httpClient;
        _anonymous = new AuthenticationState(new ClaimsPrincipal(new ClaimsIdentity()));
    }

    public override async Task<AuthenticationState> GetAuthenticationStateAsync()
    {
        var principalResponse = await _httpClient.GetStringAsync("/.auth/me");
        var kv = JsonSerializer.Deserialize<SwaPrincipalResponse>(principalResponse, new JsonSerializerOptions { PropertyNameCaseInsensitive = true });
        var principal = kv!.ClientPrincipal;

        if (principal == null || string.IsNullOrWhiteSpace(principal.IdentityProvider))
            return _anonymous;

        principal.UserRoles = principal.UserRoles?.Except(new[] { "anonymous" }, StringComparer.CurrentCultureIgnoreCase).ToList();

        if (!principal.UserRoles?.Any() ?? true)
        {
            return _anonymous;
        }

        var identity = new ClaimsIdentity(principal.IdentityProvider);
        identity.AddClaim(new Claim(ClaimTypes.NameIdentifier, principal.UserId));
        identity.AddClaim(new Claim(ClaimTypes.Name, principal.UserDetails));
        identity.AddClaims(principal!.UserRoles!.Select(r => new Claim(ClaimTypes.Role, r)));

        return new AuthenticationState(new ClaimsPrincipal(identity));
    }
}
And this unlocks pages with AuthorizeView for us.
In conclusion, if you’re working with a Blazor frontend and Azure Static Web Apps, take advantage of the built-in Azure SWA Authentication for Blazor. It can save you from having to rewrite your API backend and allows for easy integration with various identity providers.
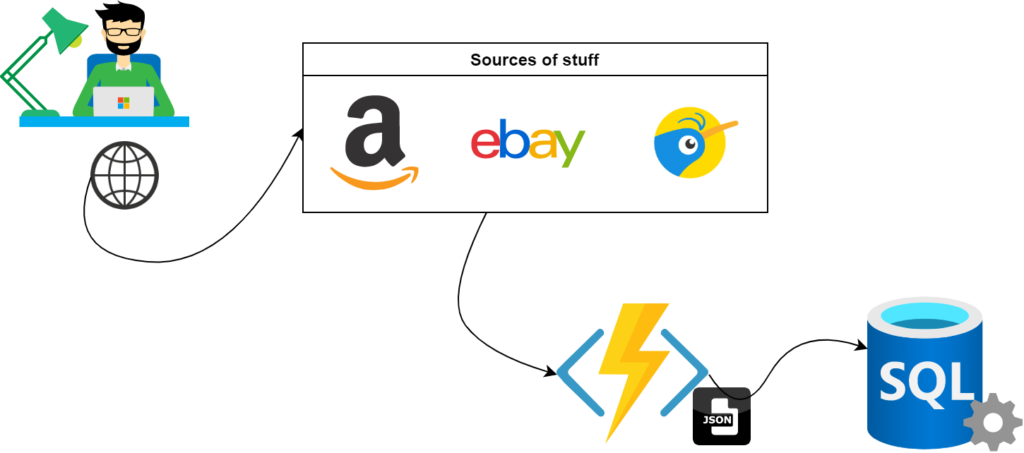
We have seen a few projects where the client insists on using SQL Server, but their workload generates a bunch of semi-structured JSON data for us to store. Now we need to bridge the gap and efficiently query it. One realistic case study where this situation may pop up would be building a browser extension that helps capture and organise wish lists from various platforms such as Amazon or eBay.
Let’s build a wish list
Our journey would likely start with a web browser. We may have a browser extension of some sort that would send information about an item we’re currently watching to an API. That API will have to make sense of all different attributes each website provides and try store it in a way that makes querying as easy and efficient as possible.
The catch is, we don’t know full list of attributes. And, probably, we should not care – perfect data model for frequently changing e-commerce websites would be hard to deduce and likely very painful to maintain. We could just lump it all together and chuck it into a schema-less data store like Cosmos DB or Mongo, but for the sake of argument we’ll imagine the client was adamant they needed a SQL Server because it’s a business decision they made a long time ago.
Not a huge drama
SQL Server has functions to work with JSON data – all we have to do is put it into a sufficiently big column. We can save heaps of time creating one simple data model and calling it a day.
Moving on to coding, let us focus on data retrieval and skip the API part for now – it’s a whole different can or worms and will distract us from our point. From here on we’ll be exploring ways to query the data
Test Bench
We’ve created a small EF Core project where DBContext looks something like this:
class WishlistEntry
{

	public int Id { get; set; }
	public int CustomerId { get; set; }
	[MaxLength(300)]
	public string ItemSource { get; set; }
	public string ItemData { get; set; }

	[DatabaseGenerated(DatabaseGeneratedOption.Computed)]
	public string ItemCategory { get; set; }
}

class ItemData
{
	public string Sku { get; set; }
	public string Name { get; set; }
	public List<Category> Category { get; set; }
}

class Category
{
	public string Id { get; set; }
	public string Name { get; set; }
}
with setup out of the way, let us define a sample entry and write a query to pick all entries that contain a category “Connected Home & Housewares”:
The naive approach to the desired outcome would be to simply try and deserialise the field and pray Entity Framework would work its magic:
var context = new SHDbContext();
//var sql = context.WishlistEntries.Select(wle => JsonConvert.DeserializeObject<ItemData>(wle.ItemData)
//                                                .Category.Any(c => c.Name == "Connected Home & Housewares")); //The LINQ expression 'c => c.Name == "Connected Home & Housewares"' could not be translated.
Unfortunately, this would not even compile as EF has no idea what to do with JsonConvert. We’ll end up having to materialise the query and handle filtering on the client side:
var data = context.WishlistEntries.Select(wle => JsonConvert.DeserializeObject<ItemData>(wle.ItemData))
                                .AsEnumerable()
                                .Where(d => d.Category.Any(c => c.Name == "Connected Home & Housewares"))
                                .ToList();
This will work as expected, and some developers will probably stop here, but this is in fact a time bomb. When our wish lists get big enough, the clients will put a serious strain on SQL Server and the network fetching the whole table in its entirety. Not nice.
Option two – write a Value Converter
Technically this is a variation of the previous option but leveraging EF Core Value Conversion capability for nicer looking query. To enable this, we’ll override OnModelCreating and add a few more lines to DB Context:
class SHDbContext : DbContext
{
	public DbSet<WishlistEntry> WishlistEntries { get; set; }

	protected override void OnConfiguring(DbContextOptionsBuilder optionsBuilder)
	{
		base.OnConfiguring(optionsBuilder);
		optionsBuilder.UseSqlServer(Environment.GetEnvironmentVariable("DB_CONNSTR")).LogTo(Console.WriteLine);
	}

	protected override void OnModelCreating(ModelBuilder modelBuilder)
	{
		base.OnModelCreating(modelBuilder);
		modelBuilder.Entity<WishlistEntry>()
		            .Property(e => e.ItemData)
		            .HasConversion((itemData) => JsonConvert.SerializeObject(itemData), str => JsonConvert.DeserializeObject<ItemData>(str));
	}
}
// ...
// finally, use the new converter like so:
var data = context.WishlistEntries.AsEnumerable().Where(d => d.ItemData.Category.Any(c => c.Name == "Connected Home & Housewares")).ToList();
 // also not ideal as we still have to filter on client side, effectively scanning all tabl
This simply shifts the JSON conversion code up the food chain, so developers won’t see it often. Unfortunately, this “out of sight – out of mind” approach won’t improve our query plan.
Option three – JSON_VALUE function
It gets pretty clear at this stage that we need to be able to filter by json fields on SQL Server side. Luckily, Microsoft provides a few json-handling capabilities. JSON_VALUE function that allows extracting one value out of the blob via given path selector. This is going to eliminate the need to land our query and should hugely improve performance. Entity Framework does not support this function by default, but it should be very easy to add:
// in the context class
 // adding static function to the DB Context
[DbFunction("JSON_VALUE", IsBuiltIn = true, IsNullable = false)]
public static string JsonValue(string expression, string path) => throw new NotImplementedException();
our query then becomes something like this:
var data = context.WishlistEntries.Where(d => SHDbContext.JsonValue(d.ItemData, "$.category[0].name").Contains("Connected Home & Housewares")).ToList();
And this is the correct answer. However, we can further improve performance by adding an index. Indexing the whole json blob will not help, but we can create a computed column with the value we care about and index that instead:
-- add computed column
ALTER TABLE WishlistEntries ADD ItemCategory AS JSON_VALUE(ItemData, '$.category[0].name')
-- index the value
CREATE INDEX IX_ItemCategory ON WishlistEntries(ItemCategory) INCLUDE(CustomerId, ItemSource, ItemData);
-- finally, test if the query picks up index by running the following and checking the Actual Execution Plan:
/* test queries */
SELECT * FROM [WishlistEntries] WHERE JSON_VALUE(ItemData, '$.category[0].name') = 'Connected Home & Housewares'
This enhancement also happens to simplify our code a bit as we can now rely on computed column value when writing queries in EF:
// add computed column to WishlistEntry
class WishlistEntry
{

	public int Id { get; set; }
	public int CustomerId { get; set; }
	[MaxLength(300)]
	public string ItemSource { get; set; }
	public string ItemData { get; set; }

	[DatabaseGenerated(DatabaseGeneratedOption.Computed)]
	public string ItemCategory { get; set; }
}

// finally the query will be like:
var data = context.WishlistEntries.Where(wle => wle.ItemCategory == "Connected Home & Housewares").ToList();
Conclusion and area for improvement
Keen eyed readers may have noticed that we hardcoded query to first array item. This was a deliberate simplification we opted for to illustrate the point. It should be possible to query an array using OPENJSON … CROSS APPLY like so, but we haven’t explored this avenue far enough to see if we’d ultimately succeed:
var data = context.WishlistEntries.FromSqlRaw(@"SELECT TOP 1 wishlist.*
      FROM [WishlistEntries] as wishlist
CROSS APPLY OPENJSON(ItemData, '$.category') WITH (CatName VARCHAR(200) '$.name') as categories
WHERE categories.CatName = {0}", "Connected Home & Housewares").ToList();
Even though our application is far from complete we are in a good place. Equipped with these techniques, we can handle almost anything users throw at us and are still able to query data fast enough. The code for this exercise is available on GitHub.
We have hit this snag while building our zero touch Terraform pipeline. And while the Internet has examples of navigating the issue with PowerShell, we could not find one that would work with Bash. Technically, PowerShell 7.x comes preinstalled on our choice of Hosted Agents too, so we could’ve used existing solution. But we felt it was a good opportunity to look at Logging Commands and ultimately could not pass up an opportunity to build something new.
Problem statement
Suppose we’ve got an Azure Resource Group Deployment task (which now supports Bicep templates natively by the way). It’s got a way of feeding deployment outputs back to the pipeline: deploymentOutputs which takes a string and returns it as a variable:
trigger: none

name: ARM Deploy

pool:
  vmImage: 'ubuntu-latest'

stages:
- stage: arm_deployment
  jobs:
  - job: deploy
    steps:
    - task: AzureResourceManagerTemplateDeployment@3
      inputs:
        deploymentScope: 'Subscription'
        azureResourceManagerConnection: $(predefinedAzureServiceConnection)
        subscriptionId: $(targetSubscriptionId)
        location: $(location)
        csmFile: '$(Build.SourcesDirectory)/arm-template.json'
        deploymentOutputs: 'outputVariablesGoHere' # this is where ARM outputs will go

    - script: |
        echo $ARM_DEPLOYMENT_OUTPUT
      env:
        ARM_DEPLOYMENT_OUTPUT: $(outputVariablesGoHere)
Let us assume our ARM template has outputs along the following lines:
then, the pipeline would produce the following output:
Starting: AzureResourceManagerTemplateDeployment
==============================================================================
...
Starting Deployment.
Updated output variable 'outputVariablesGoHere.storageAccountName.type', which contains the outputs section of the current deployment object in string format.
Updated output variable 'outputVariablesGoHere.storageAccountName.value', which contains the outputs section of the current deployment object in string format.
...
Updated output variable 'outputVariablesGoHere', which contains the outputs section of the current deployment object in string format.
Finishing: AzureResourceManagerTemplateDeployment

Starting: CmdLine
==============================================================================
...
Script contents:
echo $ARM_DEPLOYMENT_OUTPUT
========================== Starting Command Output ===========================
{"storageAccountName":{"type":"String","value":"xxxxxxxxx"},"resourceGroupName":{"type":"String","value":"xxxxxxxx"}}
Finishing: CmdLine
ADO does not support parsing JSON
By default, ADO would treat the whole object as one string and would not get us very far with it. So, we need to parse JSON and define more variables. We could opt for PowerShell task to do that, but since we’re using Ubuntu on our agents, we felt Bash would be a bit more appropriate. Let’s update the pipeline a bit and replace our simplistic echo script with a bit more logic:
Here we pass our input to jq, the JSON parser that comes preinstalled with ubuntu-latest. Then we craft a string that ADO Agent picks up and interprets as command (in this case, setting pipeline variable). These special strings are called Logging Commands.
One crucial thing to remember here is to call jq with --raw-output/-r command line parameter – this would ensure resulting strings are unquoted. Having \"value\" vs value can easily break the build and is awfully hard to troubleshoot.
Conclusion
This little script is just a sample of what’s possible. PowerShell examples online usually opt for a universal approach and enumerate all keys on the object. We’re certain Bash can offer the same flexibility but since our use case was limited by just a couple of variables, we’d keep it straight to the point and leave generalisation to readers.
This article is part of the C# Advent Series. Christmas has a special place in our hearts and this event is also a wonderful way to help build up the C# community. Do check out awesome content from other authors!
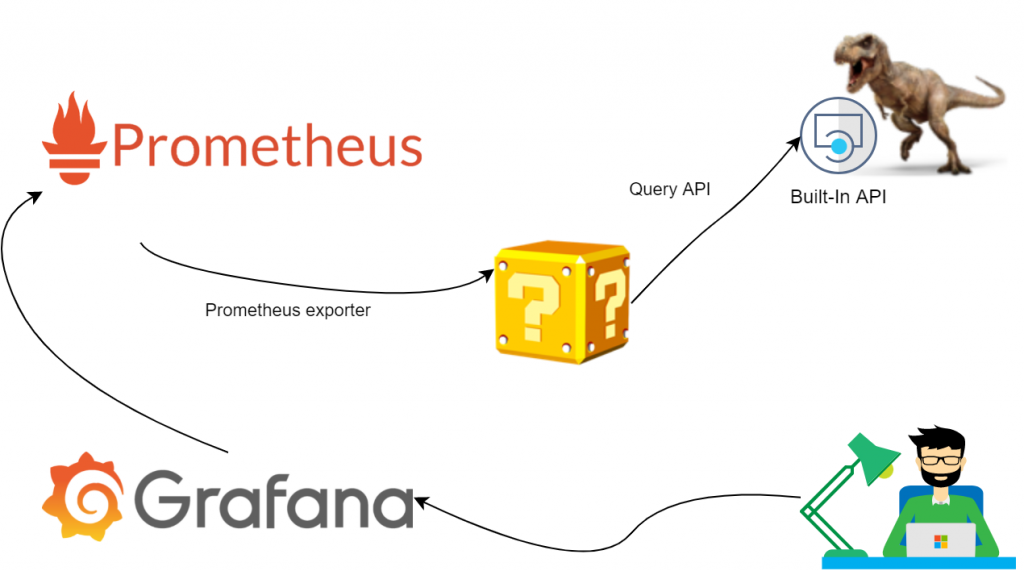
There’s a couple of things about Christmas in Southern Hemisphere that tends to hit us pretty hard each year: first, the fact that it is summer and it’s scorching hot outside. And second – is a customary closedown of almost all businesses (which probably started as response to the first point). Some businesses, however, keep boxing on.
One of our clients is into cryptocurrency mining and they could not care less about staff wanting time off to spend with family. Their only workforce are GPUs, and these devices can work 24/7. However, with temperatures creeping up, efficiency takes a hit. Also, other sad things can happen:
Solution design
Our first suggestion was to use our trusty ELK+G and poll extra data from NVIDIA SMI tool, but we soon figured out that this problem has already been solved for us. Mining software nowadays got extremely sophisticated (and obfuscated) – it now comes with own webserver and API. So, we simplified a bit:
All we have to do here would be to stand up an exporter and set up a few dashboards. Easy.
Hosted Services
We essentially need to run two services: poll underlying API and expose metrics in Prometheus-friendly format. We felt .NET Core Generic host infrastructure would fit very well here. It allows us to bootstrap an app, add Hosted Services and leave plumbing to Docker. The program ended up looking like so:
class Program
    {
        private static async Task Main(string[] args)
        {
            using IHost host = CreatHostBuilder(args).Build();

            await host.RunAsync();
        }
        static IHostBuilder CreateHostBuilder(string[] args) =>
            Host.CreateDefaultBuilder(args)
                .ConfigureAppConfiguration((configuration) =>
                {
                    configuration.AddEnvironmentVariables("TREX")
; // can add more sources such as command line
                })
                .ConfigureServices(c =>
                {
                    c.AddSingleton<MetricCollection>(); // This is where we will keep all metrics state. hence singleton
                    c.AddHostedService<PrometheusExporter>(); // exposes MetricCollection
                    c.AddHostedService<TRexPoller>(); // periodically GETs status and updates MetricCollection
                });
    }
Defining services
The two parts of our applicatgion are TRexPoller and PrometheusExporter. Writing both is trivial and we won’t spend much time on the code there. Feel free to check it out on GitHub. The point to make here is it has never been easier to focus on business logic and leave heavy lifting to respective NuGet packages.
Crafting the models
The most important part of our application is of course telemetry. We grabbed a sample json response from the API and used an online tool to convert that into C# classes:
// generated code looks like this. A set of POCOs with each property decorated with JsonProperty that maps to api response
public partial class Gpu
{
    [JsonProperty("device_id")]
    public int DeviceId { get; set; }
    [JsonProperty("hashrate")]
    public int Hashrate { get; set; }
    [JsonProperty("hashrate_day")]
    public int HashrateDay { get; set; }
    [JsonProperty("hashrate_hour")]
    public int HashrateHour { get; set; }
...
}
Now we need to define metrics that Prometheus.Net can later discover and serve up:
// example taken from https://github.com/prometheus-net/prometheus-net#quick-start
private static readonly Counter ProcessedJobCount = Metrics
    .CreateCounter("myapp_jobs_processed_total", "Number of processed jobs.");
...
ProcessJob();
ProcessedJobCount.Inc();
Turning on lazy mode
This is where we’ve got so inspired by our “low code” solution that we didn’t want to get down to hand-crafting a bunch of class fields to describe every single value the API serves. Luckily, C#9 has a new feature just for us: Source Code Generators to the rescue! We’ve covered the basic setup before, so we’ll skip this part here and move on to the Christmas magic part.
Let Code Generators do the work for us
Before we hand everything over to robots, we need to set some basic rules to control the process. Custom attributes looked like a sensible way to keep all configuration local with the model POCOs:
[AddInstrumentation("gpus")] // the first attribute prompts the generator to loop through the properties and search for metrics
public partial class Gpu
{
    [JsonProperty("device_id")]
    public int DeviceId { get; set; }
    [JsonProperty("hashrate")]
    /*
     * the second attribute controls which type the metric will have as well as what labels we want to store with it.
     * In this example, it's a Gauge with gpu_id, vendor and name being labels for grouping in Prometheus
     */
    [Metric("Gauge", "gpu_id", "vendor", "name")]
    public int Hashrate { get; set; }
    [JsonProperty("hashrate_day")]
    [Metric("Gauge", "gpu_id", "vendor", "name")]
    public int HashrateDay { get; set; }
    [JsonProperty("hashrate_hour")]
    [Metric("Gauge", "gpu_id", "vendor", "name")]
    public int HashrateHour { get; set; }
Finally, the generator itself hooks into ClassDeclarationSyntax and looks for well-known attributes:
public void OnVisitSyntaxNode(SyntaxNode syntaxNode)
    {
        if (syntaxNode is ClassDeclarationSyntax cds && cds.AttributeLists
            .SelectMany(al => al.Attributes)
            .Any(a => (a.Name as IdentifierNameSyntax)?.Identifier.ValueText == "AddInstrumentation"))
        {
            ClassesToProcess.Add(cds);
        }
    }
Once we’ve got our list, we loop through each property and generate a dictionary of Collector objects.
var text = new StringBuilder(@"public static Dictionary<string, Collector> GetMetrics(string prefix)
    {
        var result = new Dictionary<string, Collector>
        {").AppendLine();
foreach (PropertyDeclarationSyntax p in properties)
{
    var jsonPropertyAttr = p.GetAttr("JsonProperty");
    var metricAttr = p.GetAttr("Metric");
    if (metricAttr == null) continue;
    var propName = jsonPropertyAttr.GetFirstParameterValue();
    var metricName = metricAttr.GetFirstParameterValue(); // determine metric type
    if (metricAttr.ArgumentList.Arguments.Count > 1)
    {
        var labels = metricAttr.GetTailParameterValues(); // if we have extra labels to process - here's our chance
        text.AppendLine(
            $"{{$\"{{prefix}}{attrPrefix}_{propName}\", Metrics.Create{metricName}($\"{{prefix}}{attrPrefix}_{propName}\", \"{propName}\", {commonLabels}, {labels}) }},");
    }
    else
    {
        text.AppendLine(
            $"{{$\"{{prefix}}{attrPrefix}_{propName}\", Metrics.Create{metricName}($\"{{prefix}}{attrPrefix}_{propName}\", \"{propName}\", {commonLabels}) }},");
    }
}
text.AppendLine(@"};
                return result;
            }");
In parallel to defining storage for metrics, we also need to generate code that will update values as soon as we’ve heard back from the API:
private StringBuilder UpdateMetrics(List<MemberDeclarationSyntax> properties, SyntaxToken classToProcess, string attrPrefix)
{
    var text = new StringBuilder($"public static void UpdateMetrics(string prefix, Dictionary<string, Collector> metrics, {classToProcess} data, string host, string slot, string algo, List<string> extraLabels = null) {{");
    text.AppendLine();
    text.AppendLine(@"if(extraLabels == null) {
                            extraLabels = new List<string> {host, slot, algo};
                        }
                        else {
                            extraLabels.Insert(0, algo);
                            extraLabels.Insert(0, slot);
                            extraLabels.Insert(0, host);
                        }");
    foreach (PropertyDeclarationSyntax p in properties)
    {
        var jsonPropertyAttr = p.GetAttr("JsonProperty");
        var metricAttr = p.GetAttr("Metric");
        if (metricAttr == null) continue;
        var propName = jsonPropertyAttr.GetFirstParameterValue();
        var metricName = metricAttr.GetFirstParameterValue();
        var newValue = $"data.{p.Identifier.ValueText}";
        text.Append(
            $"(metrics[$\"{{prefix}}{attrPrefix}_{propName}\"] as {metricName}).WithLabels(extraLabels.ToArray())");
        switch (metricName)
        {
            case "Counter": text.AppendLine($".IncTo({newValue});"); break;
            case "Gauge": text.AppendLine($".Set({newValue});"); break;
        }
    }
    text.AppendLine("}").AppendLine();
    return text;
}
Bringing it all together with MetricCollection
Finally, we can use the generated code to bootstrap metrics on per-model basis and ensure we correctly handle updates:
internal class MetricCollection
{
    private readonly Dictionary<string, Collector> _metrics;
    private readonly string _prefix;
    private readonly string _host;
    public MetricCollection(IConfiguration configuration)
    {
        _prefix = configuration.GetValue<string>("exporterPrefix", "trex");
        _metrics = new Dictionary<string, Collector>();
        // this is where declaring particl classes and generating extra methods makes for seamless development experience
        foreach (var (key, value) in TRexResponse.GetMetrics(_prefix)) _metrics.Add(key, value);
        foreach (var (key, value) in DualStat.GetMetrics(_prefix)) _metrics.Add(key, value);
        foreach (var (key, value) in Gpu.GetMetrics(_prefix)) _metrics.Add(key, value);
        foreach (var (key, value) in Shares.GetMetrics(_prefix)) _metrics.Add(key, value);
    }
    public void Update(TRexResponse data)
    {
        TRexResponse.UpdateMetrics(_prefix, _metrics, data, _host, "main", data.Algorithm);
        DualStat.UpdateMetrics(_prefix, _metrics, data.DualStat, _host, "dual", data.DualStat.Algorithm);

        foreach (var dataGpu in data.Gpus)
        {
            Gpu.UpdateMetrics(_prefix, _metrics, dataGpu, _host, "main", data.Algorithm, new List<string>
            {
                dataGpu.DeviceId.ToString(),
                dataGpu.Vendor,
                dataGpu.Name
            });
            Shares.UpdateMetrics(_prefix, _metrics, dataGpu.Shares, _host, "main", data.Algorithm, new List<string>
            {
                dataGpu.GpuId.ToString(),
                dataGpu.Vendor,
                dataGpu.Name
            });
        }
    }
}
Peeking into generated code
Just to make sure we’re on the right track, we looked at generated code. It ain’t pretty but it’s honest work:
public partial class Shares {
public static Dictionary<string, Collector> GetMetrics(string prefix)
                {
                    var result = new Dictionary<string, Collector>
                    {
{$"{prefix}_shares_accepted_count", Metrics.CreateCounter($"{prefix}_shares_accepted_count", "accepted_count", "host", "slot", "algo", "gpu_id", "vendor", "name") },
{$"{prefix}_shares_invalid_count", Metrics.CreateCounter($"{prefix}_shares_invalid_count", "invalid_count", "host", "slot", "algo", "gpu_id", "vendor", "name") },
{$"{prefix}_shares_last_share_diff", Metrics.CreateGauge($"{prefix}_shares_last_share_diff", "last_share_diff", "host", "slot", "algo", "gpu_id", "vendor", "name") },
...
};
                            return result;
                        }
public static void UpdateMetrics(string prefix, Dictionary<string, Collector> metrics, Shares data, string host, string slot, string algo, List<string> extraLabels = null) {
if(extraLabels == null) {
                                    extraLabels = new List<string> {host, slot, algo};
                                }
                                else {
                                    extraLabels.Insert(0, algo);
                                    extraLabels.Insert(0, slot);
                                    extraLabels.Insert(0, host);
                                }
(metrics[$"{prefix}_shares_accepted_count"] as Counter).WithLabels(extraLabels.ToArray()).IncTo(data.AcceptedCount);
(metrics[$"{prefix}_shares_invalid_count"] as Counter).WithLabels(extraLabels.ToArray()).IncTo(data.InvalidCount);
(metrics[$"{prefix}_shares_last_share_diff"] as Gauge).WithLabels(extraLabels.ToArray()).Set(data.LastShareDiff);
...
}
}
Conclusion
This example barely scratches the surface of what’s possible with this feature. Source code generators are extremely helpful when we deal with tedious and repetitive development tasks. It also helps reduce maintenance overheads by enabling us to switch to declarative approach. I’m sure we will see more projects coming up where this feature will become central to the solution.
If not already, do check out the source code in GitHub. And as for us, we would like to sign off with warmest greetings of this festive season and best wishes for happiness in the New Year.
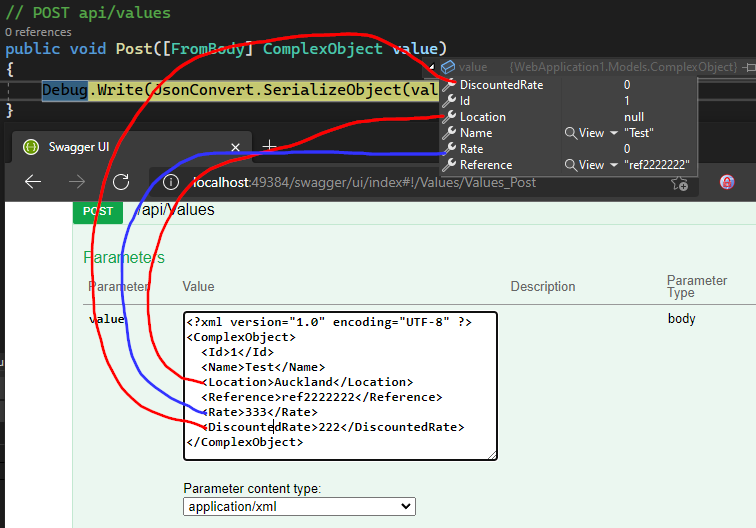
A client reached out to us with a weird problem. Their ASP.NET WebAPI project (somewhat legacy tech) needed to communicate with an application running on a mainframe (dinosaur-grade legacy tech). But they were having XML serialisation issues…
They had a test XML payload, but only half of that kept coming across the wire:
broken serialisation – missing fields
first thing we suspected was missing DataContract/DataMember attributes, but everything seemed to be okay:
[DataContract(Name = "ComplexObject", Namespace = "")]
public class ComplexObject
{
    [DataMember]
    public int Id { get; set; }
    [DataMember]
    public string Name { get; set; }
    [DataMember]
    public string Location { get; set; }
    [DataMember]
    public string Reference { get; set; }
    [DataMember]
    public double Rate { get; set; }
    [DataMember]
    public double DiscountedRate { get; set; }
}
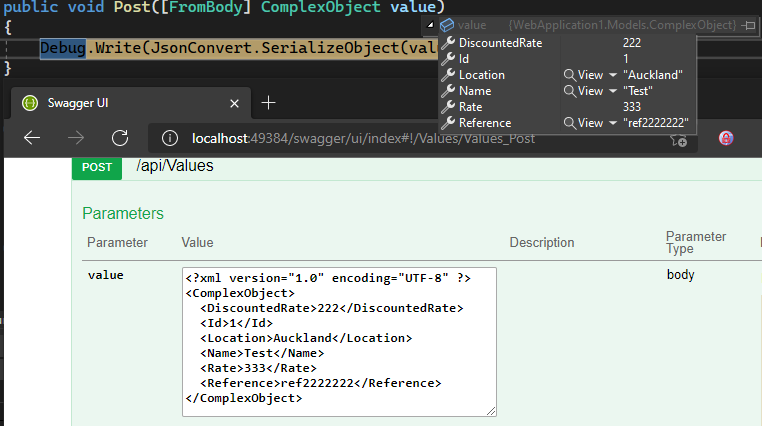
After scratching our heads for a little while and trying different solution from across the entirety of StackOverflow, we managed to dig up a piece of documentation that explained this behaviour:
Data members of base classes (assuming serialiser will apply these rules upwards recursively);
Data members in alphabetical order (bingo!);
Data members specifically numbered in decorating attribute;
With the above in mind, we got the following payload to serialise successfully:
Key difference for us was the fact that XmlSerializer does not require any decorations and works out of the box. While DataContractSerializer needs us to make code changes. In our project everything was already set up with DataContract, so we did not have to change anything.
By default, WebAPI projects come configured to leverage DataContractSerializer. It however pays to know that in case of any issues we can switch to use XMLSerializer:
public static class WebApiConfig
{
    public static void Register(HttpConfiguration config)
    {
        config.Formatters.XmlFormatter.UseXmlSerializer = true; // global setting for all types
        config.Formatters.XmlFormatter.SetSerializer<ComplexObject>(new XmlSerializer(typeof(ComplexObject))); // overriding just for one type
Setting order
Yet another option to deal with ASP.NET XML serialisation issues would be to define property order explicitly:
[DataContract(Name = "ComplexObject", Namespace = "")]
public class ComplexObject
{
    [DataMember(Order = 1)]
    public int Id { get; set; }
    [DataMember(Order = 2)]
    public string Name { get; set; }
    [DataMember(Order = 3)]
    public string Location { get; set; }
    [DataMember(Order = 4)]
    public string Reference { get; set; }
    [DataMember(Order = 5)]
    public double Rate { get; set; }
    [DataMember(Order = 6)]
    public double DiscountedRate { get; set; }
}
Conclusion
XML serialisation has been around since the beginning of .NET. And even though it may seem that JSON has taken over, XML isn’t going anywhere any time soon. It is good to know we have many ways to deal with it should we ever need to.
We’ve already looked at way to implement SQL functions via method translation. That went reasonably well, but next time we had to do something similar we discovered that our code is broken with newer versions of EF Core. We fixed it again.
Not anymore
Looking through changelogs, we noticed that EF Core 2.0 came with support for mapping scalar functions. It is remarkably simple to set up:
public class MyDbContext : DbContext
    {

        [DbFunction("DECRYPTBYPASSPHRASE", IsBuiltIn = true, IsNullable = false)]
        public static byte[] DecryptByPassphrase(string pass, byte[] ciphertext) => throw new NotImplementedException();

        [DbFunction("DECRYPTBYKEY", IsBuiltIn = true, IsNullable = false)]
        public static byte[] DecryptByKey(byte[] ciphertext) => throw new NotImplementedException();
...
and even easier to use:
var filteredSet = Set
                .Select(m => new Model
                {
                    Id = m.Id,
                    Decrypted = MyDbContext.DecryptByPassphrase("TestPassword", m.Encrypted).ToString(),
                    Decrypted2 = MyDbContext.DecryptByKey(m.Encrypted2).ToString(), // since the key's opened for session scope - just relying on it should do the trick
                }).ToList();
Initially the attribute was offering limited configuration options, but starting EF Core 5.0, this is not an issue.
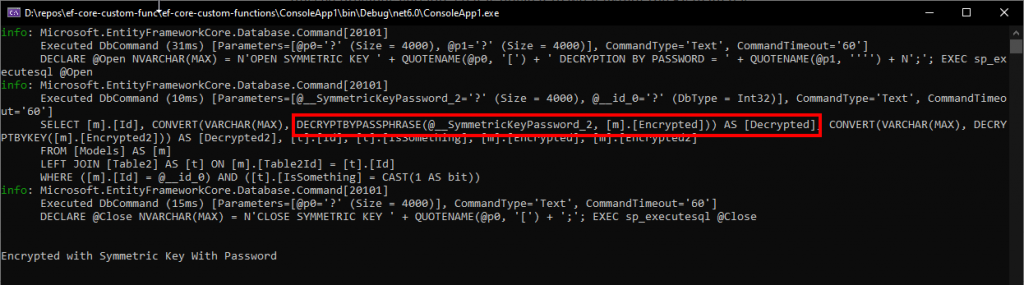
One gotcha with DECRYPT* functions is they return varbinary. Trying to use our own EF.Functions.ConvertToVarChar is not going to work since we disabled custom plugins. We want to get rid of this code after all. But Apparently .ToString() works as intended:
SELECT [m].[Id], CONVERT(varchar(100), DECRYPTBYPASSPHRASE(N'TestPassword', [m].[Encrypted])) AS [Decrypted], CONVERT(varchar(100), DECRYPTBYKEY([m].[Encrypted2])) AS [Decrypted2], [t].[Id], [t].[IsSomething], [m].[Encrypted], [m].[Encrypted2]...
Full example source is in GitHub, along with other takes we decided to leave in place for history.
Conclusion
Defining custom EF functions was one of the biggest articles we wrote here. And finding out how to fit it together probably was the most challenging and time-consuming project we undertook in recorded history. One can say we totally wasted our time, but I’d like to draw a different conclusion. We had fun, learned something new and were able to appreciate the complexity behind Entity Framework – it is not just an engineering marvel – it is also a magical beast!
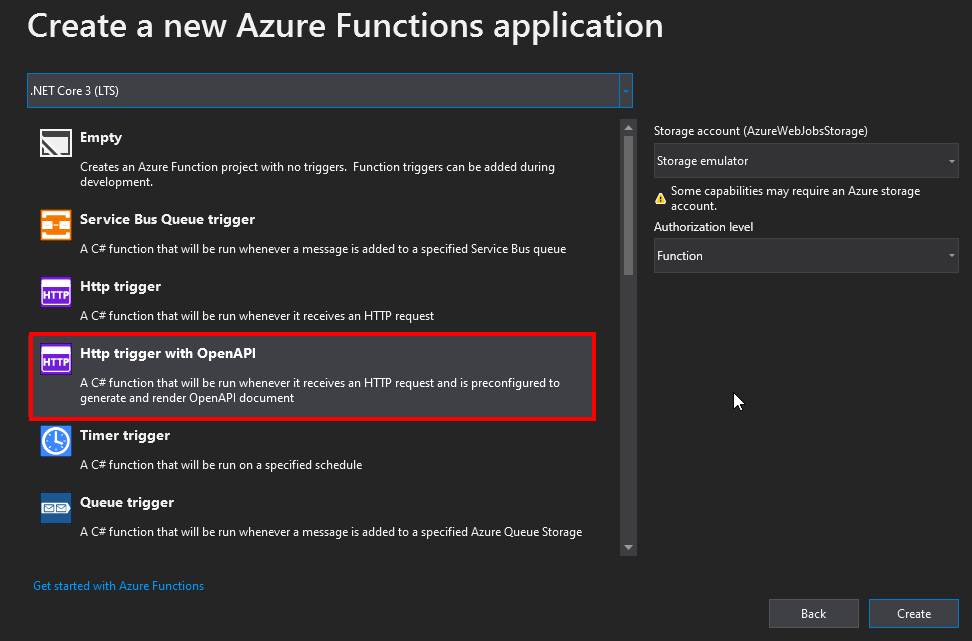
Creating Swagger-enabled Azure Functions is not that hard to do. Visual Studio literally comes with a template for that:
Inspecting the newly created project we see that it comes down to one NuGet package. It magically hooks into IWebJobsStartup and registers additional routes for Swagger UI and OpenAPI document. When run, it reflects upon suitable entry points in the assembly and builds required responses on the fly. Elegant indeed.
Installing Entity Framework
Now, suppose, we need to talk to Azure SQL. So, we’d like to add EF Core to the mix. As much as we love to go for latest and greatest, unfortunately it’s a bit messy at the moment. Instead let’s get a bit more conservative and stick to EFCore 3.1.
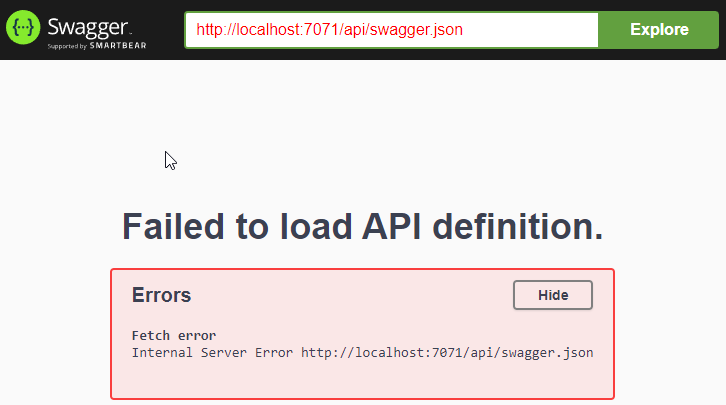
We did not expect that, did we?
The error message is pretty clear: the assembly somehow did not get copied to the output location. And indeed, the file was missing:
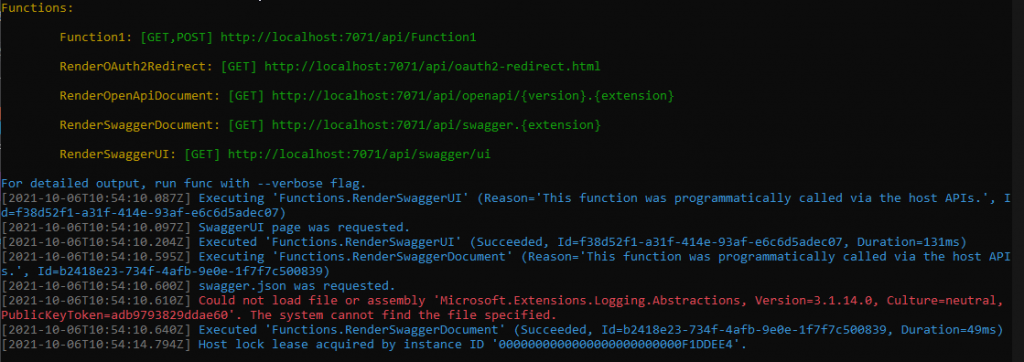
Apparently when VS builds the function, it makes a second copy of the libraries it thinks are required. And in our case, it decided it’s not picking up the dependency. Adding <_FunctionsSkipCleanOutput>true</_FunctionsSkipCleanOutput> to the project file will fix that:
Are there yet?
Probably, but there’s a catch: our deployment package just got bigger. Alternatively, we could downgrade EF Core to 3.1.13 which happens to use the same version of Microsoft.Extensions.Logging.Abstractions. This way we’d avoid having to hack project files at expense or limiting ourselves to an older version of EF Core. Ultimately, we hope OpenAPI extension picks up the slack and goes GA soon. For now, looks like we’ll have to stick to it.
Quite a few recent engagements saw us developing APIs for clients. Setting these projects up is a lot of fun at first. After a few deployments, however, we felt there should be a way to optimise our workflow and bootstrap environments a bit quicker.
We wanted to craft a skeleton project that would provide structure and repeatability. After quick validation we decided that Weather Forecast project is probably good enough as API starting point. With that part out of the way we also needed to have a client application that we could use while developing and handing the API over to the client.
Our constraints
Given the purpose of our template we also had a few more limitations:
Clean desk policy – the only required tools are Docker and VS Code (and lots or RAM! but that would be another day’s problem). Everything else should be transient and should leave no residue on host system.
Offline friendly – demos and handovers can happen on-site, where we won’t necessarily have access to corporate WiFi or wired network
Open Source – not a constraint per se, but very nice to have
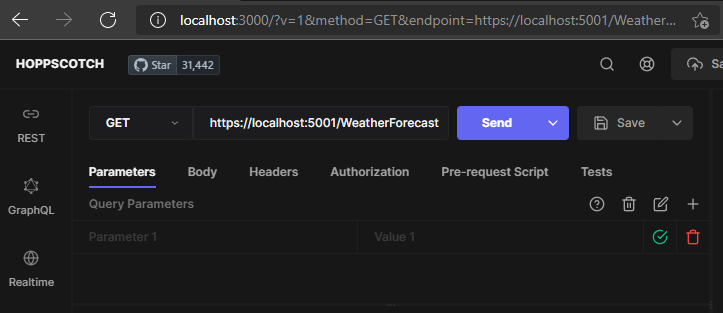
With that in mind, our first candidate Postman was out, and after scratching heads for a little while we stumbled upon Hoppscotch. A “light-weight, web-based API development suite” as it says on the tin, it seems to deliver most of the features we’d use.
Setting up with Docker
There are heaps of examples on how to use Hoppscotch, but we haven’t seen a lot regarding self-hosting. Probably, because it’s fairly straightforward to get started:
docker run -it --rm -p3000 hoppscotch/hoppscotch
After that we should be able to just visit localhost:3000 and see the sleek UI:
hoppscotch UI
Building containers
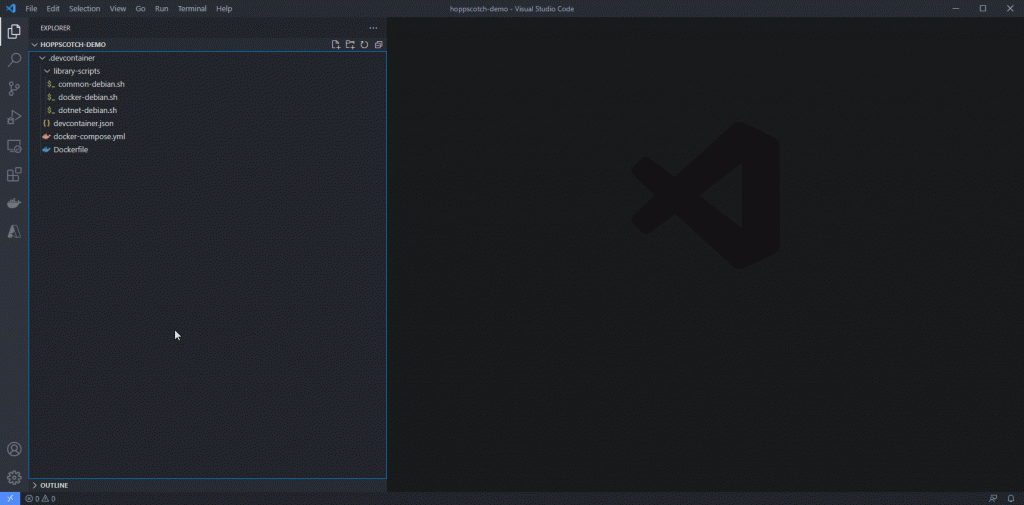
Before we get too far ahead, let’s codify the bits we already know. We start VS Code and browse through a catalog of available dev containers… This time round we needed to set up and orchestrate at least two: we’ve got our app as well as Hoppscotch sitting in the same virtual network. That led us to opt for docker-from-docker-compose container template. On top of that, we enhanced it with dotnet SDK installation like our AWS Lambda container.
Finally, the docker-compose.yml needs Hoppscotch service definition at the bottom:
Should be smooth sailing from here: reopen in container, create a web API project and test away! Right?
A few quirks to keep in mind
As soon as we fired up the UI and tried making simple requests, we realised that Hoppscotch is not immune to CORS restrictions. Developers offer a couple of ways to fix this:
enable CORS in the API itself – that’s what we ended up doing for now
set up browser extension, but we couldn’t go that route as it would moot our clean desk policy. It also it not yet available in Microsoft Edge extension store
finally, we can use proxyscotch but that looked like a rabbit hole we may want to explore later.
Authentication mechanism support is hopefully coming, so we’ll watch that space.
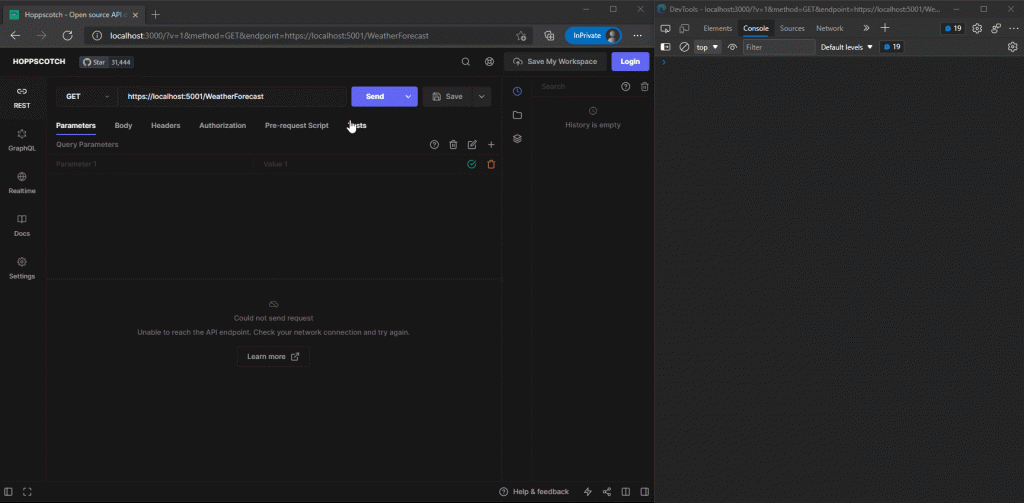
There’s one more interesting behaviour that caught us off guard: the client would silently fail SSL certificate check until we manually trusted the host in another tab. There are other more technical solutions but the easiest for now is to avoid SSL in development.
Hoppscotch ssl trust error
Conclusion
Once again, we used our weapon of choice and produced an artifact that enables us to develop and test containerised APIs faster!
A year and a half ago we posted an article on how we were able to plug into EF Core pipeline and inject our own IMethodCallTranslator. That let us leverage SQL-native encryption functionality with EF Core 3.1 and was ultimately a win. A lot has changed in the ecosystem, we’ve got .NET 5 and and .NET 6 coming up soon. So, we could not help but wonder…
Will it work with EF Core 6?
Apparently, EF6 is mostly an evolutionary step over EF5. That said, we totally missed previous version. So it is unclear to what extent the EF team has reworked their internal APIs. Most of the extensibility points we used were internal and clearly marked as “not for public consumption”. With that in mind, our concerns seemed valid.
Turns out, the code needs change…
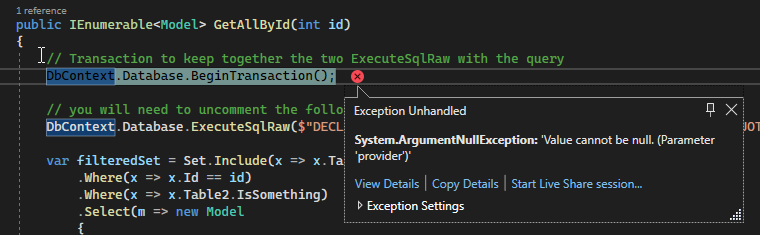
The first issue we needed to rectify was implementing ShouldUseSameServiceProvider: from what I can tell, it’s needed to cache services more efficiently, but in our case setting it to default value seems to make sense.
But that’s where things really went sideways:
Apparently adding our custom IDbContextOptionsExtension resets the cache and by the time EF arrives at Model initialisation, instance of DI container gets wiped, leaving us with a bunch of null references (including the one above).
One line fix
I am still unsure why EF so upset when we add new extension. Stepping through the code would likely provide me with the answer but I feel it’s not worth the effort. Playing around with service scopes I however noticed that many built-in services get registered using different extension method with Scoped lifecycle. This prompted me to try change my registration method signature and voila:
And as usual, fully functioning code sits on GitHub.
Let us put the keywords up front: Swashbuckle Basic authentication setup that works for Swashbuckle.WebApi installed on WebAPI projects (.NET 4.x). It’s also much less common to need Basic auth nowadays where proper mechanisms are easily available in all shapes and sizes. However, it may just become useful for internal tools or existing integrations.
Why?
Most tutorials online would cover the next gen library aimed specifically at ASP.Net Core, which is great (we’re all in for tech advancement), but sometimes legacy needs a prop up. If you are looking to add Basic Auth to ASP.NET Core project – look up AddSecurityDefinition and go from there. If legacy is indeed the in trouble – read on.
Setting it up
The prescribed solution is two steps: 1. add authentication scheme on SwaggerDocsConfig class 2. attach authentication to endpoints as required with IDocumentFilter or IOperationFilter
Assuming the installer left us with App_Start/SwaggerConfig.cs file, we’d arrive at:
public class SwaggerConfig
{
	public static void Register()
	{
		var thisAssembly = typeof(SwaggerConfig).Assembly;

		GlobalConfiguration.Configuration
			.EnableSwagger(c =>
				{
					...
					c.BasicAuth("basic").Description("Basic HTTP Authentication");
					c.OperationFilter<BasicAuthOpFilter>();
					...
				});
	}
}
and the most basic IOperationFilter would look like so:
public class BasicAuthOpFilter : IOperationFilter
{
	public void Apply(Operation operation, SchemaRegistry schemaRegistry, ApiDescription apiDescription)
	{
		operation.security = operation.security ?? new List<IDictionary<string, IEnumerable<string>>>();
		operation.security.Add(new Dictionary<string, IEnumerable<string>>()
							   {
								   { "basic", new List<string>() }
							   });
	}
}