Last time we traced the signing logic to Po.c, discovered the secrets come from a native library that decodes them at runtime, and hit a wall trying to statically reverse the XOR encoding. Time for plan B — if we can’t reverse the encoding, we’ll just read the decoded values from memory.
Why the obvious approaches don’t work
Before reaching for Frida, we tried a few shortcuts:
Approach
Result
Call Secrets.getXxx() directly
Needs an instance, not static
Create new Secrets() instance
Native code only decodes at init
Hook the constructor
App has anti-Frida detection, crashes
Reverse XOR in the .so
Position-dependent key, too complex
The key insight: the app has already decoded the secrets and stored them in a Po.c instance sitting on the heap. We don’t need to trigger the decoding — we just need to find that instance and read its fields.
Heap scanning with Java.choose()
Frida’sJava.choose() walks the heap looking for live instances of a given class. Combined with reflection to bypass private field access, it’s exactly what we need:
sequenceDiagram
    participant F as Frida
    participant H as JVM Heap
    participant I as Po.c instance
    F->>H: Java.choose("Po.c")
    H->>F: Found instance
    F->>I: reflection — get field "a"
    I-->>F: partnerKey
    F->>I: reflection — get field "b"
    I-->>F: algorithmKey
    F->>I: reflection — get field "c"
    I-->>F: algorithmName = HmacSHA1
Running the extraction
# Push frida-server to the device
adb push frida-server /data/local/tmp/
adb shell "chmod 755 /data/local/tmp/frida-server"
adb shell "/data/local/tmp/frida-server &"

# Launch the app and wait for it to fully load
adb shell am start -n com.example.app/.presentation.ui.MainActivity

# Attach and extract
frida -U -n "TargetApp" -l get_instance.js
And there it is — all three values printed to the console. The algorithm name was HmacSHA1, not HmacSHA256 as we’d assumed from static analysis. That one wrong assumption would have produced invalid signatures every time.
The takeaway
graph TD
    A["Static analysis — JADX + Apktool"] -->|finds| B["Where secrets live
How signing works"]
    C["Dynamic analysis — Frida"] -->|finds| D["Actual secret values
Actual algorithm"]
    B --> E["Complete picture"]
    D --> E
Static analysis tells you how the code works. Dynamic analysis tells you what it’s working with. For anything involving runtime-decoded secrets or obfuscated native code, you need both. We spent hours tracing through decompiled Java to understand the signing flow, and then five lines of Frida script gave us the actual values in seconds. The full toolkit: JADX for decompilation, Apktool for resources, Frida for runtime extraction. And a healthy distrust of your own assumptions. If you’re also interested in intercepting app traffic, we covered SSL unpinning on Android in a separate post.
Last time we cracked open the APK and got readable-ish Java source from JADX. 24,744 classes, most with single-letter names. Now we need to find the API signing logic — a needle in a very obfuscated haystack.
Start with what you can grep
Obfuscation renames classes and methods, but it can’t rename string literals or crypto algorithm names. So we grep:
This surfaces a handful of hits, including an interceptor class that adds signed parameters to every outgoing API request. Bingo — that’s our entry point.
Tracing the call chain
From the interceptor, we follow the method calls deeper:
graph TD
    A["HTTP Interceptor"] -->|calls| B["Po.c — SignatureEncryptor"]
    B -->|reads fields| C["a: partnerKey
b: algorithmKey
c: algorithmName"]
    B -->|calculates| D["HMAC signature"]
    C -->|populated by| E["Secrets.java — JNI bridge"]
    E -->|loads| F["libsecrets.so — native library"]
The SignatureEncryptor (obfuscated to Po.c) is where the signature gets calculated. JADX shows us the decompiled logic:
public final class c {
    private final String a;  // partnerKey
    private final String b;  // algorithmKey
    private final String c;  // algorithmName

    public final String a(long j) {
        String str = this.a + "|" + j;
        Mac mac = Mac.getInstance(this.c);
        mac.init(new SecretKeySpec(this.b.getBytes(), this.c));
        return Base64.encodeToString(mac.doFinal(str.getBytes()), 2);
    }
}
Every API request gets signed with these query parameters:
?t.p=PARTNER_ID             # hardcoded partner identifier
&t.k=PARTNER_KEY            # included in signature data
&appVersion=12.21.1         # app version from manifest
&s.expires=TIMESTAMP        # now + 1 day, in milliseconds
&signature=SIGNATURE         # Base64(HMAC-SHA1(algorithmKey, partnerKey + "|" + expires))
So the signature is an HMAC-SHA1 of the partner key concatenated with a pipe and the expiry timestamp, using a separate algorithm key as the HMAC secret. Three values we need to extract: the partner key, the algorithm key, and the algorithm name. But where do they come from?
Down the rabbit hole to native code
Tracing the constructor calls back, we find a Secrets.java class with JNI methods:
System.loadLibrary("secrets");

public native String getSignaturePartnerKey();
public native String getSignatureAlgorithmKey();
public native String getSignatureAlgorithmName();
The secrets aren’t in the Java code at all. They’re in libsecrets.so — a compiled native library, XOR-encoded and only decoded at runtime. Static analysis of the .so with radare2 reveals the decoding function, but the XOR scheme is position-dependent with a key derived from SHA256. Reversing it manually would take ages.
The wrong assumption
At this point, based on common Android patterns and the crypto imports we’d seen, we assumed the algorithm would be HmacSHA256. We were wrong — but we wouldn’t find that out until we extracted the actual runtime values. Static analysis can only take you so far.
When a client asks us to build an integration against an API that has no public documentation, sometimes the only option is to go straight to the source — the app itself. We recently needed to understand how a particular Android app signs its API requests, and what followed was a proper detective story in three acts. This is act one: getting the source code.
XAPK is just a zip in a trenchcoat
Modern Android apps don’t ship as a single APK anymore. They come as XAPKs — bundles of split APKs, each serving a specific purpose:
graph TD
    A["app.xapk"] -->|unzip| B["base APK — code + resources"]
    A --> C["config.arm64_v8a.apk — native libs"]
    A --> D["config.en.apk — English resources"]
    A --> E["config.xxhdpi.apk — screen density assets"]
The split keeps downloads smaller — your phone only fetches what it needs. For us, it means an extra extraction step before we can get to the code.
# Rename and extract — it's literally a zip
unzip app.xapk -d xapk-extracted/
The base APK is where the interesting bits live. Inside it: 8 DEX files containing roughly 24,744 classes. That’s a lot of haystacks to search through.
Two tools, two perspectives
We reach for two decompilation tools that serve different purposes.
JADX converts DEX bytecode back into readable Java. It’s our go-to for understanding what the code does:
jadx -d output app.apk --show-bad-code -j 4
The --show-bad-code flag is important — when JADX can’t perfectly decompile something, it’ll show its best attempt as a comment rather than silently skipping it.
Apktool decodes resources and produces smali — a human-readable assembly for Dalvik. We need this when we want to modify and rebuild the app later:
apktool d app.apk -o output_dir
graph LR
    A["APK"] --> B["JADX"]
    A --> C["Apktool"]
    B --> D["Java source — for reading"]
    C --> E["Smali + resources — for modifying"]
But then everything’s obfuscated
Here’s what JADX gives us for a typical class:
public final class c {
    private final String a;
    private final String b;
    private final String c;

    public c(String str, String str2, String str3) {
        this.a = str;
        this.b = str2;
        this.c = str3;
    }
}
Single-letter class names, single-letter fields. This is R8 obfuscation at work — Google’s code shrinker renames everything to minimise APK size (and conveniently makes reverse engineering harder). Not all is lost though — string literals, annotation-preserved names, and network DTOs often survive the obfuscation. That’s where we start pulling the thread.
In the next post, we’ll trace through the obfuscated code to find where the app hides its API signing secrets.
There’s a quiet revolution happening in self-hosted software. Between Immich, Jellyfin, Home Assistant, Jitsi and a dozen others, you can build yourself quite a capable home or office setup without sending a single byte to the cloud. We’ve been running a stack of self-hosted services on our internal network for a while now — all neatly managed through Docker and Traefik as our reverse weapon of choice.
Everything was humming along nicely until one day we tried to set up Jitsi Meet for internal video calls. The web UI loaded fine, but the moment we tried to join a call — nothing. No camera, no microphone. Just a cryptic error about getUserMedia being undefined.
Browsers and their trust issues
Turns out, modern browsers flat out refuse to give web apps access to certain APIs unless the page is served over HTTPS. This isn’t some obscure edge case either — it’s a long list:
Camera & Microphone (getUserMedia) — the one that bit us
Service Workers — so no PWA features or push notifications
Geolocation API
Clipboard API
Web Bluetooth / USB / NFC
They call these “secure context” requirements, and there’s no way around them. Chrome, Firefox, Safari — they all enforce it. Localhost gets a pass, but anything on LAN at http://192.168.x.x or a local hostname does not.
The old way: certbot and HTTP-01
Normally you’d chuck certbot into the mix and call it a day. We’ve done that before for public-facing services. But HTTP-01 validation needs the ACME server to reach your host over port 80 from the internet. For internal services that’s a non-starter — we’d have to punch a hole in the firewall and expose an endpoint just to prove we own a domain. Always undesirable, always scary.
DNS-01 changes everything
There’s a DNS-01 validation method that we’d known about for years but always written off as “that complicated thing that needs programmable DNS.” You had to be on Azure DNS, Route53, or Cloudflare — not your average registrar nameservers.
But then one day our annual domain renewal bill came in at a price that warranted churning providers. Since we were moving anyway, it made sense to park the zones in Azure DNS. And suddenly DNS-01 was on the table.
The interesting thing about DNS-01 is that it requires zero external exposure. The ACME server validates ownership by checking a TXT record — no inbound connections needed. And since Traefik supports it natively, we can get wildcard certs for *.yourdomain.co.nz that cover every internal service automagically.
The Traefik stack
Here’s our Traefik setup with DNS-01 via Azure DNS:
The magic is in the entrypoints config — by setting certResolver=le and specifying the domain with a wildcard SAN at the entrypoint level, every service that Traefik picks up automatically gets a valid cert. No per-service certificate config needed.
There’s a nice security bonus here too. Since our DNS zone is public, you might worry about advertising all your internal service hostnames as individual A or CNAME records for the world to see. But with a wildcard cert we only need a single *.yourdomain.co.nz DNS record pointing at Traefik’s local IP — yes, a public DNS record pointing at 192.168.1.x. It’s perfectly valid, and it means nobody on the outside can enumerate your internal services from DNS. Traefik handles the routing based on the Host header, so the individual service names never appear in your zone file.
Adding Jitsi to the mix
With Traefik handling TLS, the Jitsi stack just needs to serve plain HTTP and let Traefik do the rest:
The key bits: DISABLE_HTTPS=1 tells Jitsi’s web container to not bother with its own certs, and the Traefik labels on the web service are all it takes to wire it up. The JVB (video bridge) still needs its UDP port exposed directly since WebRTC media doesn’t go through the reverse proxy.
Fire up both stacks, point meet.yourdomain.co.nz at your Docker host in local DNS, and you’ve got Jitsi with a proper green padlock. Camera and microphone work without a hitch.
Setting up the Azure service principal
The one remaining piece is giving Traefik permission to create those DNS TXT records. We need an Azure service principal scoped to just the DNS zone:
# Create a service principal with DNS Zone Contributor role
SUBSCRIPTION_ID="your-subscription-id"
RESOURCE_GROUP="dns-rg"
DNS_ZONE="yourdomain.co.nz"

SCOPE="/subscriptions/$SUBSCRIPTION_ID/resourceGroups/$RESOURCE_GROUP/providers/Microsoft.Network/dnszones/$DNS_ZONE"

az ad sp create-for-rbac \
  --name "traefik-acme" \
  --role "DNS Zone Contributor" \
  --scopes "$SCOPE"

# Output will include appId, password, and tenant — plug those into
# AZURE_CLIENT_ID, AZURE_CLIENT_SECRET, and AZURE_TENANT_ID respectively
Just remember the client secret expires (default is one year), so set yourself a calendar reminder or you’ll be debugging cert renewals in 12 months wondering what went wrong.
Multi-room audio is one of those things that sounds like it should be simple. You’ve got speakers, you’ve got a network — just pipe audio from A to B, right? Well, not quite. One of our clients wanted whole-house audio using Raspberry Pis as receivers with Snapcast, and while the server side was straightforward, getting snapclient to talk to PulseAudio on a fresh Raspbian Bookworm install turned into a bit of a detour.
The problem
Out of the box, snapclient on Raspbian Bookworm can’t connect to PulseAudio. The service starts, but there’s no sound — and the logs are full of connection refused errors. Since these Pis are headless appliances with no desktop environment, PulseAudio isn’t running in a user session where snapclient can reach it.
Going system-wide
The fix is to run PulseAudio as a system-wide daemon. Not everyone’s favourite approach — the PulseAudio docs will wag a finger at you — but for a headless audio appliance it’s the pragmatic choice.
First, we create a systemd service for PulseAudio:
Every now and then a client comes to us with an interesting challenge: they need to see what an Android app is actually sending over the wire. Maybe it’s a security audit, maybe they’re debugging an API integration, or maybe they just want to understand what data is leaving their devices. SSL pinning makes this tricky — the app refuses to trust anything other than its own bundled certificate. Here’s how we get around that.
What you’ll need
An Android device — this can be a physical phone, but it doesn’t have to be. Projects like Bliss OS let you run full Android on an x86 virtual machine, which is honestly more convenient for this kind of work — no cables, easy snapshots, and you can throw the VM away when you’re done. We’ve had good results running Bliss OS on Proxmox. Setting up an Android x86 VM is a topic for another day, but it’s worth knowing the option exists.
Your proxy’s root certificate installed on the device
Patching the APK
The patch-apk script does the heavy lifting — it decompiles the APK, injects the Frida gadget, and repackages it. Sometimes things won’t build cleanly though. We’ve hit cases where special characters in resource files trip up apktool during reassembly. If that happens, hunt down the offending characters and sanitise them before rebuilding.
Intercepting traffic
Once you’ve got the patched APK installed on the device:
Set up a proxy server with MITM support on your machine — we’ve used Fiddler but mitmproxy works too
Configure the device to use your machine as its proxy
Launch the patched app — it’ll appear stuck on a black screen initially, that’s normal
Now connect to it:
objection explore
Once Objection confirms it’s connected and linked to the instrumented app, the app will unfreeze. Then disable SSL pinning:
android sslpinning disable
Use the app as normal and watch the decrypted traffic flow through your proxy. All the API calls, payloads, headers — everything that was previously hidden behind the pinned certificate is now visible in plain text.
Oracle’s Always Free Tier is ridiculously generous. We’ve been running an Ampere A1 instance with 4 vCPUs and 24GB RAM for a few years now — hosting a VPN and a handful of Docker containers. Hard to complain about free.
The dreaded email
One day we got a friendly reminder from Oracle: instances with consistently low utilisation would be stopped. The official policy is pretty clear:
Idle Always Free compute instances may be reclaimed by Oracle. Oracle will deem virtual machine and bare metal compute instances as idle if, during a 7-day period, the following are true:
CPU utilization for the 95th percentile is less than 20%
Network utilization is less than 20%
Memory utilization is less than 20% (applies to A1 shapes only)
The thing is, a VPN server mostly just shuffles packets. CPU sits near zero most of the time. So by Oracle’s metrics, our perfectly functional box looks “idle”.
The lazy fix
We needed to bump CPU utilisation above 20% without actually doing anything useful. A busy loop seemed like the obvious choice:
#!/bin/bash

lc() {
  (
    pids=""
    cpus=${1:-1}
    seconds=${2:-60}
    echo $(date '+%Y-%m-%d %H:%M:%S') loading $cpus CPUs for $seconds seconds
    trap 'for p in $pids; do kill $p; done' 0
    for ((i=0;i<cpus;i++)); do while : ; do : ; done & pids="$pids $!"; done
    sleep $seconds
  )
}

lc 4 60
The lc function spawns N subprocesses that each run an infinite loop (: ; is bash’s no-op), waits for a set duration, then kills them all via the trap. We spin up all 4 CPUs for 60 seconds.
Scheduling it
Cron does the rest. Every 5 minutes, we burn 60 seconds of CPU:
That’s 60 seconds of 100% load out of every 300 seconds — roughly 20% average utilisation. Right on Oracle’s threshold, and in practice the VPN traffic on top pushes us comfortably over.
The log is a nice touch for troubleshooting:
2026-03-07 09:45:01 loading 4 CPUs for 60 seconds
2026-03-07 09:50:01 loading 4 CPUs for 60 seconds
2026-03-07 09:55:01 loading 4 CPUs for 60 seconds
It’s been running since late 2023. No more threatening emails from Oracle.
Getting Blazor AuthorizeView to work with Azure Static Web App
Recently, we inherited an Azure Static Web App project with a Blazor WASM frontend. The previous developer had given up on configuring the built-in authentication that comes bundled with Static Web Apps and was about to ditch the whole platform and rewrite the API backend for ASP.NET and App Services. This would have meant we could use ASP.NET Membership and be in full control of the user lifecycle. At the same time, we would have implemented our own user management layer which would be redundant in our case. We would also have missed features like AzureAD Auth and a user invite system that we get for free with SWA.
Inventory inspection
Ultimately, we have two puzzle pieces here: Static Web Apps authentication and Blazor.
Azure Static Web Apps provide built-in authentication and authorization for web applications. This allows users to authenticate with their preferred identity provider such as Azure Active Directory, GitHub, Twitter, Facebook, and Google, to access resources on the app. When a user logs in, Azure Static Web Apps takes care of tokens and exposes an API that returns user information and authentication status in a simple JSON format:
All that we care about here is the fact that the userRoles property is provided for both the API and frontend via an /.auth/me endpoint.
Moving on to the consumer side, Blazor offers the AuthorizeViewcomponent to show content only to authorized users. When an unauthorized user tries to access a page, Blazor will render the contents of the NotAuthorized tag, which is likely going to point to a login page. Decision on whether a given user is authorized to see a page is delegated to the AuthenticationStateProvider service. Default implementation plugs into ASP.NET membership, which is exactly what we’re trying to avoid.
Making changes
Luckily, writing a custom Provider and injecting it instead of the stock one is a matter of configuring the DI container at startup:
var builder = WebAssemblyHostBuilder.CreateDefault(args);
builder.Services.AddAuthorizationCore();
builder.Services.AddScoped<AuthenticationStateProvider, CustomAuthStateProvider>();
The provider would then look something like this:
public class SwaPrincipalResponse
{
    public ClientPrincipal? ClientPrincipal { get; set; }
}

public class AuthStateProvider : AuthenticationStateProvider
{
    private readonly HttpClient _httpClient;
    private readonly AuthenticationState _anonymous;

    public AuthStateProvider(HttpClient httpClient)
    {
        _httpClient = httpClient;
        _anonymous = new AuthenticationState(new ClaimsPrincipal(new ClaimsIdentity()));
    }

    public override async Task<AuthenticationState> GetAuthenticationStateAsync()
    {
        var principalResponse = await _httpClient.GetStringAsync("/.auth/me");
        var kv = JsonSerializer.Deserialize<SwaPrincipalResponse>(principalResponse, new JsonSerializerOptions { PropertyNameCaseInsensitive = true });
        var principal = kv!.ClientPrincipal;

        if (principal == null || string.IsNullOrWhiteSpace(principal.IdentityProvider))
            return _anonymous;

        principal.UserRoles = principal.UserRoles?.Except(new[] { "anonymous" }, StringComparer.CurrentCultureIgnoreCase).ToList();

        if (!principal.UserRoles?.Any() ?? true)
        {
            return _anonymous;
        }

        var identity = new ClaimsIdentity(principal.IdentityProvider);
        identity.AddClaim(new Claim(ClaimTypes.NameIdentifier, principal.UserId));
        identity.AddClaim(new Claim(ClaimTypes.Name, principal.UserDetails));
        identity.AddClaims(principal!.UserRoles!.Select(r => new Claim(ClaimTypes.Role, r)));

        return new AuthenticationState(new ClaimsPrincipal(identity));
    }
}
And this unlocks pages with AuthorizeView for us.
In conclusion, if you’re working with a Blazor frontend and Azure Static Web Apps, take advantage of the built-in Azure SWA Authentication for Blazor. It can save you from having to rewrite your API backend and allows for easy integration with various identity providers.
It is somewhat common for our clients to come to us for small website deployments. They’re after landing pages, or single page apps so they can put something up quickly at minimal cost.
There are options
Azure, as our platform of choice, offers many ways to deploy static content. We have talked about some ways to host simple pages before, but this time round, let’s throw BYO domains and SSL into the mix, evaluate upgrade potential, and compare costs. One extra goal we have set for ourselves was to build IaC via Terraform for each option so we can streamline our process further.
Since BYO domains require manual setup and validation, we opted to manually create a parent DNS zone, validate it prior to running Terraform and let the code automagically create child zone for our experiments. Real setups may differ.
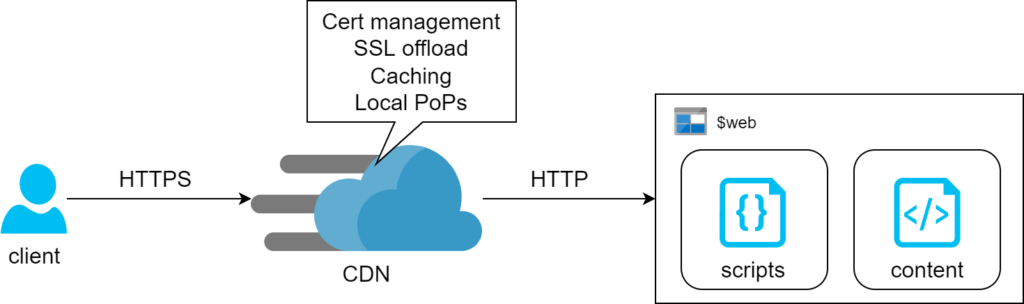
Storage + CDN
The first method relies on Azure Storage Account feature where it can serve content of a container via HTTP or HTTPS. There’s no operational cost for this feature – we only pay for consumed storage. The drawback of this design is lack of support for managed SSL certs on custom domains. Prescribed architecture works around this by adding CDN in front of it and we found that the associated cost is likely going to be negligible for simple static pages (we’re talking $0.13 per 100Gb on top of standard egress charges). That said, the egress bill itself can potentially blow out if left unchecked.
A few notes on automation
Switching static website feature is considered a data plane exercise, so ARM templates are of little help. Terraform, however supports this with just a couple lines of config:
Secondly, CDN requires two CNAME domains for custom domain to work: the subdomain itself and one extra for verification. Nothing overly complicated, we just need to make sure we script both:
resource "azurerm_dns_cname_record" "static" {
  name                = "storage-account"
  zone_name           = azurerm_dns_zone.static.name
  resource_group_name = azurerm_resource_group.main.name
  ttl                 = 60
  record              = azurerm_cdn_endpoint.main.host_name
}

resource "azurerm_dns_cname_record" "static_cdnverify" {
  name                = "cdnverify.storage-account"
  zone_name           = azurerm_dns_zone.static.name
  resource_group_name = azurerm_resource_group.main.name
  ttl                 = 60
  record              = "cdnverify.${azurerm_cdn_endpoint.main.host_name}"
}
Finally, CDN takes a little while to deploy a custom domain (seems to get stuck with verification) – ours took 10 minutes to complete this step.
Static Web App
This is probably the most appropriate way to host static content in Azure. Not only it supports serving content, it also comes with built-in Functions and Authentication. We also get CDN capabilities out of the box and on top of that it is usable on free tier. This definitely is our platform of choice.
Since we’ve already covered Static Web Apps we’d just briefly touch upon automating it with Terraform. The only complication here is that native azurerm_static_site is perfectly capable of standing up the resource but has no idea on how to deploy content. Since there’s no supported way of manually uploading content, we opted for docker deployment. Fitting it back into the pipeline was a bit of a hack, which is essentially a shell script to run when content changes:
resource "null_resource" "publish_swa" {
    triggers = {
      script_checksum = sha1(join("", [for f in fileset("content", "*"): filesha1("content/${f}")])) // recreate resource on file checksum change. This will always trigger a new build, so we don't care about the state as much
    }
    provisioner "local-exec" {
        working_dir = "${path.module}"
        interpreter = ["bash", "-c"]
        command = <<EOT
docker run --rm -e INPUT_AZURE_STATIC_WEB_APPS_API_TOKEN=${azurerm_static_site.main.api_key} -e DEPLOYMENT_PROVIDER=DevOps -e GITHUB_WORKSPACE=/working_dir -e INPUT_APP_LOCATION=. -v `pwd`/content:/working_dir mcr.microsoft.com/appsvc/staticappsclient:stable ./bin/staticsites/StaticSitesClient upload --verbose true
EOT
    }
// the block above assumes static content sits in `./content` directory. Using `pwd` with backticks is particularly important as terraform attempts parsing ${pwd} syntax, while we need to pass it into the shell
    depends_on = [
      azurerm_static_site.main
    ]
}
App Service
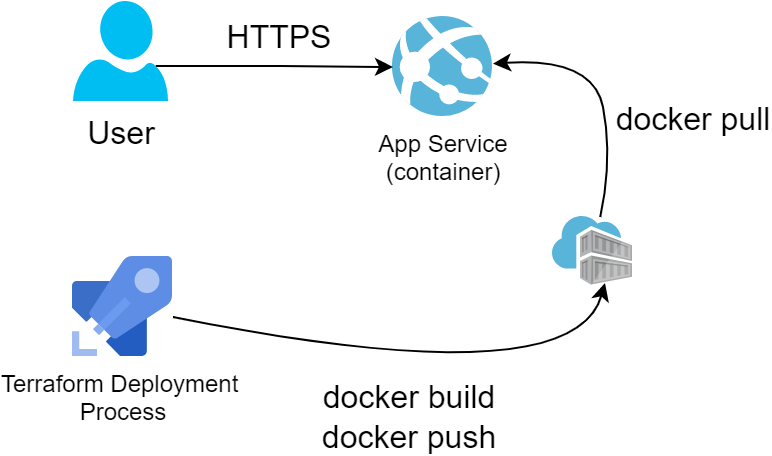
Finally comes the totally overengineered approach that will also be the most expensive and offers no regional redundancy by default. Using App Service makes no sense for hosting simple static pages but may come in handy as a pattern for more advanced scenarios like containers or server-side-rendered web applications.
Notes on building it up
For this exercise we opted to host our content in a simple nginx docker container. Linux App Service plans with Custom Domain and SSL support start from $20/month, so they are not cheap. We started with scaffolding a Container Registry, where we’d push a small container so that App Service can pull it on startup:
FROM nginx:alpine
WORKDIR /usr/share/nginx/html/
COPY index.html .
COPY ./nginx.conf /etc/nginx/nginx.conf # there's minimal nginx config, check out github
EXPOSE 80 # we only care to expose HTTP endpoint, so no certs are needed for nginx at this stage
We picked Nginx because of its simplicity and low overheads to illustrate our point. But since we can containerise just about anything, this method becomes useful for more complicated deployments.
resource "null_resource" "build_container" {
    triggers = {
      script_checksum = sha1(join("", [for f in fileset("content", "*"): filesha1("content/${f}")])) // the operation will kick in on change to any of the files in content directory
    }

// normal build-push flow for private registry
    provisioner "local-exec" { command = "docker login -u ${azurerm_container_registry.acr.admin_username} -p ${azurerm_container_registry.acr.admin_password} ${azurerm_container_registry.acr.login_server}" }
    provisioner "local-exec" { command = "docker build ./content/ -t ${azurerm_container_registry.acr.login_server}/static-site:latest" }
    provisioner "local-exec" { command = "docker push ${azurerm_container_registry.acr.login_server}/static-site:latest" }
    provisioner "local-exec" { command = "docker logout ${azurerm_container_registry.acr.login_server}" }
    depends_on = [
      azurerm_container_registry.acr
    ]
}

resource "azurerm_app_service" "main" {
  name                = "${var.prefix}-app-svc"
  location            = azurerm_resource_group.main.location
  resource_group_name = azurerm_resource_group.main.name
  app_service_plan_id = azurerm_app_service_plan.main.id

  app_settings = {
    WEBSITES_ENABLE_APP_SERVICE_STORAGE = false // this is required for Linux app service plans
    DOCKER_REGISTRY_SERVER_URL      = azurerm_container_registry.acr.login_server // the convenience of rolling ACR with terraform is that we literally have all the variables already available
    DOCKER_REGISTRY_SERVER_USERNAME = azurerm_container_registry.acr.admin_username // App Service uses admin account to pull container images from ACR. We have to enable it when defining the resource
    DOCKER_REGISTRY_SERVER_PASSWORD = azurerm_container_registry.acr.admin_password
  }

  site_config {
    linux_fx_version = "DOCKER|${azurerm_container_registry.acr.name}.azurecr.io/static-site:latest"
    always_on        = "true" // this is also required on Linux app service plans
  }

  depends_on = [
    null_resource.build_container
  ]
}
Conclusion
Going through this exercise, we’ve built a bit of a decision matrix on which service to use:
We have seen a few projects where the client insists on using SQL Server, but their workload generates a bunch of semi-structured JSON data for us to store. Now we need to bridge the gap and efficiently query it. One realistic case study where this situation may pop up would be building a browser extension that helps capture and organise wish lists from various platforms such as Amazon or eBay.
Let’s build a wish list
Our journey would likely start with a web browser. We may have a browser extension of some sort that would send information about an item we’re currently watching to an API. That API will have to make sense of all different attributes each website provides and try store it in a way that makes querying as easy and efficient as possible.
The catch is, we don’t know full list of attributes. And, probably, we should not care – perfect data model for frequently changing e-commerce websites would be hard to deduce and likely very painful to maintain. We could just lump it all together and chuck it into a schema-less data store like Cosmos DB or Mongo, but for the sake of argument we’ll imagine the client was adamant they needed a SQL Server because it’s a business decision they made a long time ago.
Not a huge drama
SQL Server has functions to work with JSON data – all we have to do is put it into a sufficiently big column. We can save heaps of time creating one simple data model and calling it a day.
Moving on to coding, let us focus on data retrieval and skip the API part for now – it’s a whole different can or worms and will distract us from our point. From here on we’ll be exploring ways to query the data
Test Bench
We’ve created a small EF Core project where DBContext looks something like this:
class WishlistEntry
{

	public int Id { get; set; }
	public int CustomerId { get; set; }
	[MaxLength(300)]
	public string ItemSource { get; set; }
	public string ItemData { get; set; }

	[DatabaseGenerated(DatabaseGeneratedOption.Computed)]
	public string ItemCategory { get; set; }
}

class ItemData
{
	public string Sku { get; set; }
	public string Name { get; set; }
	public List<Category> Category { get; set; }
}

class Category
{
	public string Id { get; set; }
	public string Name { get; set; }
}
with setup out of the way, let us define a sample entry and write a query to pick all entries that contain a category “Connected Home & Housewares”:
The naive approach to the desired outcome would be to simply try and deserialise the field and pray Entity Framework would work its magic:
var context = new SHDbContext();
//var sql = context.WishlistEntries.Select(wle => JsonConvert.DeserializeObject<ItemData>(wle.ItemData)
//                                                .Category.Any(c => c.Name == "Connected Home & Housewares")); //The LINQ expression 'c => c.Name == "Connected Home & Housewares"' could not be translated.
Unfortunately, this would not even compile as EF has no idea what to do with JsonConvert. We’ll end up having to materialise the query and handle filtering on the client side:
var data = context.WishlistEntries.Select(wle => JsonConvert.DeserializeObject<ItemData>(wle.ItemData))
                                .AsEnumerable()
                                .Where(d => d.Category.Any(c => c.Name == "Connected Home & Housewares"))
                                .ToList();
This will work as expected, and some developers will probably stop here, but this is in fact a time bomb. When our wish lists get big enough, the clients will put a serious strain on SQL Server and the network fetching the whole table in its entirety. Not nice.
Option two – write a Value Converter
Technically this is a variation of the previous option but leveraging EF Core Value Conversion capability for nicer looking query. To enable this, we’ll override OnModelCreating and add a few more lines to DB Context:
class SHDbContext : DbContext
{
	public DbSet<WishlistEntry> WishlistEntries { get; set; }

	protected override void OnConfiguring(DbContextOptionsBuilder optionsBuilder)
	{
		base.OnConfiguring(optionsBuilder);
		optionsBuilder.UseSqlServer(Environment.GetEnvironmentVariable("DB_CONNSTR")).LogTo(Console.WriteLine);
	}

	protected override void OnModelCreating(ModelBuilder modelBuilder)
	{
		base.OnModelCreating(modelBuilder);
		modelBuilder.Entity<WishlistEntry>()
		            .Property(e => e.ItemData)
		            .HasConversion((itemData) => JsonConvert.SerializeObject(itemData), str => JsonConvert.DeserializeObject<ItemData>(str));
	}
}
// ...
// finally, use the new converter like so:
var data = context.WishlistEntries.AsEnumerable().Where(d => d.ItemData.Category.Any(c => c.Name == "Connected Home & Housewares")).ToList();
 // also not ideal as we still have to filter on client side, effectively scanning all tabl
This simply shifts the JSON conversion code up the food chain, so developers won’t see it often. Unfortunately, this “out of sight – out of mind” approach won’t improve our query plan.
Option three – JSON_VALUE function
It gets pretty clear at this stage that we need to be able to filter by json fields on SQL Server side. Luckily, Microsoft provides a few json-handling capabilities. JSON_VALUE function that allows extracting one value out of the blob via given path selector. This is going to eliminate the need to land our query and should hugely improve performance. Entity Framework does not support this function by default, but it should be very easy to add:
// in the context class
 // adding static function to the DB Context
[DbFunction("JSON_VALUE", IsBuiltIn = true, IsNullable = false)]
public static string JsonValue(string expression, string path) => throw new NotImplementedException();
our query then becomes something like this:
var data = context.WishlistEntries.Where(d => SHDbContext.JsonValue(d.ItemData, "$.category[0].name").Contains("Connected Home & Housewares")).ToList();
And this is the correct answer. However, we can further improve performance by adding an index. Indexing the whole json blob will not help, but we can create a computed column with the value we care about and index that instead:
-- add computed column
ALTER TABLE WishlistEntries ADD ItemCategory AS JSON_VALUE(ItemData, '$.category[0].name')
-- index the value
CREATE INDEX IX_ItemCategory ON WishlistEntries(ItemCategory) INCLUDE(CustomerId, ItemSource, ItemData);
-- finally, test if the query picks up index by running the following and checking the Actual Execution Plan:
/* test queries */
SELECT * FROM [WishlistEntries] WHERE JSON_VALUE(ItemData, '$.category[0].name') = 'Connected Home & Housewares'
This enhancement also happens to simplify our code a bit as we can now rely on computed column value when writing queries in EF:
// add computed column to WishlistEntry
class WishlistEntry
{

	public int Id { get; set; }
	public int CustomerId { get; set; }
	[MaxLength(300)]
	public string ItemSource { get; set; }
	public string ItemData { get; set; }

	[DatabaseGenerated(DatabaseGeneratedOption.Computed)]
	public string ItemCategory { get; set; }
}

// finally the query will be like:
var data = context.WishlistEntries.Where(wle => wle.ItemCategory == "Connected Home & Housewares").ToList();
Conclusion and area for improvement
Keen eyed readers may have noticed that we hardcoded query to first array item. This was a deliberate simplification we opted for to illustrate the point. It should be possible to query an array using OPENJSON … CROSS APPLY like so, but we haven’t explored this avenue far enough to see if we’d ultimately succeed:
var data = context.WishlistEntries.FromSqlRaw(@"SELECT TOP 1 wishlist.*
      FROM [WishlistEntries] as wishlist
CROSS APPLY OPENJSON(ItemData, '$.category') WITH (CatName VARCHAR(200) '$.name') as categories
WHERE categories.CatName = {0}", "Connected Home & Housewares").ToList();
Even though our application is far from complete we are in a good place. Equipped with these techniques, we can handle almost anything users throw at us and are still able to query data fast enough. The code for this exercise is available on GitHub.