This is the third part of the series following our humble endeavors to automate Terraform deployment tasks. First part here, second part here. With housekeeping out of the way, let’s get on to the content.
Now that we’ve got the Terraform part sorted, we’d like to take this project to a logical conclusion and build a reusable template for our future endeavors.
Compile or script?
Our initial idea was to write a small console app that would gather parameters and make all API calls. But this repository got us thinking, that it’s way more efficient to be able to just run the script off GitHub. So, we went to the drawing board and ended up with a Bash script. It ain’t much but it’s honest work.
Ultimately the script goes to create an ADO Project, imports its own GitHub repo into a newly created project and proceeds to set up the pipeline.
Streamlining process
With this tooling, we can now automate most of our process. We’d start by obtaining the parameters and setting up required credentials:
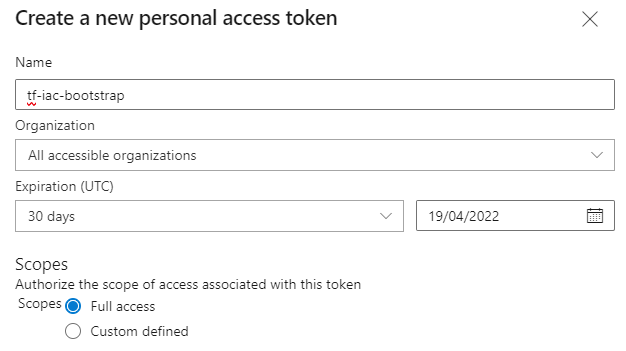
In ADO we’ll need to create and grab a PAT of a user with permissions to manage the organization
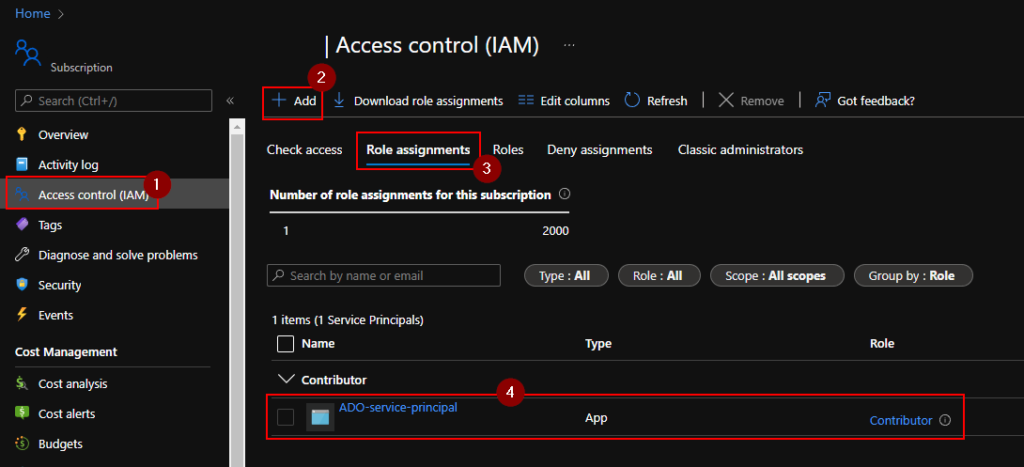
By default, the principal has no permissions, so we’ll need to give it something like Contributor access on a Subscription we want to manage
Finally, it’s good practice to name Azure resources in such a way that it makes sense later. We come up with a distinct prefix for Terraform state storage account. Since storage accounts have strict naming policies, our prefix must be 2-13 characters long and must only contain alphanumerics.
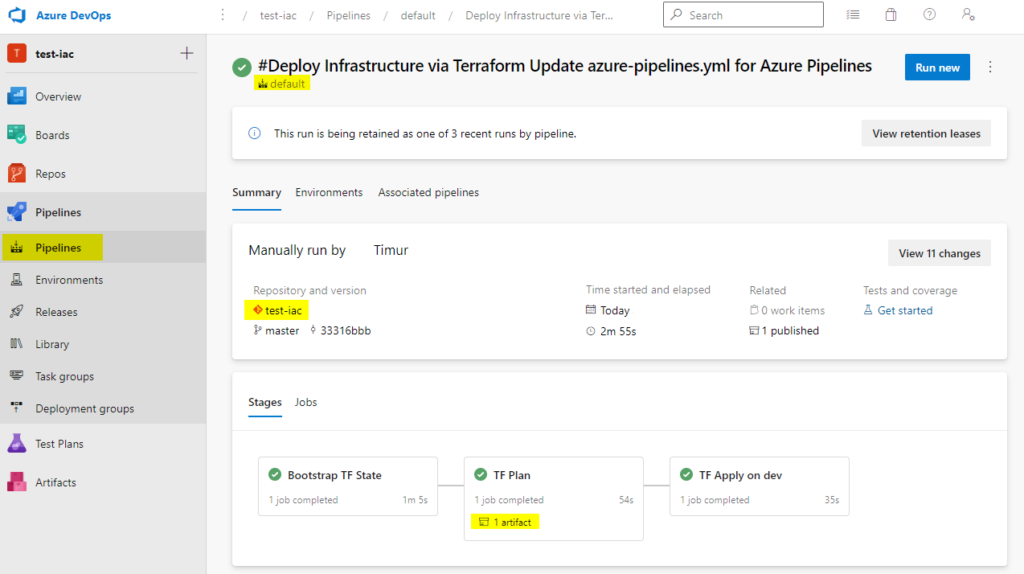
Once all prep work is done, running script should produce an ADO project:
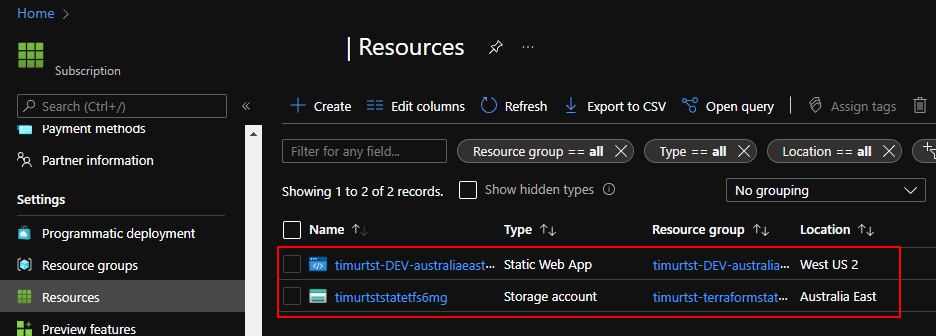
And running a default pipeline there should deploy Terraform management resource group (this is where state file will sit) and an actual workload – in our case it’s a Static Web App
Conclusion
This repository gives us a good starting point in our engagements with clients using ADO. As more clients start to pick GitHub as their platform of choice, we may have to upgrade it to use Actions. Until then, happy infrastructure-as-coding!
This is the second part of the series following our humble endeavors to automate Terraform deployment tasks. First part here. With housekeeping out of the way, let’s get on to the content.
For purposes of this exercise, it does not matter what we want to deploy. Can be a simple Web App or full fat Landing Zone. The pipeline itself remains unchanged.
Sample Infrastructure
Since we want an absolute minimum, we’ll go with one resource group and one Static Web App:
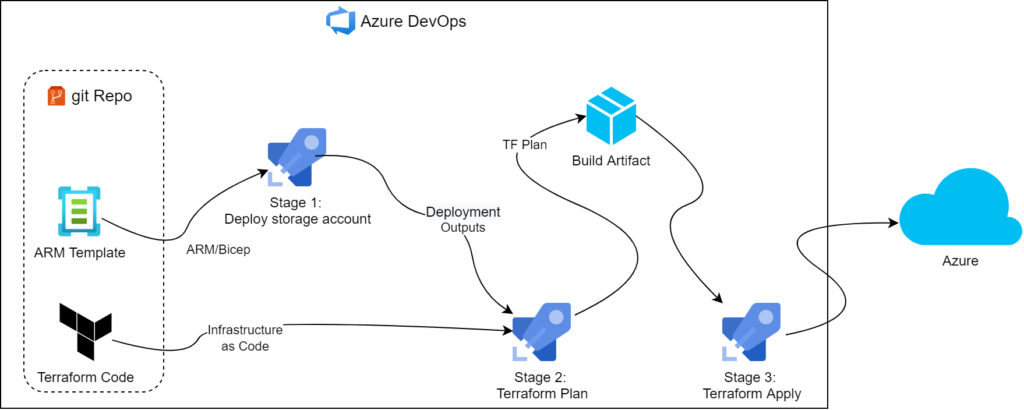
Since our goal is to have as little human intervention as possible, we went with multi-stage YAML pipeline.
the YAML may look something like that:
trigger: none # intended to run manually
name: Deploy Terraform

pool:
  vmImage: 'ubuntu-latest'

variables:
  - group: 'bootstrap-state-variable-grp'

stages:
- stage: bootstrap_state
  displayName: 'Bootstrap TF State'
  jobs:
  - job: tf_bootstrap
    steps:
    - task: AzureResourceManagerTemplateDeployment@3
      inputs:
        deploymentScope: 'Subscription'
        azureResourceManagerConnection: '$(azureServiceConnection)'
        subscriptionId: '$(targetSubscriptionId)'
        location: '$(location)'
        csmFile: '$(Build.SourcesDirectory)/bicep/main.bicep' # on dev machine, compile into ARM (az bicep build --file .\bicep\main.bicep) and use that instead until agent gets update to 3.199.x
        deploymentOutputs: 'deploymentOutputs'
        overrideParameters: '-prefix $(prefix) -location $(location)'
    - script: |
        # this script takes output from ARM deployment and makes it available to steps further down the pipeline
        echo "##vso[task.setvariable variable=resourceGroupName;isOutput=true]`echo $DEPLOYMENT_OUTPUT | jq -r '.resourceGroupName.value'`"
        echo "##vso[task.setvariable variable=storageAccountName;isOutput=true]`echo $DEPLOYMENT_OUTPUT | jq -r '.storageAccountName.value'`"
        echo "##vso[task.setvariable variable=containerName;isOutput=true]`echo $DEPLOYMENT_OUTPUT | jq -r '.containerName.value'`"
        echo "##vso[task.setvariable variable=storageAccessKey;isOutput=true;isSecret=true]`echo $DEPLOYMENT_OUTPUT | jq -r '.storageAccessKey.value'`"
      # https://docs.microsoft.com/en-us/azure/devops/pipelines/process/variables?view=azure-devops&tabs=yaml%2Cbatch#share-variables-across-pipelines
      name: armOutputs # giving name to this task is extremely important as we will use it to reference the variables from later stages
      env:
        DEPLOYMENT_OUTPUT: $(deploymentOutputs)

- stage: run_tf_plan # Build stage
  displayName: 'TF Plan'
  jobs:
  - job: tf_plan
    variables:
      # to be able to reference outputs from earlier stage, we start hierarchy from stageDependencies and address job outputs by full name: <stage_id>.<job_id>.outputs
      - name: resourceGroupName
        value: $[ stageDependencies.bootstrap_state.tf_bootstrap.outputs['armOutputs.resourceGroupName'] ]
      - name: storageAccountName
        value: $[ stageDependencies.bootstrap_state.tf_bootstrap.outputs['armOutputs.storageAccountName'] ]
      - name: containerName
        value: $[ stageDependencies.bootstrap_state.tf_bootstrap.outputs['armOutputs.containerName'] ]
      - name: storageAccessKey
        value: $[ stageDependencies.bootstrap_state.tf_bootstrap.outputs['armOutputs.storageAccessKey'] ]
    steps:
      # check out TF code from git
      - checkout: self
        persistCredentials: true
      # init terraform and point the backend to correct storage account
      - task: TerraformTaskV2@2 # https://github.com/microsoft/azure-pipelines-extensions/blob/master/Extensions/Terraform/Src/Tasks/TerraformTask/TerraformTaskV2/task.json
        displayName: terraform init
        inputs:
          workingDirectory: '$(System.DefaultWorkingDirectory)/tf'
          backendServiceArm: $(azureServiceConnection)
          backendAzureRmResourceGroupName: $(resourceGroupName)
          backendAzureRmStorageAccountName: $(storageAccountName)
          backendAzureRmContainerName: $(containerName)
          backendAzureRmKey: '$(prefix)/terraform.tfstate'
        env:
          ARM_ACCESS_KEY: $(storageAccessKey)
      # run terraform plan and store it as a file so we can package it
      - task: TerraformTaskV2@2
        displayName: terraform plan
        inputs:
          workingDirectory: '$(System.DefaultWorkingDirectory)/tf'
          environmentServiceNameAzureRM: $(azureServiceConnection)
          command: 'plan'
          # feed tfvars file and set variables for azure backend (see TF files for usage)
          commandOptions: '-input=false -var-file=terraform.tfvars -var="prefix=$(prefix)" -var="location=$(location)" -var="subscription_id=$(targetSubscriptionId)" -out=$(prefix)-plan.tfplan'
        env:
          ARM_ACCESS_KEY: $(storageAccessKey)
      # package workspace into an artifact so we can publish it
      - task: ArchiveFiles@2
        inputs:
          displayName: 'Create Plan Artifact'
          rootFolderOrFile: '$(System.DefaultWorkingDirectory)/tf'
          includeRootFolder: false
          archiveFile: '$(Build.ArtifactStagingDirectory)/$(Build.BuildId).zip'
          replaceExistingArchive: true
      # publish artifact to ADO
      - task: PublishBuildArtifacts@1
        inputs:
          displayName: 'Publish Plan Artifact'
          PathtoPublish: '$(Build.ArtifactStagingDirectory)'
          ArtifactName: '$(Build.BuildId)-tfplan'
          publishLocation: 'Container'

- stage: run_tf_apply # Deploy stage
  dependsOn:
    - bootstrap_state # adding extra dependencies so we can access armOutputs from earlier stages
    - run_tf_plan # by default next stage would have depended on the previous, but we broke that chain by depending on earlier stages
  displayName: 'TF Apply'
  jobs:
  - deployment: tf_apply
    variables:
      # to be able to reference outputs from earlier stages, we start hierarchy from stageDependencies and address job outputs by full name: <stage_id>.<job_id>.outputs
      - name: storageAccessKey
        value: $[ stageDependencies.bootstrap_state.tf_bootstrap.outputs['armOutputs.storageAccessKey'] ]
    environment: 'dev' # required for deployment jobs. will need to authorise the pipeline to use it at first run
    strategy:
        runOnce:
          deploy:
            steps:
            # grab published artifact
            - task: DownloadBuildArtifacts@0
              inputs:
                artifactName: '$(Build.BuildId)-tfplan'
                displayName: 'Download Plan Artifact'
            # unpack the archive, we should end up with all necessary files in root of working directory
            - task: ExtractFiles@1
              inputs:
                archiveFilePatterns: '$(System.ArtifactsDirectory)/$(Build.BuildId)-tfplan/$(Build.BuildId).zip'
                destinationFolder: '$(System.DefaultWorkingDirectory)/'
                cleanDestinationFolder: false
                displayName: 'Extract Terraform Plan Artifact'
            - task: TerraformTaskV2@2
              displayName: terraform apply
              inputs:
                workingDirectory: $(System.DefaultWorkingDirectory)
                command: 'apply'
                commandOptions: '-auto-approve -input=false $(prefix)-plan.tfplan'
                environmentServiceNameAzureRM: $(azureServiceConnection)
              env:
                ARM_ACCESS_KEY: $(storageAccessKey)
Couple of notes regarding the pipeline
The pipeline is pretty straightforward so instead of going through it line by line, we just wanted to point out a few things that really helped us put this together
Building on top of that, we had to import these variables in subsequent stages using stage dependencies. The pipeline can ultimately be represented as a tree containing stages on top level and ending with tasks as leaves. Keywords dependencies and stageDependencies tell us which level we’re looking at
For this trick to work, the requesting stage must depend on the stage where variables are exported from. By default, subsequent stages depend on the stages immediately preceding them. But in more complicated scenarios we can use dependsOn parameter and specify it ourselves.
Keen-eyed readers may notice we do not perform Terraform Install at all. This is very intentional, as Hosted Agent we’re using for this build already has TF 1.1.5 installed. It’s good enough for us but may need an upgrade in your case
The same point applies to using jq in our JSON parsing script – it’s already in there but your mileage may vary
Conclusion
With the build pipeline sorted, we’re yet another step closer to our zero-touch Terraform deployment nirvana. We already can grab the code and commit it into a fresh ADO project to give our workflow a boost. I’m not sharing the code just yet as there are still a couple of things we can do, so watch this space for more content!
We have hit this snag while building our zero touch Terraform pipeline. And while the Internet has examples of navigating the issue with PowerShell, we could not find one that would work with Bash. Technically, PowerShell 7.x comes preinstalled on our choice of Hosted Agents too, so we could’ve used existing solution. But we felt it was a good opportunity to look at Logging Commands and ultimately could not pass up an opportunity to build something new.
Problem statement
Suppose we’ve got an Azure Resource Group Deployment task (which now supports Bicep templates natively by the way). It’s got a way of feeding deployment outputs back to the pipeline: deploymentOutputs which takes a string and returns it as a variable:
trigger: none

name: ARM Deploy

pool:
  vmImage: 'ubuntu-latest'

stages:
- stage: arm_deployment
  jobs:
  - job: deploy
    steps:
    - task: AzureResourceManagerTemplateDeployment@3
      inputs:
        deploymentScope: 'Subscription'
        azureResourceManagerConnection: $(predefinedAzureServiceConnection)
        subscriptionId: $(targetSubscriptionId)
        location: $(location)
        csmFile: '$(Build.SourcesDirectory)/arm-template.json'
        deploymentOutputs: 'outputVariablesGoHere' # this is where ARM outputs will go

    - script: |
        echo $ARM_DEPLOYMENT_OUTPUT
      env:
        ARM_DEPLOYMENT_OUTPUT: $(outputVariablesGoHere)
Let us assume our ARM template has outputs along the following lines:
then, the pipeline would produce the following output:
Starting: AzureResourceManagerTemplateDeployment
==============================================================================
...
Starting Deployment.
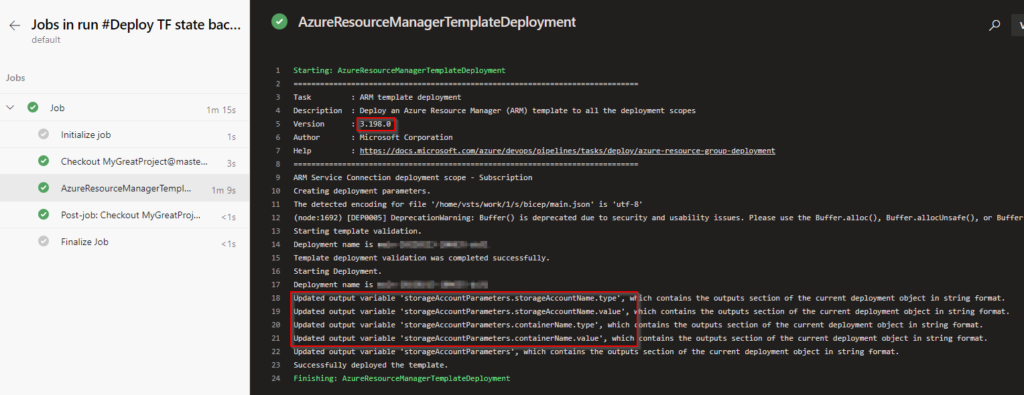
Updated output variable 'outputVariablesGoHere.storageAccountName.type', which contains the outputs section of the current deployment object in string format.
Updated output variable 'outputVariablesGoHere.storageAccountName.value', which contains the outputs section of the current deployment object in string format.
...
Updated output variable 'outputVariablesGoHere', which contains the outputs section of the current deployment object in string format.
Finishing: AzureResourceManagerTemplateDeployment
Starting: CmdLine
==============================================================================
...
Script contents:
echo $ARM_DEPLOYMENT_OUTPUT
========================== Starting Command Output ===========================
{"storageAccountName":{"type":"String","value":"xxxxxxxxx"},"resourceGroupName":{"type":"String","value":"xxxxxxxx"}}
Finishing: CmdLine
ADO does not support parsing JSON
By default, ADO would treat the whole object as one string and would not get us very far with it. So, we need to parse JSON and define more variables. We could opt for PowerShell task to do that, but since we’re using Ubuntu on our agents, we felt Bash would be a bit more appropriate. Let’s update the pipeline a bit and replace our simplistic echo script with a bit more logic:
Here we pass our input to jq, the JSON parser that comes preinstalled with ubuntu-latest. Then we craft a string that ADO Agent picks up and interprets as command (in this case, setting pipeline variable). These special strings are called Logging Commands.
One crucial thing to remember here is to call jq with --raw-output/-r command line parameter – this would ensure resulting strings are unquoted. Having \"value\" vs value can easily break the build and is awfully hard to troubleshoot.
Conclusion
This little script is just a sample of what’s possible. PowerShell examples online usually opt for a universal approach and enumerate all keys on the object. We’re certain Bash can offer the same flexibility but since our use case was limited by just a couple of variables, we’d keep it straight to the point and leave generalisation to readers.
We often get to come in, deploy cloud services for customers and get out. Some customers have established teams and processes, others have green fields and rely on us to do the right thing. Regardless of the level of investment, customers expect us to stick to the best practice and not only create bits of cloud infrastructure for them but also do the right thing and codify the infrastructure as much as possible. By default, we’d stick to Terraform for that.
Storing state
To be able to manage infrastructure and detect changes, Terraform needs a place to store current state of affairs. The easiest solution would be to store the state file locally but that’s not really an option for CI/CD pipelines. Luckily, we’ve got a bunch of backends to pick from.
This, however, leads to a chicken and egg situation where we can’t use Terraform to deploy storage backend without having access to storage backend where it can keep state file.
Bicep
So far, we’ve been mostly dealing with Azure so it made sense to prep a quick Bicep snippet to create required resources for us. One thing to keep in mind is the fact that Bicep by default deploys resources into resourceGroup scope. This implies we’ve already created a resource group, which is not exactly what we want to do. To switch it up we need to start at subscription level (this is what we are usually given, anyway) and create a resource group followed by whatever else we wanted. The recommended way to do that would be to declare main template for RG and reference a module with all other good stuff:
targetScope = 'subscription' // switching scopes here


// declaring some parameters so we can easier manage the pipeline later
@maxLength(13)
@minLength(2)
param prefix string
param tfstate_rg_name string = '${prefix}-terraformstate-rg'
@allowed([
  'australiaeast'
])
param location string

// creating resource group
resource rg 'Microsoft.Resources/resourceGroups@2021-01-01' = {
  name: tfstate_rg_name
  location: location
}

// Deploying storage account via module reference
module stg './tfstate-storage.bicep' = {
  name: 'storageDeployment'
  scope: resourceGroup(rg.name)
  params: {
    storageAccountName: '${prefix}statetf${take(uniqueString(prefix),4)}'
    location: location
  }
}
Assuming we just want to chuck all our assets into a repository and drive from there, it’d make sense to also write a simple ADO deployment pipeline. Previously we’d have to opt forAzureCLI task and do something like this:
- task: AzureCLI@2
  inputs:
    azureSubscription: $(azureServiceConnection)
    scriptType: bash
    scriptLocation: inlineScript
    inlineScript: |
      # steps to create RG
      az deployment group create --resource-group $(resourceGroupName) --template-file bicep/main.bicep
Luckily, the work has been done and starting with agent version 3.199, AzureResourceManagerTemplateDeployment does support Bicep deployments natively! Unfortunately, at the time of testing our ADO-hosted agent was still at version 3.198 so we had to cheat and compile Bicep down to ARM manually. The final pipeline, however, would look something like this:
trigger: none # intended to run manually

name: Deploy TF state backend via Bicep

pool:
  vmImage: 'ubuntu-latest'

variables:
  - group: "bootstrap-state-variable-grp" # define variable groups to point to correct subscription

steps:
- task: AzureResourceManagerTemplateDeployment@3
  inputs:
    deploymentScope: 'Subscription'
    azureResourceManagerConnection: $(azureServiceConnection)
    subscriptionId: $(targetSubscriptionId)
    location: $(location)
    templateLocation: 'Linked Artifact'
    csmFile: '$(System.DefaultWorkingDirectory)/bicep/main.bicep' # on dev machine, compile into ARM (az bicep build --file .\bicep\main.bicep) and use that instead until agent gets update to 3.199.x
    deploymentMode: 'Incremental'
    deploymentOutputs: 'storageAccountParameters'
    overrideParameters: '-prefix $(prefix) -location $(location)'
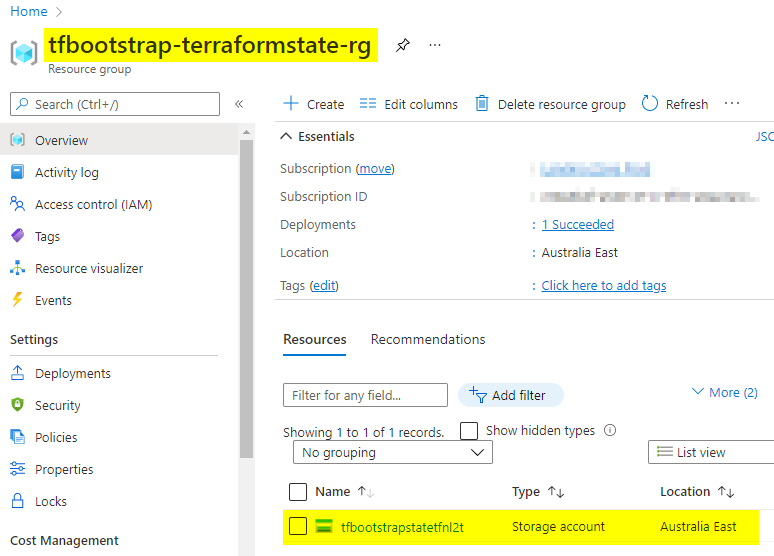
Running through ADO should yield us a usable storage account within a brand-new resource group:
Where to from here
Having dealt with foundations, we should be able to capture output of this step (we mostly care about storage account name as it’s got some randomness in it) and feed it to Terraform backend provider. We’ll cover it in the next part of this series.
Conclusion
Existing solutions in this space have so far relied on either PowerShell or az cli to do the job. That’s still doable but can get a bit bulky, especially if we want to query outputs. Now that Bicep support is landing in AzureResourceManagerTemplateDeploymentV3 directly, we will likely see this as a recommended approach.
This article is part of the C# Advent Series. Christmas has a special place in our hearts and this event is also a wonderful way to help build up the C# community. Do check out awesome content from other authors!
There’s a couple of things about Christmas in Southern Hemisphere that tends to hit us pretty hard each year: first, the fact that it is summer and it’s scorching hot outside. And second – is a customary closedown of almost all businesses (which probably started as response to the first point). Some businesses, however, keep boxing on.
One of our clients is into cryptocurrency mining and they could not care less about staff wanting time off to spend with family. Their only workforce are GPUs, and these devices can work 24/7. However, with temperatures creeping up, efficiency takes a hit. Also, other sad things can happen:
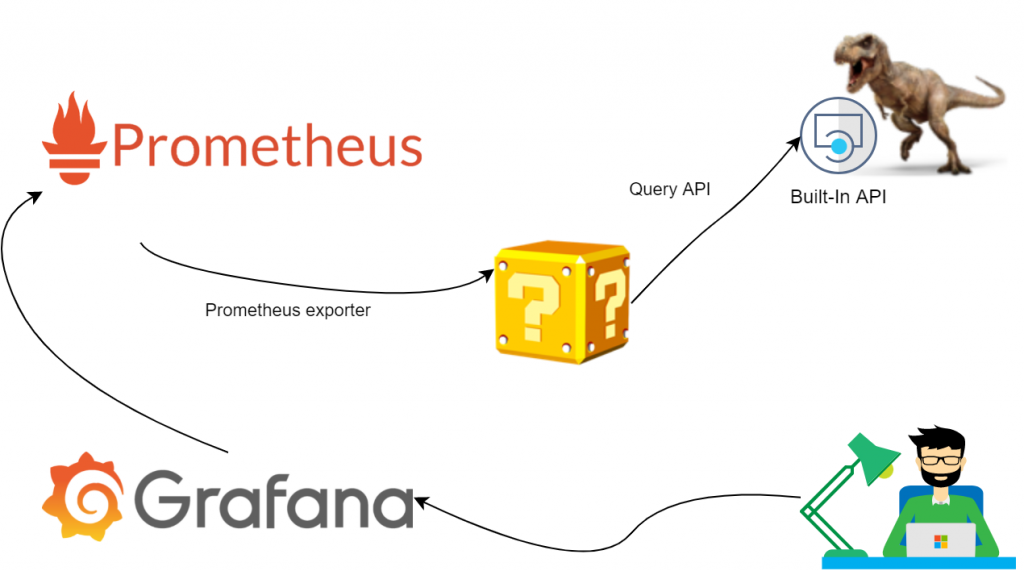
Solution design
Our first suggestion was to use our trusty ELK+G and poll extra data from NVIDIA SMI tool, but we soon figured out that this problem has already been solved for us. Mining software nowadays got extremely sophisticated (and obfuscated) – it now comes with own webserver and API. So, we simplified a bit:
All we have to do here would be to stand up an exporter and set up a few dashboards. Easy.
Hosted Services
We essentially need to run two services: poll underlying API and expose metrics in Prometheus-friendly format. We felt .NET Core Generic host infrastructure would fit very well here. It allows us to bootstrap an app, add Hosted Services and leave plumbing to Docker. The program ended up looking like so:
class Program
    {
        private static async Task Main(string[] args)
        {
            using IHost host = CreatHostBuilder(args).Build();

            await host.RunAsync();
        }
        static IHostBuilder CreateHostBuilder(string[] args) =>
            Host.CreateDefaultBuilder(args)
                .ConfigureAppConfiguration((configuration) =>
                {
                    configuration.AddEnvironmentVariables("TREX")
; // can add more sources such as command line
                })
                .ConfigureServices(c =>
                {
                    c.AddSingleton<MetricCollection>(); // This is where we will keep all metrics state. hence singleton
                    c.AddHostedService<PrometheusExporter>(); // exposes MetricCollection
                    c.AddHostedService<TRexPoller>(); // periodically GETs status and updates MetricCollection
                });
    }
Defining services
The two parts of our applicatgion are TRexPoller and PrometheusExporter. Writing both is trivial and we won’t spend much time on the code there. Feel free to check it out on GitHub. The point to make here is it has never been easier to focus on business logic and leave heavy lifting to respective NuGet packages.
Crafting the models
The most important part of our application is of course telemetry. We grabbed a sample json response from the API and used an online tool to convert that into C# classes:
// generated code looks like this. A set of POCOs with each property decorated with JsonProperty that maps to api response
public partial class Gpu
{
    [JsonProperty("device_id")]
    public int DeviceId { get; set; }
    [JsonProperty("hashrate")]
    public int Hashrate { get; set; }
    [JsonProperty("hashrate_day")]
    public int HashrateDay { get; set; }
    [JsonProperty("hashrate_hour")]
    public int HashrateHour { get; set; }
...
}
Now we need to define metrics that Prometheus.Net can later discover and serve up:
// example taken from https://github.com/prometheus-net/prometheus-net#quick-start
private static readonly Counter ProcessedJobCount = Metrics
    .CreateCounter("myapp_jobs_processed_total", "Number of processed jobs.");
...
ProcessJob();
ProcessedJobCount.Inc();
Turning on lazy mode
This is where we’ve got so inspired by our “low code” solution that we didn’t want to get down to hand-crafting a bunch of class fields to describe every single value the API serves. Luckily, C#9 has a new feature just for us: Source Code Generators to the rescue! We’ve covered the basic setup before, so we’ll skip this part here and move on to the Christmas magic part.
Let Code Generators do the work for us
Before we hand everything over to robots, we need to set some basic rules to control the process. Custom attributes looked like a sensible way to keep all configuration local with the model POCOs:
[AddInstrumentation("gpus")] // the first attribute prompts the generator to loop through the properties and search for metrics
public partial class Gpu
{
    [JsonProperty("device_id")]
    public int DeviceId { get; set; }
    [JsonProperty("hashrate")]
    /*
     * the second attribute controls which type the metric will have as well as what labels we want to store with it.
     * In this example, it's a Gauge with gpu_id, vendor and name being labels for grouping in Prometheus
     */
    [Metric("Gauge", "gpu_id", "vendor", "name")]
    public int Hashrate { get; set; }
    [JsonProperty("hashrate_day")]
    [Metric("Gauge", "gpu_id", "vendor", "name")]
    public int HashrateDay { get; set; }
    [JsonProperty("hashrate_hour")]
    [Metric("Gauge", "gpu_id", "vendor", "name")]
    public int HashrateHour { get; set; }
Finally, the generator itself hooks into ClassDeclarationSyntax and looks for well-known attributes:
public void OnVisitSyntaxNode(SyntaxNode syntaxNode)
    {
        if (syntaxNode is ClassDeclarationSyntax cds && cds.AttributeLists
            .SelectMany(al => al.Attributes)
            .Any(a => (a.Name as IdentifierNameSyntax)?.Identifier.ValueText == "AddInstrumentation"))
        {
            ClassesToProcess.Add(cds);
        }
    }
Once we’ve got our list, we loop through each property and generate a dictionary of Collector objects.
var text = new StringBuilder(@"public static Dictionary<string, Collector> GetMetrics(string prefix)
    {
        var result = new Dictionary<string, Collector>
        {").AppendLine();
foreach (PropertyDeclarationSyntax p in properties)
{
    var jsonPropertyAttr = p.GetAttr("JsonProperty");
    var metricAttr = p.GetAttr("Metric");
    if (metricAttr == null) continue;
    var propName = jsonPropertyAttr.GetFirstParameterValue();
    var metricName = metricAttr.GetFirstParameterValue(); // determine metric type
    if (metricAttr.ArgumentList.Arguments.Count > 1)
    {
        var labels = metricAttr.GetTailParameterValues(); // if we have extra labels to process - here's our chance
        text.AppendLine(
            $"{{$\"{{prefix}}{attrPrefix}_{propName}\", Metrics.Create{metricName}($\"{{prefix}}{attrPrefix}_{propName}\", \"{propName}\", {commonLabels}, {labels}) }},");
    }
    else
    {
        text.AppendLine(
            $"{{$\"{{prefix}}{attrPrefix}_{propName}\", Metrics.Create{metricName}($\"{{prefix}}{attrPrefix}_{propName}\", \"{propName}\", {commonLabels}) }},");
    }
}
text.AppendLine(@"};
                return result;
            }");
In parallel to defining storage for metrics, we also need to generate code that will update values as soon as we’ve heard back from the API:
private StringBuilder UpdateMetrics(List<MemberDeclarationSyntax> properties, SyntaxToken classToProcess, string attrPrefix)
{
    var text = new StringBuilder($"public static void UpdateMetrics(string prefix, Dictionary<string, Collector> metrics, {classToProcess} data, string host, string slot, string algo, List<string> extraLabels = null) {{");
    text.AppendLine();
    text.AppendLine(@"if(extraLabels == null) {
                            extraLabels = new List<string> {host, slot, algo};
                        }
                        else {
                            extraLabels.Insert(0, algo);
                            extraLabels.Insert(0, slot);
                            extraLabels.Insert(0, host);
                        }");
    foreach (PropertyDeclarationSyntax p in properties)
    {
        var jsonPropertyAttr = p.GetAttr("JsonProperty");
        var metricAttr = p.GetAttr("Metric");
        if (metricAttr == null) continue;
        var propName = jsonPropertyAttr.GetFirstParameterValue();
        var metricName = metricAttr.GetFirstParameterValue();
        var newValue = $"data.{p.Identifier.ValueText}";
        text.Append(
            $"(metrics[$\"{{prefix}}{attrPrefix}_{propName}\"] as {metricName}).WithLabels(extraLabels.ToArray())");
        switch (metricName)
        {
            case "Counter": text.AppendLine($".IncTo({newValue});"); break;
            case "Gauge": text.AppendLine($".Set({newValue});"); break;
        }
    }
    text.AppendLine("}").AppendLine();
    return text;
}
Bringing it all together with MetricCollection
Finally, we can use the generated code to bootstrap metrics on per-model basis and ensure we correctly handle updates:
internal class MetricCollection
{
    private readonly Dictionary<string, Collector> _metrics;
    private readonly string _prefix;
    private readonly string _host;
    public MetricCollection(IConfiguration configuration)
    {
        _prefix = configuration.GetValue<string>("exporterPrefix", "trex");
        _metrics = new Dictionary<string, Collector>();
        // this is where declaring particl classes and generating extra methods makes for seamless development experience
        foreach (var (key, value) in TRexResponse.GetMetrics(_prefix)) _metrics.Add(key, value);
        foreach (var (key, value) in DualStat.GetMetrics(_prefix)) _metrics.Add(key, value);
        foreach (var (key, value) in Gpu.GetMetrics(_prefix)) _metrics.Add(key, value);
        foreach (var (key, value) in Shares.GetMetrics(_prefix)) _metrics.Add(key, value);
    }
    public void Update(TRexResponse data)
    {
        TRexResponse.UpdateMetrics(_prefix, _metrics, data, _host, "main", data.Algorithm);
        DualStat.UpdateMetrics(_prefix, _metrics, data.DualStat, _host, "dual", data.DualStat.Algorithm);

        foreach (var dataGpu in data.Gpus)
        {
            Gpu.UpdateMetrics(_prefix, _metrics, dataGpu, _host, "main", data.Algorithm, new List<string>
            {
                dataGpu.DeviceId.ToString(),
                dataGpu.Vendor,
                dataGpu.Name
            });
            Shares.UpdateMetrics(_prefix, _metrics, dataGpu.Shares, _host, "main", data.Algorithm, new List<string>
            {
                dataGpu.GpuId.ToString(),
                dataGpu.Vendor,
                dataGpu.Name
            });
        }
    }
}
Peeking into generated code
Just to make sure we’re on the right track, we looked at generated code. It ain’t pretty but it’s honest work:
public partial class Shares {
public static Dictionary<string, Collector> GetMetrics(string prefix)
                {
                    var result = new Dictionary<string, Collector>
                    {
{$"{prefix}_shares_accepted_count", Metrics.CreateCounter($"{prefix}_shares_accepted_count", "accepted_count", "host", "slot", "algo", "gpu_id", "vendor", "name") },
{$"{prefix}_shares_invalid_count", Metrics.CreateCounter($"{prefix}_shares_invalid_count", "invalid_count", "host", "slot", "algo", "gpu_id", "vendor", "name") },
{$"{prefix}_shares_last_share_diff", Metrics.CreateGauge($"{prefix}_shares_last_share_diff", "last_share_diff", "host", "slot", "algo", "gpu_id", "vendor", "name") },
...
};
                            return result;
                        }
public static void UpdateMetrics(string prefix, Dictionary<string, Collector> metrics, Shares data, string host, string slot, string algo, List<string> extraLabels = null) {
if(extraLabels == null) {
                                    extraLabels = new List<string> {host, slot, algo};
                                }
                                else {
                                    extraLabels.Insert(0, algo);
                                    extraLabels.Insert(0, slot);
                                    extraLabels.Insert(0, host);
                                }
(metrics[$"{prefix}_shares_accepted_count"] as Counter).WithLabels(extraLabels.ToArray()).IncTo(data.AcceptedCount);
(metrics[$"{prefix}_shares_invalid_count"] as Counter).WithLabels(extraLabels.ToArray()).IncTo(data.InvalidCount);
(metrics[$"{prefix}_shares_last_share_diff"] as Gauge).WithLabels(extraLabels.ToArray()).Set(data.LastShareDiff);
...
}
}
Conclusion
This example barely scratches the surface of what’s possible with this feature. Source code generators are extremely helpful when we deal with tedious and repetitive development tasks. It also helps reduce maintenance overheads by enabling us to switch to declarative approach. I’m sure we will see more projects coming up where this feature will become central to the solution.
If not already, do check out the source code in GitHub. And as for us, we would like to sign off with warmest greetings of this festive season and best wishes for happiness in the New Year.
Windows PowerShell is an extremely useful tool when it comes to quickly churning out useful bits of automation. If these scripts run unattended, we’d often sprinkle logs to aid troubleshooting. What one does with these logs totally depends on application, but we’ve seen some decent Sentinel deployments with alerting and hunting queries (which is beside the point of today’s post).
We recently had a mysterious issue where we tried ingesting a log file into Azure Log Analytics Workspace but it never came through…
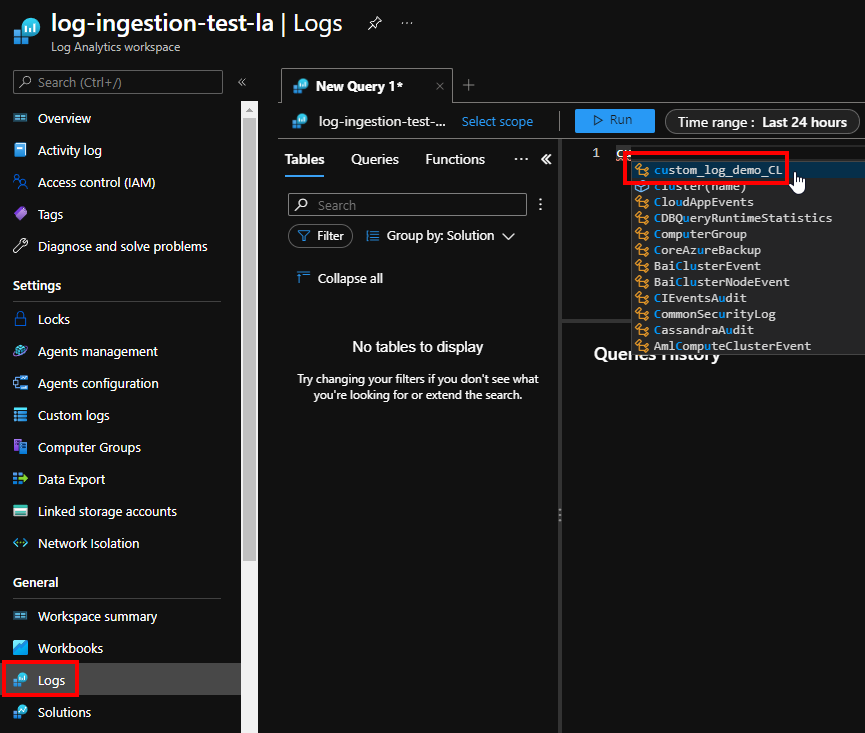
Ingesting custom logs
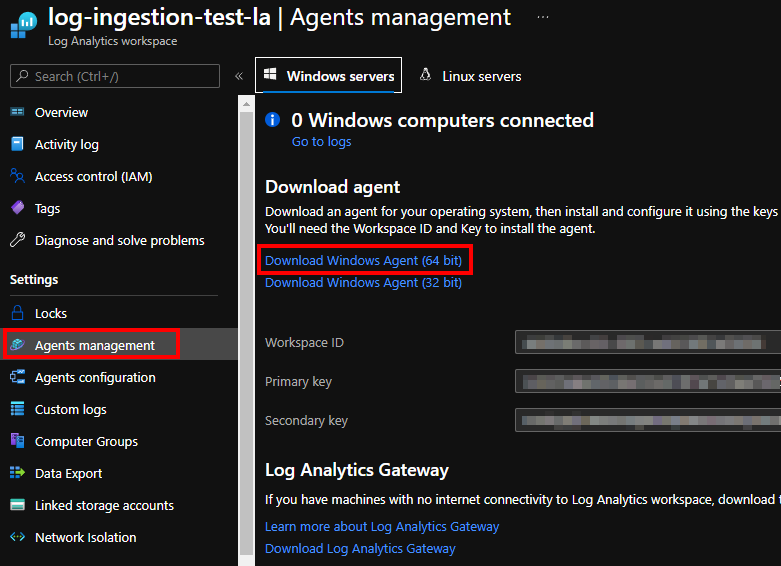
Generally speaking, this is a very simple operation. Spin up log analytics workspace and add a “Custom Logs” entry:
Finally, make sure to install Monitoring Agent on target machine and that’s it:
After a little while, new log entries would get beamed up to Azure:
Here we let our scripts run and went ahead to grab some drinks. But after a couple of hours and few bottles of fermented grape juice we realised that nothing happened…
What could possibly go wrong?
Having double- and triple- checked our setup everything looked solid. For the sake of completeness, our PowerShell script was doing something along the following lines:
$scriptDir = "."
$LogFilePath = Join-Path $scriptDir "log.txt"

# we do not overwrite the file. we always append
if (!(Test-Path $LogFilePath))
{
    $LogFile = New-Item -Path $LogFilePath -ItemType File
} else {
    $LogFile = Get-Item -Path $LogFilePath
}

 "$(Get-Date -Format "yyyy-MM-dd HH:mm:ss") Starting Processing" | Out-File $LogFile -Append

# do work

"$(Get-Date -Format "yyyy-MM-dd HH:mm:ss") Ending Processing" | Out-File $LogFile -Append
Nothing fancy, just making sure timestamps are in a supported format. We also made sure we do not rotate the file as log collection agent will not pick it up. So, we turned to the documentation:
The log must either have a single entry per line or use a timestamp matching one of the following formats at the start of each entry – ✓ check
The log file must not allow circular logging or log rotation, where the file is overwritten with new entries – ✓ check
For Linux, time zone conversion is not supported for time stamps in the logs – not our case
and finally, the log file must use ASCII or UTF-8 encoding. Other formats such as UTF-16 are not supported – let’s look at that a bit closer
Figuring this out
Looking at Out-File, we see that default Encoding is utf8NoBOM. This is exactly what we’re after, but examining our file revealed a troubling discrepancy:
That would explain why Monitoring Agent would not ingest our custom logs. Fixing this is rather easy, just set default output encoding at the start of the script: $PSDefaultParameterValues['Out-File:Encoding'] = 'utf8'.
But the question of how that could happen still remained…
Check your version
After a few more hours trying various combinations of inputs and PowerShell parameters, we checked $PSVersionTable.PSVersion and realised we ran PS5.1. This is where it started to click: documentation by default pointed us to the latest 7.2 LTS where the default encoding is different! Indeed, rewinding to PS5.1 reveals that the default used to be unicode: UTF-16 with the little-endian byte order.
Conclusion
Since PowerShell 7.x+ is not exclusive to Windows anymore, Microsoft seems to have accepted a few changes dependent on underlying behaviours of .NET frameworks these were built upon. There’s in fact an extensive list of breaking changes that mention encoding a few times. We totally support the need to advance tooling and converging tech. We, however, hope that as Monitoring Agent matures, more of these restrictions will get removed and this will not be an issue anymore. Until then – happy cloud computing!
Every now and then we need to set ourselves up a new dev machine. And 99% of the time, that means setting up git source control. We believe that password authentication is a no-no, so we needed a quick way to bootstrap fresh Windows 10 install to use SSH key pairs.
This Is The Way
Setting things up would involve making sure OpenSSH is installed, ssh-agent is running and key pair is generated and registered with the agent. Finally, we’d go to http://dev.azure.com/{orgname}/_usersSettings/keys and paste public key in. This however is a laborious task, and most sources online seem to suggest doing it that way. We decided to simplify:
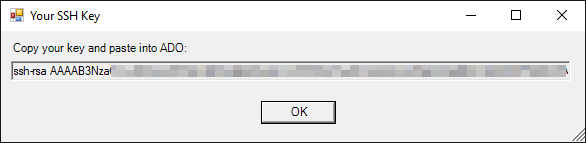
This script will take care of prerequisites (if run as admin) or try to generate a key in case everything else is done. Then it’ll paint a small window with public key:
The script makes a couple of assumptions about existing keys and will just roll with defaults. Nothing fancy at all. We also wanted to automate posting to ADO, but that did not happen (see below).
Setting up Visual Studio
Next order of business was to set up the IDE. It appears, Visual Studio would default to using password credentials, unless we set a GIT_SSH environment variable and point it to ssh.exe from OpenSSH distribution. The script will take care of that too.
Posting public key to Azure DevOps (not really)
ADO does not have an API for managing SSH keys. Therefore, generating PATs and service credentials will not going to help. We can try to make it happen by reverse engineering the front-end call and hoping it’s isolated enough for us to be able to repeat the procedure. Turns out, it’s indeed a matter of sending payload to https://dev.azure.com/{org}/_apis/Contribution/HierarchyQuery – this looks like a common message bus for ADO Extensions to post updates to:
The first issue waits us right in the payload: dataProviderContext.targetAccounts needs a value, but we could not find where to fetch it from. It’s loaded along with other content on the page, but opening it kind of eliminates the purpose of automating this task. And unfortunately, that’s not the only obstacle we’ve hit there.
Authentication
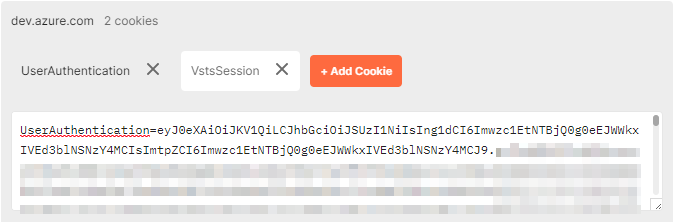
Front end relies on cookies to authenticate this request. We found that the only one we really need is UserAuthentication:
The value is standard JWT, issued by app.vstoken.visualstudio.com. Getting it requires us to register an app and have users go through oAuth flow. Also, since ADO works on concept of tenants and organisations, it is tricky to get the correct tenancy without interactive login. It seems doable, but we have deemed it to be not worth the effort. <sad_face_emoji_here>
Conclusion
Despite not being able to reach our fully automated nirvana, we’ve got to a state where we’d prep the system for SSH and surface the public key to copy-paste. It seems that reverse engineering the ADO frontend and extracting token from there is very much achievable, but at the stage we’d not pursue it. Publishing the code on GitHub gives us a faint hope the Community may push it across the line.
For quite some time we wanted to be able to securely access our on-prem services, such as local NAS, IoT hub and Grafana. We have tried setting up PPTP but quickly realised that the technology has been long compromised. IPsec would be a great option, but it requires both ends of tunnel to have static IP addresses.
OpenVPN and AWS
Theoretically we can simply spin up an EC2 instance from the marketplace or even configure it manually, but we were feeling adventurous.
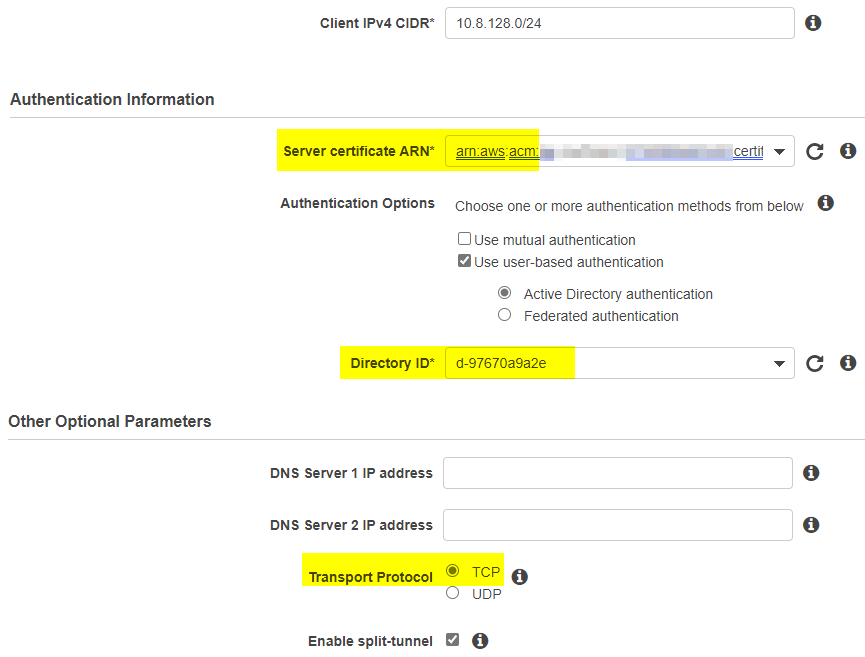
Setting up Client VPN Endpoint on AWS effectively stands up managed OpenVPN instance. We ended up not going with it (and we’ll get to reasons in a few moments), but let’s quickly go through steps one would need to take to pull it off. The setup is fairly complex and involved:
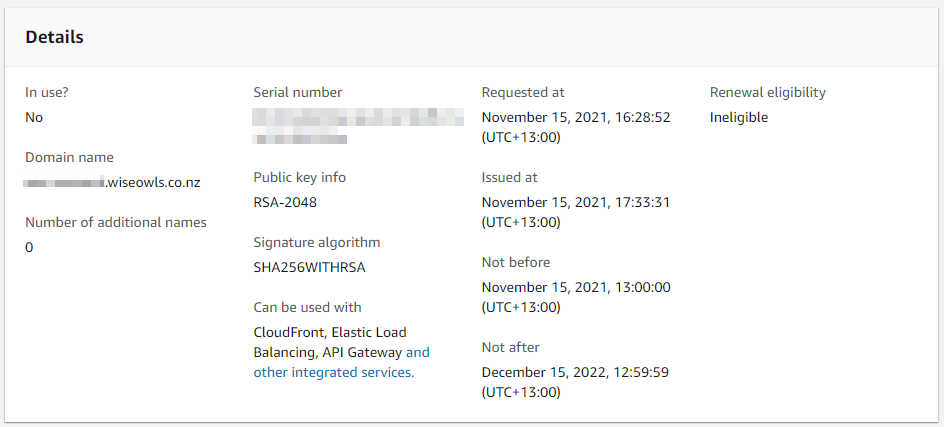
Set up server certificate in AWS Certificate manager. Public certificates are free, but we had to go through DNS-based ownership validation, which is not that hard but takes anywhere between 15 minutes and few hours and we were not planning to use that domain name to connect to our server anyway.
Make sure to pick up IP range that’s big enough (at least /22) and does not overlap with given VPC
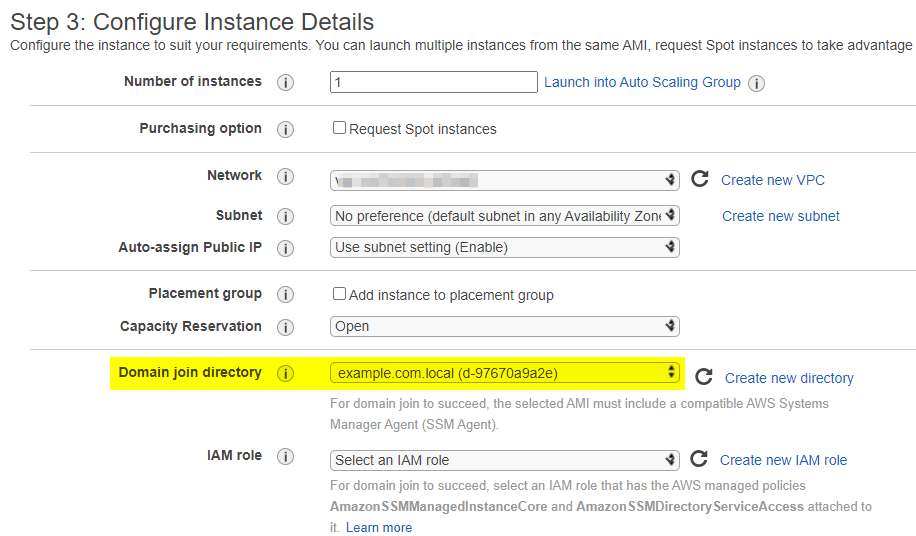
Stand up some sort of Directory Service for user authentication. Cognito is not an option, and we don’t have AD readily available. Creating full fat AD just for VPN seemed overkill, so we created Simple AD (which is still surplus to needs). It would’ve been fine, but to manage it, we had to stand up a Windows EC2. We of course joined it into the domain. And this stage it became obvious, that creating a virtual EC2 appliance would probably be way easier, but we decided to proceed for the sake of science.
Finally, coming back to VPC we created a Gateway and VPN itself. One thing to keep in mind here is Transport protocol: Mikrotik only supports TCP. Yuck.
All we have left to do now would be to download .ovpn file and use it to set up our router. But unfortunately, this is where our shenanigans will have to stop: RouterOS does not support AES-256-GCM.
L2TP scripts
Since we were standing up compute resources anyway, our goal shifted towards finding the easiest way to set things up. And IPsec VPN Server Auto Setup Scripts delivered just that! Just running wget https://git.io/vpnquickstart -O vpn.sh && sudo sh vpn.sh on a fresh EC2 instance did the trick for us. One thing to remember is to save auto-generated credentials the script prints on exit – that’s almost all VPN server setup done.
Since we had a router on the other end and wanted access to internal resources, we had to log in again and add couple of routes into /etc/ppp/ip-up.local:
#!/bin/bash
/sbin/route add -net 192.168.99.0/24 gw $4 # see for parameters: https://tldp.org/HOWTO/PPP-HOWTO/x1455.html
We also wanted to use conditional routing on the client side and only route certain client machines through the tunnel. For that, /etc/sysconfig/iptables needed a little update:
# Modified by hwdsl2 VPN script
*nat
:POSTROUTING ACCEPT [0:0]
# autogenerated code here
-A POSTROUTING -s 192.168.99.0/24 -j MASQUERADE # adding our own network so it gets NATted

COMMIT
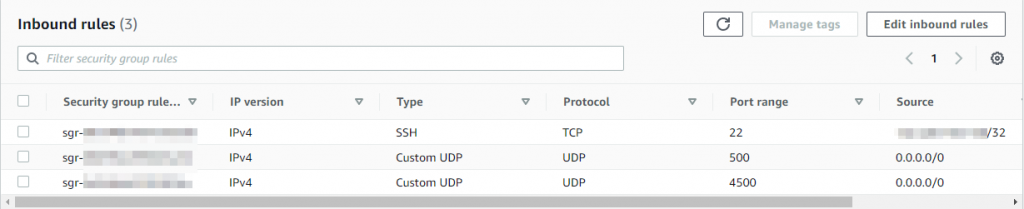
Finally, we needed to enable L2TP through AWS NSG:
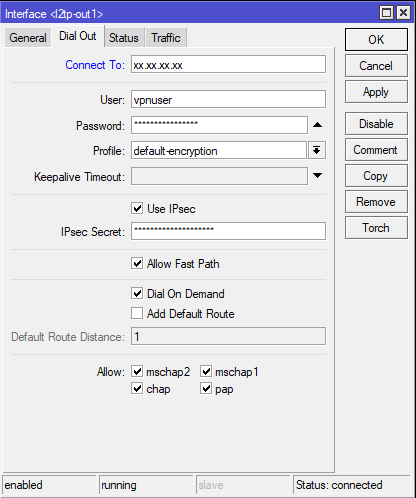
Mikrotik setup
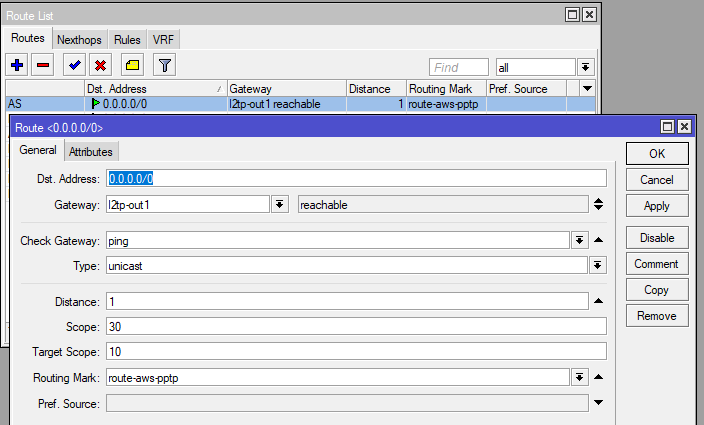
With WinBox, setting up VPN in RouterOS is pretty straightforward:
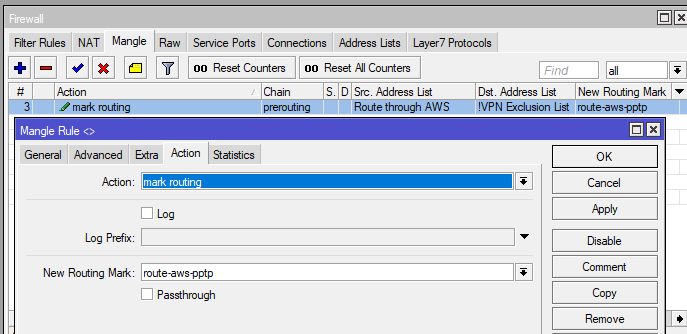
you may notice we opted to not use the VPN as default route. This solution comes with tradeoffs, but in our case, we wanted to only tunnel specific clients. For that we have set up policy routing. Added a Mangle rule where we mark all connections from chosen hosts and then assigned new routing table to these packets:
Conclusion
It is a bit unfortunate that in 2021 Mikrotik still does not properly support OpenVPN. On the other hand, it exposes a lot of configurability to cater for uncommon network layouts. And now we got a bit closer to realising its full potential.
A client reached out to us with a weird problem. Their ASP.NET WebAPI project (somewhat legacy tech) needed to communicate with an application running on a mainframe (dinosaur-grade legacy tech). But they were having XML serialisation issues…
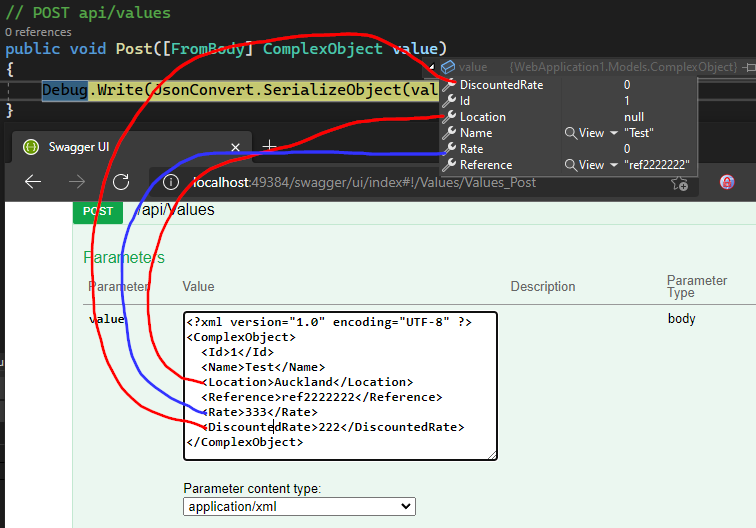
They had a test XML payload, but only half of that kept coming across the wire:
broken serialisation – missing fields
first thing we suspected was missing DataContract/DataMember attributes, but everything seemed to be okay:
[DataContract(Name = "ComplexObject", Namespace = "")]
public class ComplexObject
{
    [DataMember]
    public int Id { get; set; }
    [DataMember]
    public string Name { get; set; }
    [DataMember]
    public string Location { get; set; }
    [DataMember]
    public string Reference { get; set; }
    [DataMember]
    public double Rate { get; set; }
    [DataMember]
    public double DiscountedRate { get; set; }
}
After scratching our heads for a little while and trying different solution from across the entirety of StackOverflow, we managed to dig up a piece of documentation that explained this behaviour:
Data members of base classes (assuming serialiser will apply these rules upwards recursively);
Data members in alphabetical order (bingo!);
Data members specifically numbered in decorating attribute;
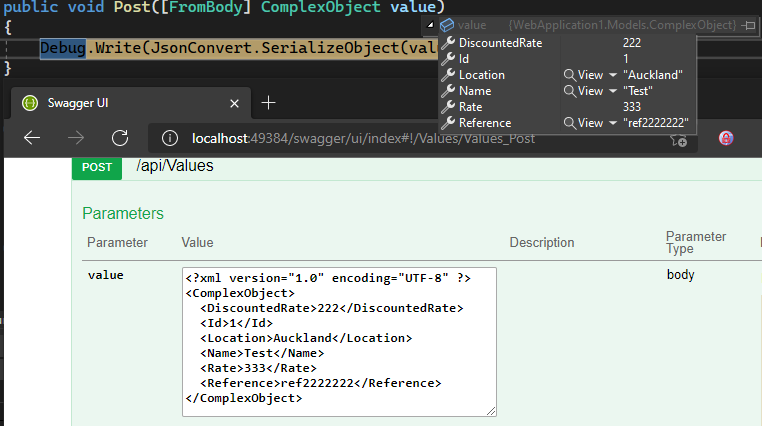
With the above in mind, we got the following payload to serialise successfully:
Key difference for us was the fact that XmlSerializer does not require any decorations and works out of the box. While DataContractSerializer needs us to make code changes. In our project everything was already set up with DataContract, so we did not have to change anything.
By default, WebAPI projects come configured to leverage DataContractSerializer. It however pays to know that in case of any issues we can switch to use XMLSerializer:
public static class WebApiConfig
{
    public static void Register(HttpConfiguration config)
    {
        config.Formatters.XmlFormatter.UseXmlSerializer = true; // global setting for all types
        config.Formatters.XmlFormatter.SetSerializer<ComplexObject>(new XmlSerializer(typeof(ComplexObject))); // overriding just for one type
Setting order
Yet another option to deal with ASP.NET XML serialisation issues would be to define property order explicitly:
[DataContract(Name = "ComplexObject", Namespace = "")]
public class ComplexObject
{
    [DataMember(Order = 1)]
    public int Id { get; set; }
    [DataMember(Order = 2)]
    public string Name { get; set; }
    [DataMember(Order = 3)]
    public string Location { get; set; }
    [DataMember(Order = 4)]
    public string Reference { get; set; }
    [DataMember(Order = 5)]
    public double Rate { get; set; }
    [DataMember(Order = 6)]
    public double DiscountedRate { get; set; }
}
Conclusion
XML serialisation has been around since the beginning of .NET. And even though it may seem that JSON has taken over, XML isn’t going anywhere any time soon. It is good to know we have many ways to deal with it should we ever need to.
We’ve already looked at way to implement SQL functions via method translation. That went reasonably well, but next time we had to do something similar we discovered that our code is broken with newer versions of EF Core. We fixed it again.
Not anymore
Looking through changelogs, we noticed that EF Core 2.0 came with support for mapping scalar functions. It is remarkably simple to set up:
public class MyDbContext : DbContext
    {

        [DbFunction("DECRYPTBYPASSPHRASE", IsBuiltIn = true, IsNullable = false)]
        public static byte[] DecryptByPassphrase(string pass, byte[] ciphertext) => throw new NotImplementedException();

        [DbFunction("DECRYPTBYKEY", IsBuiltIn = true, IsNullable = false)]
        public static byte[] DecryptByKey(byte[] ciphertext) => throw new NotImplementedException();
...
and even easier to use:
var filteredSet = Set
                .Select(m => new Model
                {
                    Id = m.Id,
                    Decrypted = MyDbContext.DecryptByPassphrase("TestPassword", m.Encrypted).ToString(),
                    Decrypted2 = MyDbContext.DecryptByKey(m.Encrypted2).ToString(), // since the key's opened for session scope - just relying on it should do the trick
                }).ToList();
Initially the attribute was offering limited configuration options, but starting EF Core 5.0, this is not an issue.
One gotcha with DECRYPT* functions is they return varbinary. Trying to use our own EF.Functions.ConvertToVarChar is not going to work since we disabled custom plugins. We want to get rid of this code after all. But Apparently .ToString() works as intended:
SELECT [m].[Id], CONVERT(varchar(100), DECRYPTBYPASSPHRASE(N'TestPassword', [m].[Encrypted])) AS [Decrypted], CONVERT(varchar(100), DECRYPTBYKEY([m].[Encrypted2])) AS [Decrypted2], [t].[Id], [t].[IsSomething], [m].[Encrypted], [m].[Encrypted2]...
Full example source is in GitHub, along with other takes we decided to leave in place for history.
Conclusion
Defining custom EF functions was one of the biggest articles we wrote here. And finding out how to fit it together probably was the most challenging and time-consuming project we undertook in recorded history. One can say we totally wasted our time, but I’d like to draw a different conclusion. We had fun, learned something new and were able to appreciate the complexity behind Entity Framework – it is not just an engineering marvel – it is also a magical beast!