Reverse engineering an Android app part 3 — Extracting runtime secrets with Frida

Last time we traced the signing logic to Po.c, discovered the secrets come from a native library that decodes them at runtime, and hit a wall trying to statically reverse the XOR encoding. Time for plan B — if we can’t reverse the encoding, we’ll just read the decoded values from memory.

Why the obvious approaches don’t work

Before reaching for Frida, we tried a few shortcuts:

ApproachResult
Call Secrets.getXxx() directlyNeeds an instance, not static
Create new Secrets() instanceNative code only decodes at init
Hook the constructorApp has anti-Frida detection, crashes
Reverse XOR in the .soPosition-dependent key, too complex

The key insight: the app has already decoded the secrets and stored them in a Po.c instance sitting on the heap. We don’t need to trigger the decoding — we just need to find that instance and read its fields.

Heap scanning with Java.choose()

Frida’s Java.choose() walks the heap looking for live instances of a given class. Combined with reflection to bypass private field access, it’s exactly what we need:

Java.perform(function() {
    var PoC = Java.use("Po.c");

    var aField = PoC.class.getDeclaredField("a");
    var bField = PoC.class.getDeclaredField("b");
    var cField = PoC.class.getDeclaredField("c");
    aField.setAccessible(true);
    bField.setAccessible(true);
    cField.setAccessible(true);

    Java.choose("Po.c", {
        onMatch: function(instance) {
            console.log("partnerKey:    " + aField.get(instance));
            console.log("algorithmKey:  " + bField.get(instance));
            console.log("algorithmName: " + cField.get(instance));
        },
        onComplete: function() {}
    });
});
sequenceDiagram
    participant F as Frida
    participant H as JVM Heap
    participant I as Po.c instance
    F->>H: Java.choose("Po.c")
    H->>F: Found instance
    F->>I: reflection — get field "a"
    I-->>F: partnerKey
    F->>I: reflection — get field "b"
    I-->>F: algorithmKey
    F->>I: reflection — get field "c"
    I-->>F: algorithmName = HmacSHA1

Running the extraction

# Push frida-server to the device
adb push frida-server /data/local/tmp/
adb shell "chmod 755 /data/local/tmp/frida-server"
adb shell "/data/local/tmp/frida-server &"

# Launch the app and wait for it to fully load
adb shell am start -n com.example.app/.presentation.ui.MainActivity

# Attach and extract
frida -U -n "TargetApp" -l get_instance.js

And there it is — all three values printed to the console. The algorithm name was HmacSHA1, not HmacSHA256 as we’d assumed from static analysis. That one wrong assumption would have produced invalid signatures every time.

The takeaway

graph TD
    A["Static analysis — JADX + Apktool"] -->|finds| B["Where secrets live
How signing works"] C["Dynamic analysis — Frida"] -->|finds| D["Actual secret values
Actual algorithm"] B --> E["Complete picture"] D --> E

Static analysis tells you how the code works. Dynamic analysis tells you what it’s working with. For anything involving runtime-decoded secrets or obfuscated native code, you need both. We spent hours tracing through decompiled Java to understand the signing flow, and then five lines of Frida script gave us the actual values in seconds. The full toolkit: JADX for decompilation, Apktool for resources, Frida for runtime extraction. And a healthy distrust of your own assumptions. If you’re also interested in intercepting app traffic, we covered SSL unpinning on Android in a separate post.


Reverse engineering an Android app part 2 — Following the breadcrumbs

Last time we cracked open the APK and got readable-ish Java source from JADX. 24,744 classes, most with single-letter names. Now we need to find the API signing logic — a needle in a very obfuscated haystack.

Start with what you can grep

Obfuscation renames classes and methods, but it can’t rename string literals or crypto algorithm names. So we grep:

grep -r "signature\|HMAC\|hmac" decompiled/ --include="*.java"

This surfaces a handful of hits, including an interceptor class that adds signed parameters to every outgoing API request. Bingo — that’s our entry point.

Tracing the call chain

From the interceptor, we follow the method calls deeper:

graph TD
    A["HTTP Interceptor"] -->|calls| B["Po.c — SignatureEncryptor"]
    B -->|reads fields| C["a: partnerKey
b: algorithmKey
c: algorithmName"] B -->|calculates| D["HMAC signature"] C -->|populated by| E["Secrets.java — JNI bridge"] E -->|loads| F["libsecrets.so — native library"]

The SignatureEncryptor (obfuscated to Po.c) is where the signature gets calculated. JADX shows us the decompiled logic:

public final class c {
    private final String a;  // partnerKey
    private final String b;  // algorithmKey
    private final String c;  // algorithmName

    public final String a(long j) {
        String str = this.a + "|" + j;
        Mac mac = Mac.getInstance(this.c);
        mac.init(new SecretKeySpec(this.b.getBytes(), this.c));
        return Base64.encodeToString(mac.doFinal(str.getBytes()), 2);
    }
}

Every API request gets signed with these query parameters:

?t.p=PARTNER_ID             # hardcoded partner identifier
&t.k=PARTNER_KEY            # included in signature data
&appVersion=12.21.1         # app version from manifest
&s.expires=TIMESTAMP        # now + 1 day, in milliseconds
&signature=SIGNATURE         # Base64(HMAC-SHA1(algorithmKey, partnerKey + "|" + expires))

So the signature is an HMAC-SHA1 of the partner key concatenated with a pipe and the expiry timestamp, using a separate algorithm key as the HMAC secret. Three values we need to extract: the partner key, the algorithm key, and the algorithm name. But where do they come from?

Down the rabbit hole to native code

Tracing the constructor calls back, we find a Secrets.java class with JNI methods:

System.loadLibrary("secrets");

public native String getSignaturePartnerKey();
public native String getSignatureAlgorithmKey();
public native String getSignatureAlgorithmName();

The secrets aren’t in the Java code at all. They’re in libsecrets.so — a compiled native library, XOR-encoded and only decoded at runtime. Static analysis of the .so with radare2 reveals the decoding function, but the XOR scheme is position-dependent with a key derived from SHA256. Reversing it manually would take ages.

The wrong assumption

At this point, based on common Android patterns and the crypto imports we’d seen, we assumed the algorithm would be HmacSHA256. We were wrong — but we wouldn’t find that out until we extracted the actual runtime values. Static analysis can only take you so far.

graph LR
    A["Static analysis"] -->|suggested| B["HmacSHA256 ❌"]
    C["Runtime extraction"] -->|revealed| D["HmacSHA1 ✅"]

Next time: we bring in Frida to read the decoded secrets straight from memory.

Reverse engineering an Android app part 1 — Cracking it open

When a client asks us to build an integration against an API that has no public documentation, sometimes the only option is to go straight to the source — the app itself. We recently needed to understand how a particular Android app signs its API requests, and what followed was a proper detective story in three acts. This is act one: getting the source code.

XAPK is just a zip in a trenchcoat

Modern Android apps don’t ship as a single APK anymore. They come as XAPKs — bundles of split APKs, each serving a specific purpose:

graph TD
    A["app.xapk"] -->|unzip| B["base APK — code + resources"]
    A --> C["config.arm64_v8a.apk — native libs"]
    A --> D["config.en.apk — English resources"]
    A --> E["config.xxhdpi.apk — screen density assets"]

The split keeps downloads smaller — your phone only fetches what it needs. For us, it means an extra extraction step before we can get to the code.

# Rename and extract — it's literally a zip
unzip app.xapk -d xapk-extracted/

The base APK is where the interesting bits live. Inside it: 8 DEX files containing roughly 24,744 classes. That’s a lot of haystacks to search through.

Two tools, two perspectives

We reach for two decompilation tools that serve different purposes.

JADX converts DEX bytecode back into readable Java. It’s our go-to for understanding what the code does:

jadx -d output app.apk --show-bad-code -j 4

The --show-bad-code flag is important — when JADX can’t perfectly decompile something, it’ll show its best attempt as a comment rather than silently skipping it.

Apktool decodes resources and produces smali — a human-readable assembly for Dalvik. We need this when we want to modify and rebuild the app later:

apktool d app.apk -o output_dir
graph LR
    A["APK"] --> B["JADX"]
    A --> C["Apktool"]
    B --> D["Java source — for reading"]
    C --> E["Smali + resources — for modifying"]

But then everything’s obfuscated

Here’s what JADX gives us for a typical class:

public final class c {
    private final String a;
    private final String b;
    private final String c;

    public c(String str, String str2, String str3) {
        this.a = str;
        this.b = str2;
        this.c = str3;
    }
}

Single-letter class names, single-letter fields. This is R8 obfuscation at work — Google’s code shrinker renames everything to minimise APK size (and conveniently makes reverse engineering harder). Not all is lost though — string literals, annotation-preserved names, and network DTOs often survive the obfuscation. That’s where we start pulling the thread.

In the next post, we’ll trace through the obfuscated code to find where the app hides its API signing secrets.

Proper SSL certificates on your local network

There’s a quiet revolution happening in self-hosted software. Between Immich, Jellyfin, Home Assistant, Jitsi and a dozen others, you can build yourself quite a capable home or office setup without sending a single byte to the cloud. We’ve been running a stack of self-hosted services on our internal network for a while now — all neatly managed through Docker and Traefik as our reverse weapon of choice.

Everything was humming along nicely until one day we tried to set up Jitsi Meet for internal video calls. The web UI loaded fine, but the moment we tried to join a call — nothing. No camera, no microphone. Just a cryptic error about getUserMedia being undefined.

Browsers and their trust issues

Turns out, modern browsers flat out refuse to give web apps access to certain APIs unless the page is served over HTTPS. This isn’t some obscure edge case either — it’s a long list:

  • Camera & Microphone (getUserMedia) — the one that bit us
  • Service Workers — so no PWA features or push notifications
  • Geolocation API
  • Clipboard API
  • Web Bluetooth / USB / NFC

They call these “secure context” requirements, and there’s no way around them. Chrome, Firefox, Safari — they all enforce it. Localhost gets a pass, but anything on LAN at http://192.168.x.x or a local hostname does not.

The old way: certbot and HTTP-01

Normally you’d chuck certbot into the mix and call it a day. We’ve done that before for public-facing services. But HTTP-01 validation needs the ACME server to reach your host over port 80 from the internet. For internal services that’s a non-starter — we’d have to punch a hole in the firewall and expose an endpoint just to prove we own a domain. Always undesirable, always scary.

DNS-01 changes everything

There’s a DNS-01 validation method that we’d known about for years but always written off as “that complicated thing that needs programmable DNS.” You had to be on Azure DNS, Route53, or Cloudflare — not your average registrar nameservers.

But then one day our annual domain renewal bill came in at a price that warranted churning providers. Since we were moving anyway, it made sense to park the zones in Azure DNS. And suddenly DNS-01 was on the table.

The interesting thing about DNS-01 is that it requires zero external exposure. The ACME server validates ownership by checking a TXT record — no inbound connections needed. And since Traefik supports it natively, we can get wildcard certs for *.yourdomain.co.nz that cover every internal service automagically.

The Traefik stack

Here’s our Traefik setup with DNS-01 via Azure DNS:

version: "3.3"

services:
  traefik:
    image: traefik:mimolette
    container_name: traefik
    restart: unless-stopped
    command:
      - "--entrypoints.web.address=:80"
      - "--entrypoints.websecure.address=:443"
      - "--entrypoints.websecure.http.tls.certResolver=le"
      - "--entrypoints.websecure.http.tls.domains[0].main=yourdomain.co.nz"
      - "--entrypoints.websecure.http.tls.domains[0].sans=*.yourdomain.co.nz"
      - "--providers.docker=true"
      - "--providers.docker.exposedbydefault=true"
      - "--certificatesresolvers.le.acme.dnschallenge=true"
      - "--certificatesresolvers.le.acme.dnschallenge.provider=azuredns"
      - "--certificatesresolvers.le.acme.email=admin@yourdomain.co.nz"
      - "--certificatesresolvers.le.acme.storage=/letsencrypt/acme.json"
    ports:
      - "80:80"
      - "443:443"
    environment:
      - "AZURE_SUBSCRIPTION_ID=your-subscription-id"
      - "AZURE_RESOURCE_GROUP=dns-rg"
      - "AZURE_CLIENT_ID=your-client-id"
      - "AZURE_TENANT_ID=your-tenant-id"
      - "AZURE_CLIENT_SECRET=your-client-secret"
      - "AZURE_DNS_ZONE=yourdomain.co.nz"
    volumes:
      - "./traefik_data:/letsencrypt"
      - "/var/run/docker.sock:/var/run/docker.sock:ro"
    networks:
      - default
      - jitsi_default

networks:
  default:
  jitsi_default:
    external: true

The magic is in the entrypoints config — by setting certResolver=le and specifying the domain with a wildcard SAN at the entrypoint level, every service that Traefik picks up automatically gets a valid cert. No per-service certificate config needed.

There’s a nice security bonus here too. Since our DNS zone is public, you might worry about advertising all your internal service hostnames as individual A or CNAME records for the world to see. But with a wildcard cert we only need a single *.yourdomain.co.nz DNS record pointing at Traefik’s local IP — yes, a public DNS record pointing at 192.168.1.x. It’s perfectly valid, and it means nobody on the outside can enumerate your internal services from DNS. Traefik handles the routing based on the Host header, so the individual service names never appear in your zone file.

Adding Jitsi to the mix

With Traefik handling TLS, the Jitsi stack just needs to serve plain HTTP and let Traefik do the rest:

version: "3.3"

services:
  web:
    image: jitsi/web:stable
    restart: unless-stopped
    environment:
      - PUBLIC_URL=https://meet.yourdomain.co.nz
      - DISABLE_HTTPS=1
      - ENABLE_LOBBY=1
    labels:
      - "traefik.http.routers.jitsi.rule=Host(`meet.yourdomain.co.nz`)"
      - "traefik.http.services.jitsi.loadbalancer.server.port=80"
    networks:
      - default

# ... more stuff here ...

The key bits: DISABLE_HTTPS=1 tells Jitsi’s web container to not bother with its own certs, and the Traefik labels on the web service are all it takes to wire it up. The JVB (video bridge) still needs its UDP port exposed directly since WebRTC media doesn’t go through the reverse proxy.

Fire up both stacks, point meet.yourdomain.co.nz at your Docker host in local DNS, and you’ve got Jitsi with a proper green padlock. Camera and microphone work without a hitch.

Setting up the Azure service principal

The one remaining piece is giving Traefik permission to create those DNS TXT records. We need an Azure service principal scoped to just the DNS zone:

# Create a service principal with DNS Zone Contributor role
SUBSCRIPTION_ID="your-subscription-id"
RESOURCE_GROUP="dns-rg"
DNS_ZONE="yourdomain.co.nz"

SCOPE="/subscriptions/$SUBSCRIPTION_ID/resourceGroups/$RESOURCE_GROUP/providers/Microsoft.Network/dnszones/$DNS_ZONE"

az ad sp create-for-rbac \
  --name "traefik-acme" \
  --role "DNS Zone Contributor" \
  --scopes "$SCOPE"

# Output will include appId, password, and tenant — plug those into
# AZURE_CLIENT_ID, AZURE_CLIENT_SECRET, and AZURE_TENANT_ID respectively

Just remember the client secret expires (default is one year), so set yourself a calendar reminder or you’ll be debugging cert renewals in 12 months wondering what went wrong.

Running snapclient with pulseaudio on Raspbian

Multi-room audio is one of those things that sounds like it should be simple. You’ve got speakers, you’ve got a network — just pipe audio from A to B, right? Well, not quite. One of our clients wanted whole-house audio using Raspberry Pis as receivers with Snapcast, and while the server side was straightforward, getting snapclient to talk to PulseAudio on a fresh Raspbian Bookworm install turned into a bit of a detour.

The problem

Out of the box, snapclient on Raspbian Bookworm can’t connect to PulseAudio. The service starts, but there’s no sound — and the logs are full of connection refused errors. Since these Pis are headless appliances with no desktop environment, PulseAudio isn’t running in a user session where snapclient can reach it.

Going system-wide

The fix is to run PulseAudio as a system-wide daemon. Not everyone’s favourite approach — the PulseAudio docs will wag a finger at you — but for a headless audio appliance it’s the pragmatic choice.

First, we create a systemd service for PulseAudio:

sudo nano /etc/systemd/system/pulseaudio.service
[Unit]
Description=PulseAudio Daemon

[Install]
WantedBy=multi-user.target

[Service]
Type=simple
ExecStart=/usr/bin/pulseaudio --system --realtime --disallow-exit --no-cpu-limit
Restart=on-failure
LimitRTPRIO=1000
LimitNICE=-20
LimitMEMLOCK=256M

Making snapclient wait its turn

Next, we update the snapclient service to depend on PulseAudio — otherwise it might start before PulseAudio is ready and sulk about it:

sudo nano /etc/systemd/system/multi-user.target.wants/snapclient.service
[Unit]
Description=Snapcast client
Documentation=man:snapclient(1)
Wants=avahi-daemon.service
After=network-online.target time-sync.target sound.target avahi-daemon.service pulseaudio.service

[Service]
EnvironmentFile=-/etc/default/snapclient
ExecStart=/usr/bin/snapclient --logsink=system $SNAPCLIENT_OPTS
User=snapclient
Group=snapclient
Restart=on-failure

[Install]
WantedBy=multi-user.target

Note the pulseaudio.service added to the After= line.

Permissions and config

The snapclient user needs to be in the pulse-access group to talk to the system-wide PulseAudio daemon:

adduser snapclient pulse-access

And finally, we tell snapclient to actually use PulseAudio as its output:

sudo nano /etc/default/snapclient
START_SNAPCLIENT=true
SNAPCLIENT_OPTS="--player pulse"

Reboot the Pi and that’s it — audio sorted.

Android apps SSL Unpinning

Every now and then a client comes to us with an interesting challenge: they need to see what an Android app is actually sending over the wire. Maybe it’s a security audit, maybe they’re debugging an API integration, or maybe they just want to understand what data is leaving their devices. SSL pinning makes this tricky — the app refuses to trust anything other than its own bundled certificate. Here’s how we get around that.

What you’ll need

An Android device — this can be a physical phone, but it doesn’t have to be. Projects like Bliss OS let you run full Android on an x86 virtual machine, which is honestly more convenient for this kind of work — no cables, easy snapshots, and you can throw the VM away when you’re done. We’ve had good results running Bliss OS on Proxmox. Setting up an Android x86 VM is a topic for another day, but it’s worth knowing the option exists.

Software:

  • ADB (Android Debug Bridge)
  • Frida and Objection
  • patch-apk script for repackaging
  • Your proxy’s root certificate installed on the device

Patching the APK

The patch-apk script does the heavy lifting — it decompiles the APK, injects the Frida gadget, and repackages it. Sometimes things won’t build cleanly though. We’ve hit cases where special characters in resource files trip up apktool during reassembly. If that happens, hunt down the offending characters and sanitise them before rebuilding.

Intercepting traffic

Once you’ve got the patched APK installed on the device:

  1. Set up a proxy server with MITM support on your machine — we’ve used Fiddler but mitmproxy works too
  2. Configure the device to use your machine as its proxy
  3. Launch the patched app — it’ll appear stuck on a black screen initially, that’s normal

Now connect to it:

objection explore

Once Objection confirms it’s connected and linked to the instrumented app, the app will unfreeze. Then disable SSL pinning:

android sslpinning disable

Use the app as normal and watch the decrypted traffic flow through your proxy. All the API calls, payloads, headers — everything that was previously hidden behind the pinned certificate is now visible in plain text.

Building Terraform Quick Start repo part 3 – Azure DevOps API

This is the third part of the series following our humble endeavors to automate Terraform deployment tasks. First part here, second part here. With housekeeping out of the way, let’s get on to the content.

Now that we’ve got the Terraform part sorted, we’d like to take this project to a logical conclusion and build a reusable template for our future endeavors.

Compile or script?

Our initial idea was to write a small console app that would gather parameters and make all API calls. But this repository got us thinking, that it’s way more efficient to be able to just run the script off GitHub. So, we went to the drawing board and ended up with a Bash script. It ain’t much but it’s honest work.

Ultimately the script goes to create an ADO Project, imports its own GitHub repo into a newly created project and proceeds to set up the pipeline.

Streamlining process

With this tooling, we can now automate most of our process. We’d start by obtaining the parameters and setting up required credentials:

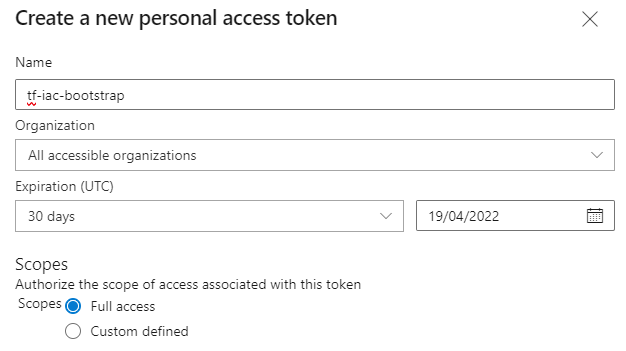
  1. In ADO we’ll need to create and grab a PAT of a user with permissions to manage the organization
Azure DevOps project creation API response
  1. In target Azure environment we need to start with finding the tenant id
  2. While we’re collecting intel, we’d also grab target Subscription Name and Id.
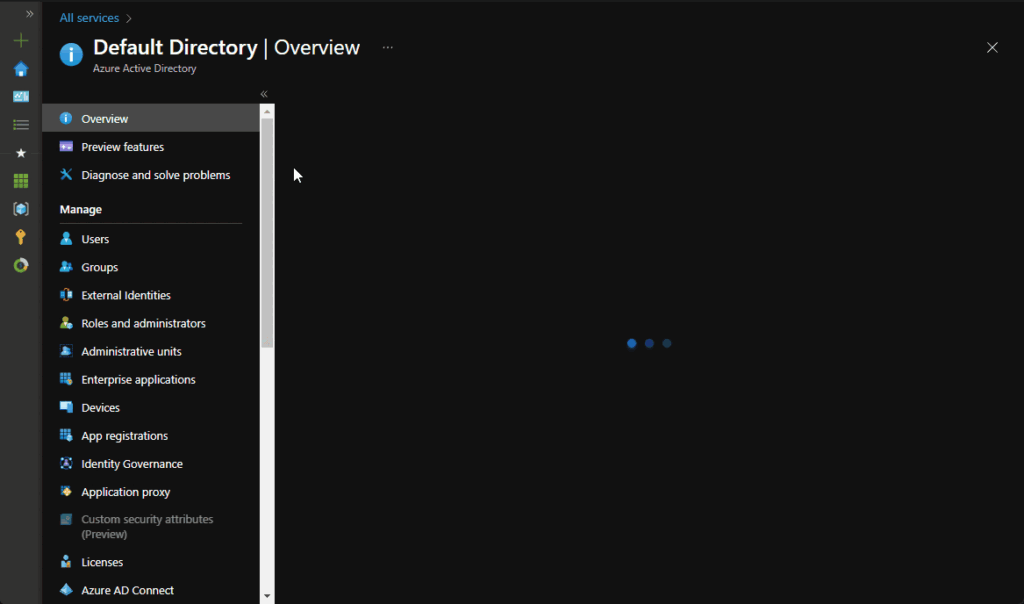
  3. Next step would be creating a Service Principal for Terraform.
Creating an Azure AD service principal for pipeline authentication
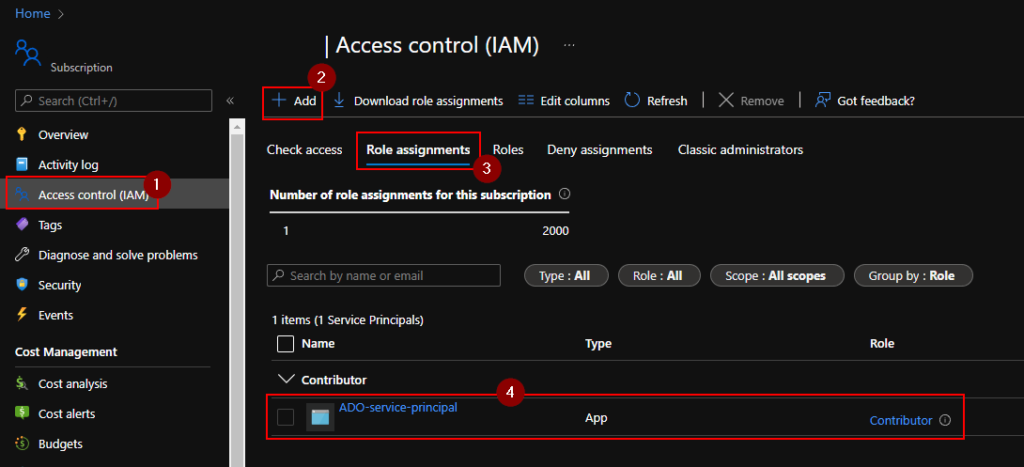
  1. By default, the principal has no permissions, so we’ll need to give it something like Contributor access on a Subscription we want to manage
Script execution output showing project setup progress
  1. Finally, it’s good practice to name Azure resources in such a way that it makes sense later. We come up with a distinct prefix for Terraform state storage account. Since storage accounts have strict naming policies, our prefix must be 2-13 characters long and must only contain alphanumerics.

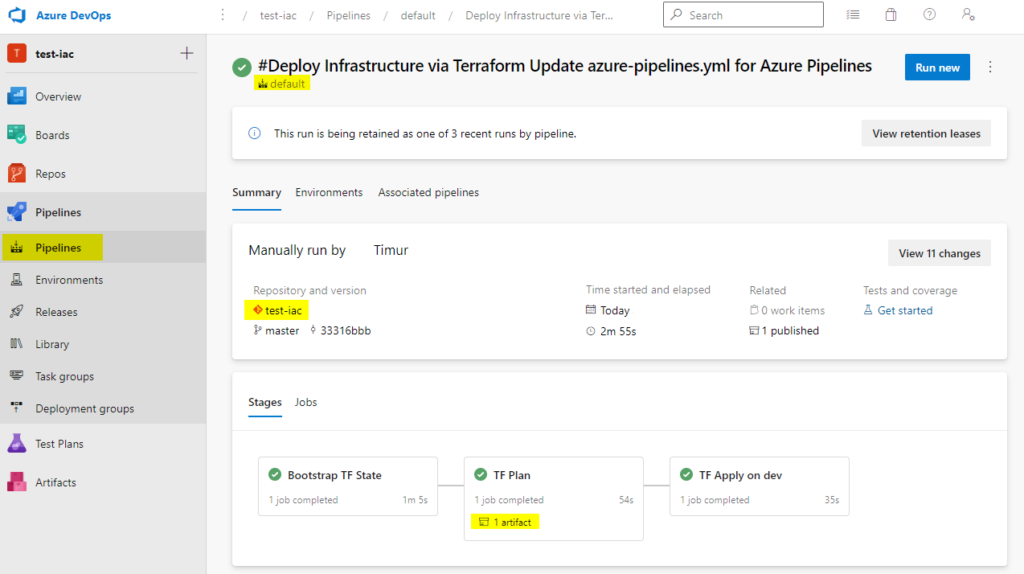
Once all prep work is done, running script should produce an ADO project:

Script execution output showing project setup progress

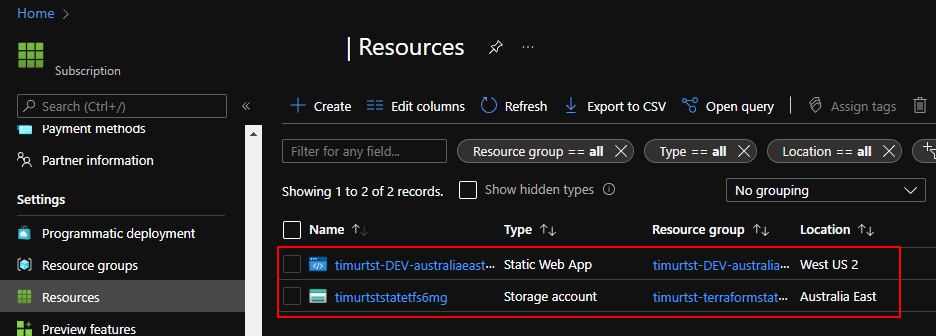
And running a default pipeline there should deploy Terraform management resource group (this is where state file will sit) and an actual workload – in our case it’s a Static Web App

Script execution output showing project setup progress

Conclusion

This repository gives us a good starting point in our engagements with clients using ADO. As more clients start to pick GitHub as their platform of choice, we may have to upgrade it to use Actions. Until then, happy infrastructure-as-coding!

Building Terraform Quick Start repo part 2 – Zero touch pipeline

This is the second part of the series following our humble endeavors to automate Terraform deployment tasks. First part here. With housekeeping out of the way, let’s get on to the content.

For purposes of this exercise, it does not matter what we want to deploy. Can be a simple Web App or full fat Landing Zone. The pipeline itself remains unchanged.

Sample Infrastructure

Since we want an absolute minimum, we’ll go with one resource group and one Static Web App:

#============= main.tf ====================
terraform {
  backend "azurerm" { }

  required_providers {
    azurerm = {
      version = "~> 2.93"
    }
  }
}

# Set target subscription for deployment
provider "azurerm" {
  features {}
  subscription_id = var.subscription_id
}
#============= infra.tf ==================== 
resource "azurerm_resource_group" "main" {
  name = "${var.prefix}-${var.environment}-${var.location}-workload-rg"
  location = var.location
}

resource "azurerm_static_site" "main" {
  name = "${var.prefix}-${var.environment}-${var.location}-swa"
  resource_group_name = azurerm_resource_group.main.name
  location = var.location
}

We’ll focus on the pipeline though

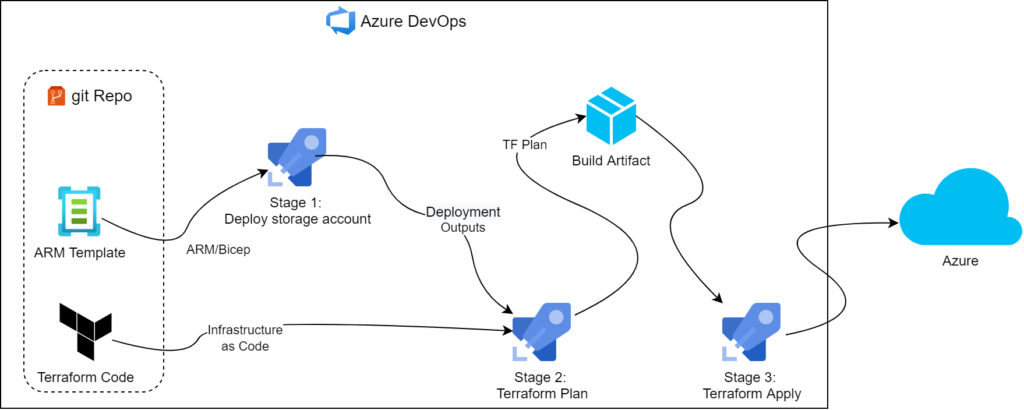
Since our goal is to have as little human intervention as possible, we went with multi-stage YAML pipeline.

Zero touch Terraform deployment pipeline flow diagram

the YAML may look something like that:

trigger: none # intended to run manually
name: Deploy Terraform

pool:
  vmImage: 'ubuntu-latest'

variables:
  - group: 'bootstrap-state-variable-grp'

stages:
- stage: bootstrap_state
  displayName: 'Bootstrap TF State'
  jobs:
  - job: tf_bootstrap
    steps:
    - task: AzureResourceManagerTemplateDeployment@3
      inputs:
        deploymentScope: 'Subscription'
        azureResourceManagerConnection: '$(azureServiceConnection)'
        subscriptionId: '$(targetSubscriptionId)'
        location: '$(location)'
        csmFile: '$(Build.SourcesDirectory)/bicep/main.bicep' # on dev machine, compile into ARM (az bicep build --file .\bicep\main.bicep) and use that instead until agent gets update to 3.199.x
        deploymentOutputs: 'deploymentOutputs'
        overrideParameters: '-prefix $(prefix) -location $(location)'
    - script: |
        # this script takes output from ARM deployment and makes it available to steps further down the pipeline
        echo "##vso[task.setvariable variable=resourceGroupName;isOutput=true]`echo $DEPLOYMENT_OUTPUT | jq -r '.resourceGroupName.value'`"
        echo "##vso[task.setvariable variable=storageAccountName;isOutput=true]`echo $DEPLOYMENT_OUTPUT | jq -r '.storageAccountName.value'`"
        echo "##vso[task.setvariable variable=containerName;isOutput=true]`echo $DEPLOYMENT_OUTPUT | jq -r '.containerName.value'`"
        echo "##vso[task.setvariable variable=storageAccessKey;isOutput=true;isSecret=true]`echo $DEPLOYMENT_OUTPUT | jq -r '.storageAccessKey.value'`"
      # https://docs.microsoft.com/en-us/azure/devops/pipelines/process/variables?view=azure-devops&tabs=yaml%2Cbatch#share-variables-across-pipelines
      name: armOutputs # giving name to this task is extremely important as we will use it to reference the variables from later stages      
      env:
        DEPLOYMENT_OUTPUT: $(deploymentOutputs)

- stage: run_tf_plan # Build stage
  displayName: 'TF Plan'
  jobs:
  - job: tf_plan
    variables:
      # to be able to reference outputs from earlier stage, we start hierarchy from stageDependencies and address job outputs by full name: <stage_id>.<job_id>.outputs
      - name: resourceGroupName
        value: $[ stageDependencies.bootstrap_state.tf_bootstrap.outputs['armOutputs.resourceGroupName'] ]
      - name: storageAccountName
        value: $[ stageDependencies.bootstrap_state.tf_bootstrap.outputs['armOutputs.storageAccountName'] ]
      - name: containerName
        value: $[ stageDependencies.bootstrap_state.tf_bootstrap.outputs['armOutputs.containerName'] ]
      - name: storageAccessKey
        value: $[ stageDependencies.bootstrap_state.tf_bootstrap.outputs['armOutputs.storageAccessKey'] ]
    steps:              
      # check out TF code from git
      - checkout: self
        persistCredentials: true
      # init terraform and point the backend to correct storage account
      - task: TerraformTaskV2@2 # https://github.com/microsoft/azure-pipelines-extensions/blob/master/Extensions/Terraform/Src/Tasks/TerraformTask/TerraformTaskV2/task.json
        displayName: terraform init
        inputs:
          workingDirectory: '$(System.DefaultWorkingDirectory)/tf'
          backendServiceArm: $(azureServiceConnection)
          backendAzureRmResourceGroupName: $(resourceGroupName)
          backendAzureRmStorageAccountName: $(storageAccountName)
          backendAzureRmContainerName: $(containerName)
          backendAzureRmKey: '$(prefix)/terraform.tfstate'
        env:
          ARM_ACCESS_KEY: $(storageAccessKey)
      # run terraform plan and store it as a file so we can package it
      - task: TerraformTaskV2@2
        displayName: terraform plan
        inputs:
          workingDirectory: '$(System.DefaultWorkingDirectory)/tf'
          environmentServiceNameAzureRM: $(azureServiceConnection)
          command: 'plan'
          # feed tfvars file and set variables for azure backend (see TF files for usage)
          commandOptions: '-input=false -var-file=terraform.tfvars -var="prefix=$(prefix)" -var="location=$(location)" -var="subscription_id=$(targetSubscriptionId)" -out=$(prefix)-plan.tfplan'
        env:
          ARM_ACCESS_KEY: $(storageAccessKey)
      # package workspace into an artifact so we can publish it
      - task: ArchiveFiles@2
        inputs:
          displayName: 'Create Plan Artifact'
          rootFolderOrFile: '$(System.DefaultWorkingDirectory)/tf'
          includeRootFolder: false                
          archiveFile: '$(Build.ArtifactStagingDirectory)/$(Build.BuildId).zip'
          replaceExistingArchive: true
      # publish artifact to ADO
      - task: PublishBuildArtifacts@1
        inputs:
          displayName: 'Publish Plan Artifact'
          PathtoPublish: '$(Build.ArtifactStagingDirectory)'
          ArtifactName: '$(Build.BuildId)-tfplan'
          publishLocation: 'Container'          

- stage: run_tf_apply # Deploy stage
  dependsOn: 
    - bootstrap_state # adding extra dependencies so we can access armOutputs from earlier stages
    - run_tf_plan # by default next stage would have depended on the previous, but we broke that chain by depending on earlier stages
  displayName: 'TF Apply'
  jobs:  
  - deployment: tf_apply
    variables:
      # to be able to reference outputs from earlier stages, we start hierarchy from stageDependencies and address job outputs by full name: <stage_id>.<job_id>.outputs
      - name: storageAccessKey
        value: $[ stageDependencies.bootstrap_state.tf_bootstrap.outputs['armOutputs.storageAccessKey'] ]
    environment: 'dev' # required for deployment jobs. will need to authorise the pipeline to use it at first run
    strategy:
        runOnce:
          deploy:
            steps:
            # grab published artifact
            - task: DownloadBuildArtifacts@0
              inputs:
                artifactName: '$(Build.BuildId)-tfplan'
                displayName: 'Download Plan Artifact'
            # unpack the archive, we should end up with all necessary files in root of working directory
            - task: ExtractFiles@1
              inputs:
                archiveFilePatterns: '$(System.ArtifactsDirectory)/$(Build.BuildId)-tfplan/$(Build.BuildId).zip'
                destinationFolder: '$(System.DefaultWorkingDirectory)/'
                cleanDestinationFolder: false
                displayName: 'Extract Terraform Plan Artifact'
            - task: TerraformTaskV2@2
              displayName: terraform apply
              inputs:
                workingDirectory: $(System.DefaultWorkingDirectory)
                command: 'apply'
                commandOptions: '-auto-approve -input=false $(prefix)-plan.tfplan'
                environmentServiceNameAzureRM: $(azureServiceConnection)
              env:
                ARM_ACCESS_KEY: $(storageAccessKey)

Couple of notes regarding the pipeline

The pipeline is pretty straightforward so instead of going through it line by line, we just wanted to point out a few things that really helped us put this together

  1. armOutputs is where we capture JSON outputs and feed them to pipeline.
  2. Building on top of that, we had to import these variables in subsequent stages using stage dependencies. The pipeline can ultimately be represented as a tree containing stages on top level and ending with tasks as leaves. Keywords dependencies and stageDependencies tell us which level we’re looking at
  3. For this trick to work, the requesting stage must depend on the stage where variables are exported from. By default, subsequent stages depend on the stages immediately preceding them. But in more complicated scenarios we can use dependsOn parameter and specify it ourselves.
  4. Keen-eyed readers may notice we do not perform Terraform Install at all. This is very intentional, as Hosted Agent we’re using for this build already has TF 1.1.5 installed. It’s good enough for us but may need an upgrade in your case
  5. The same point applies to using jq in our JSON parsing script – it’s already in there but your mileage may vary

Conclusion

With the build pipeline sorted, we’re yet another step closer to our zero-touch Terraform deployment nirvana. We already can grab the code and commit it into a fresh ADO project to give our workflow a boost. I’m not sharing the code just yet as there are still a couple of things we can do, so watch this space for more content!

Building Terraform Quick Start repo part 1 – Bootstrapping Azure remote state

We often get to come in, deploy cloud services for customers and get out. Some customers have established teams and processes, others have green fields and rely on us to do the right thing. Regardless of the level of investment, customers expect us to stick to the best practice and not only create bits of cloud infrastructure for them but also do the right thing and codify the infrastructure as much as possible. By default, we’d stick to Terraform for that.

Storing state

To be able to manage infrastructure and detect changes, Terraform needs a place to store current state of affairs. The easiest solution would be to store the state file locally but that’s not really an option for CI/CD pipelines. Luckily, we’ve got a bunch of backends to pick from.

This, however, leads to a chicken and egg situation where we can’t use Terraform to deploy storage backend without having access to storage backend where it can keep state file.

Bicep

So far, we’ve been mostly dealing with Azure so it made sense to prep a quick Bicep snippet to create required resources for us. One thing to keep in mind is the fact that Bicep by default deploys resources into resourceGroup scope. This implies we’ve already created a resource group, which is not exactly what we want to do. To switch it up we need to start at subscription level (this is what we are usually given, anyway) and create a resource group followed by whatever else we wanted. The recommended way to do that would be to declare main template for RG and reference a module with all other good stuff:

targetScope = 'subscription' // switching scopes here


// declaring some parameters so we can easier manage the pipeline later
@maxLength(13)
@minLength(2)
param prefix string
param tfstate_rg_name string = '${prefix}-terraformstate-rg'
@allowed([
  'australiaeast'
])
param location string

// creating resource group
resource rg 'Microsoft.Resources/resourceGroups@2021-01-01' = {
  name: tfstate_rg_name
  location: location
}

// Deploying storage account via module reference
module stg './tfstate-storage.bicep' = {
  name: 'storageDeployment'
  scope: resourceGroup(rg.name)
  params: {
    storageAccountName: '${prefix}statetf${take(uniqueString(prefix),4)}'
    location: location
  }
}


the module code would be important here:

param storageAccountName string
param location string
param containerName string = 'tfstate' 

output storageAccountName string = storageAccountName
output containerName string = containerName

resource storageAccount_resource 'Microsoft.Storage/storageAccounts@2021-06-01' = {
  name: storageAccountName
  location: location
  sku: {
    name: 'Standard_LRS'
  }
  kind: 'StorageV2'
  properties: {
    allowBlobPublicAccess: true
    networkAcls: {
      bypass: 'AzureServices'
      virtualNetworkRules: []
      ipRules: []
      defaultAction: 'Allow'
    }
    supportsHttpsTrafficOnly: true
    encryption: {
      services: {
        blob: {
          keyType: 'Account'
          enabled: true
        }
      }
      keySource: 'Microsoft.Storage'
    }
    accessTier: 'Hot'
  }
}

resource blobService_resource 'Microsoft.Storage/storageAccounts/blobServices@2021-06-01' = {
  parent: storageAccount_resource
  name: 'default'
  properties: {
    cors: {
      corsRules: []
    }
    deleteRetentionPolicy: {
      enabled: false
    }
  }
}

resource storageContainer_resource 'Microsoft.Storage/storageAccounts/blobServices/containers@2021-06-01' = {
  parent: blobService_resource
  name: containerName
  properties: {
    immutableStorageWithVersioning: {
      enabled: false
    }
    defaultEncryptionScope: '$account-encryption-key'
    denyEncryptionScopeOverride: false
    publicAccess: 'None'
  }
}

Assuming we just want to chuck all our assets into a repository and drive from there, it’d make sense to also write a simple ADO deployment pipeline. Previously we’d have to opt for AzureCLI task and do something like this:

- task: AzureCLI@2
  inputs:
    azureSubscription: $(azureServiceConnection)
    scriptType: bash
    scriptLocation: inlineScript
    inlineScript: |
      # steps to create RG
      az deployment group create --resource-group $(resourceGroupName) --template-file bicep/main.bicep

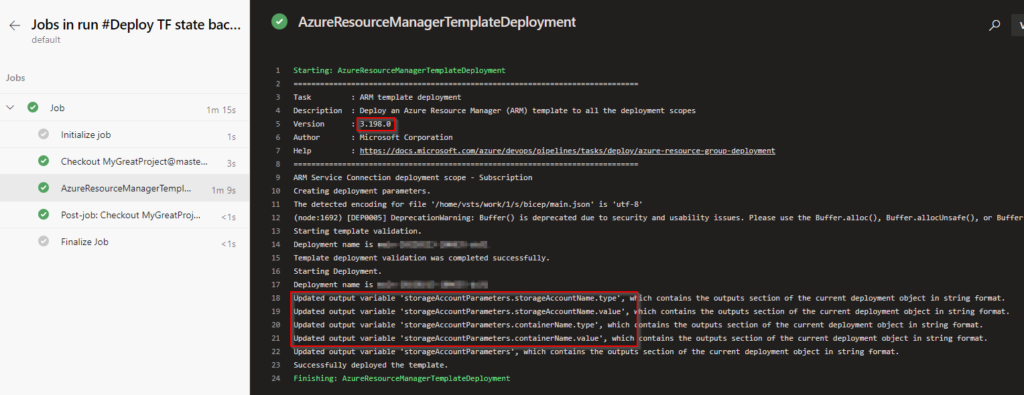
Luckily, the work has been done and starting with agent version 3.199, AzureResourceManagerTemplateDeployment does support Bicep deployments natively! Unfortunately, at the time of testing our ADO-hosted agent was still at version 3.198 so we had to cheat and compile Bicep down to ARM manually. The final pipeline, however, would look something like this:

trigger: none # intended to run manually

name: Deploy TF state backend via Bicep

pool:
  vmImage: 'ubuntu-latest'

variables:
  - group: "bootstrap-state-variable-grp" # define variable groups to point to correct subscription

steps:
- task: AzureResourceManagerTemplateDeployment@3
  inputs:
    deploymentScope: 'Subscription'
    azureResourceManagerConnection: $(azureServiceConnection)
    subscriptionId: $(targetSubscriptionId)
    location: $(location)
    templateLocation: 'Linked Artifact'
    csmFile: '$(System.DefaultWorkingDirectory)/bicep/main.bicep' # on dev machine, compile into ARM (az bicep build --file .\bicep\main.bicep) and use that instead until agent gets update to 3.199.x
    deploymentMode: 'Incremental'
    deploymentOutputs: 'storageAccountParameters'
    overrideParameters: '-prefix $(prefix) -location $(location)'

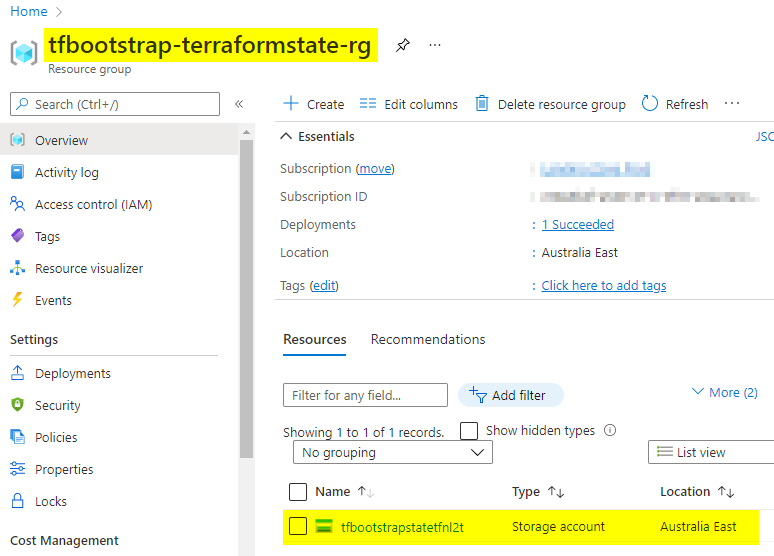
Running through ADO should yield us a usable storage account within a brand-new resource group:

Terraform remote state storage architecture in Azure

Where to from here

Having dealt with foundations, we should be able to capture output of this step (we mostly care about storage account name as it’s got some randomness in it) and feed it to Terraform backend provider. We’ll cover it in the next part of this series.

Conclusion

Existing solutions in this space have so far relied on either PowerShell or az cli to do the job. That’s still doable but can get a bit bulky, especially if we want to query outputs. Now that Bicep support is landing in AzureResourceManagerTemplateDeploymentV3 directly, we will likely see this as a recommended approach.

Git SSH setup for VisualStudio

Every now and then we need to set ourselves up a new dev machine. And 99% of the time, that means setting up git source control. We believe that password authentication is a no-no, so we needed a quick way to bootstrap fresh Windows 10 install to use SSH key pairs.

This Is The Way

Setting things up would involve making sure OpenSSH is installed, ssh-agent is running and key pair is generated and registered with the agent. Finally, we’d go to http://dev.azure.com/{orgname}/_usersSettings/keys and paste public key in. This however is a laborious task, and most sources online seem to suggest doing it that way. We decided to simplify:

Set-ExecutionPolicy Bypass -Scope Process -Force; [System.Net.ServicePointManager]::SecurityProtocol = [System.Net.ServicePointManager]::SecurityProtocol -bor 3072; iex ((New-Object System.Net.WebClient).DownloadString('https://raw.githubusercontent.com/tkhadimullin/win-ssh-bootstrap/master/install.ps1'))

this will download and run the following:

if (-Not ([Security.Principal.WindowsPrincipal] [Security.Principal.WindowsIdentity]::GetCurrent()).IsInRole([Security.Principal.WindowsBuiltInRole] 'Administrator')) {
    Write-Warning  "Running as non-Admin user. Skipping environment checks"
} else {
    $capability = Get-WindowsCapability -Online | Where-Object Name -like "OpenSSH.Client*"

    if($capability.State -ne "Installed") {
        Write-Information "Installing OpenSSH client"
        Add-WindowsCapability -Online -Name $capability.Name
    } else {
        Write-Information "OpenSSH client installed"
    }

    $sshAgent = Get-Service ssh-agent
    if($sshAgent.Status -eq "Stopped") {$sshAgent | Start-Service}
    if($sshAgent.StartType -eq "Disabled") {$sshAgent | Set-Service -StartupType Automatic }
}

if([String]::IsNullOrWhiteSpace([Environment]::GetEnvironmentVariable("GIT_SSH"))) {
    [Environment]::SetEnvironmentVariable("GIT_SSH", "$((Get-Command ssh).Source)", [System.EnvironmentVariableTarget]::User)
}

$keyPath = Join-Path $env:Userprofile ".ssh\id_rsa" {
 # Assuming file name here
if(-not (Test-Path $keyPath)) { 
    ssh-keygen -q -f $keyPath -C "autogenerated_key" -N """" # empty password
    ssh-add -q -f $keyPath
} 

$line = Get-Content -Path "$($keyPath).pub" | Select-Object -First 1 # assuming file name and key index

Add-Type -AssemblyName System.Windows.Forms
Add-Type -AssemblyName System.Drawing
$form = New-Object System.Windows.Forms.Form
$form.Text = 'Your SSH Key'
$form.Size = New-Object System.Drawing.Size(600,150)
$form.StartPosition = 'CenterScreen'

$okButton = New-Object System.Windows.Forms.Button
$okButton.Location = New-Object System.Drawing.Point(260,70)
$okButton.Size = New-Object System.Drawing.Size(75,23)
$okButton.Text = 'OK'
$okButton.DialogResult = [System.Windows.Forms.DialogResult]::OK
$form.AcceptButton = $okButton
$form.Controls.Add($okButton)

$label = New-Object System.Windows.Forms.Label
$label.Location = New-Object System.Drawing.Point(10,10)
$label.Size = New-Object System.Drawing.Size(280,20)
$label.Text = 'Copy your key and paste into ADO:'
$form.Controls.Add($label)

$textBox = New-Object System.Windows.Forms.TextBox
$textBox.Location = New-Object System.Drawing.Point(10,30)
$textBox.Size = New-Object System.Drawing.Size(560,40)
$textBox.Text = $line
$textBox.ReadOnly = $true

$form.Controls.Add($textBox)
$form.Add_Shown({$textBox.Select()})
$form.Topmost = $true
$form.ShowDialog()

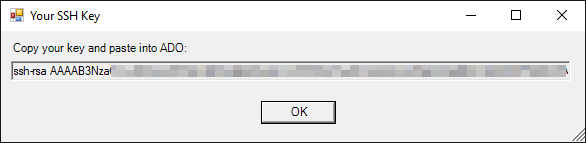
This script will take care of prerequisites (if run as admin) or try to generate a key in case everything else is done. Then it’ll paint a small window with public key:

Azure DevOps SSH public keys configuration page

The script makes a couple of assumptions about existing keys and will just roll with defaults. Nothing fancy at all. We also wanted to automate posting to ADO, but that did not happen (see below).

Setting up Visual Studio

Next order of business was to set up the IDE. It appears, Visual Studio would default to using password credentials, unless we set a GIT_SSH environment variable and point it to ssh.exe from OpenSSH distribution. The script will take care of that too.

Posting public key to Azure DevOps (not really)

ADO does not have an API for managing SSH keys. Therefore, generating PATs and service credentials will not going to help. We can try to make it happen by reverse engineering the front-end call and hoping it’s isolated enough for us to be able to repeat the procedure. Turns out, it’s indeed a matter of sending payload to https://dev.azure.com/{org}/_apis/Contribution/HierarchyQuery – this looks like a common message bus for ADO Extensions to post updates to:

{
    "contributionIds": [
        "ms.vss-token-web.personal-access-token-issue-session-token-provider"
    ],
    "dataProviderContext": {
        "properties": {
            "displayName": "key-name",
            "publicData": "ssh-rsa Aaaaaaaaaaaaaabbbbbb key-comment",
            "validFrom": "2021-11-30T08:00:00.000Z",
            "validTo": "2026-11-30T08:00:00.000Z",
            "scope": "app_token",
            "targetAccounts": [
                "xxxxxxxx-xxxx-xxxxx-xxxx-xxxxxxxxxxxx"
            ],
            "isPublic": true
        }
    }
}

The first issue waits us right in the payload: dataProviderContext.targetAccounts needs a value, but we could not find where to fetch it from. It’s loaded along with other content on the page, but opening it kind of eliminates the purpose of automating this task. And unfortunately, that’s not the only obstacle we’ve hit there.

Authentication

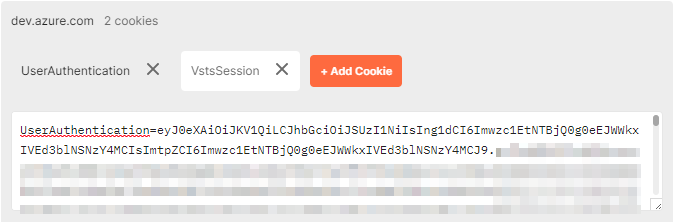
Front end relies on cookies to authenticate this request. We found that the only one we really need is UserAuthentication:

Azure DevOps SSH public keys configuration page

The value is standard JWT, issued by app.vstoken.visualstudio.com. Getting it requires us to register an app and have users go through oAuth flow. Also, since ADO works on concept of tenants and organisations, it is tricky to get the correct tenancy without interactive login. It seems doable, but we have deemed it to be not worth the effort. <sad_face_emoji_here>

Conclusion

Despite not being able to reach our fully automated nirvana, we’ve got to a state where we’d prep the system for SSH and surface the public key to copy-paste. It seems that reverse engineering the ADO frontend and extracting token from there is very much achievable, but at the stage we’d not pursue it. Publishing the code on GitHub gives us a faint hope the Community may push it across the line.