Oracle’s Always Free Tier is ridiculously generous. We’ve been running an Ampere A1 instance with 4 vCPUs and 24GB RAM for a few years now — hosting a VPN and a handful of Docker containers. Hard to complain about free.
The dreaded email
One day we got a friendly reminder from Oracle: instances with consistently low utilisation would be stopped. The official policy is pretty clear:
Idle Always Free compute instances may be reclaimed by Oracle. Oracle will deem virtual machine and bare metal compute instances as idle if, during a 7-day period, the following are true:
CPU utilization for the 95th percentile is less than 20%
Network utilization is less than 20%
Memory utilization is less than 20% (applies to A1 shapes only)
The thing is, a VPN server mostly just shuffles packets. CPU sits near zero most of the time. So by Oracle’s metrics, our perfectly functional box looks “idle”.
The lazy fix
We needed to bump CPU utilisation above 20% without actually doing anything useful. A busy loop seemed like the obvious choice:
#!/bin/bash

lc() {
  (
    pids=""
    cpus=${1:-1}
    seconds=${2:-60}
    echo $(date '+%Y-%m-%d %H:%M:%S') loading $cpus CPUs for $seconds seconds
    trap 'for p in $pids; do kill $p; done' 0
    for ((i=0;i<cpus;i++)); do while : ; do : ; done & pids="$pids $!"; done
    sleep $seconds
  )
}

lc 4 60
The lc function spawns N subprocesses that each run an infinite loop (: ; is bash’s no-op), waits for a set duration, then kills them all via the trap. We spin up all 4 CPUs for 60 seconds.
Scheduling it
Cron does the rest. Every 5 minutes, we burn 60 seconds of CPU:
That’s 60 seconds of 100% load out of every 300 seconds — roughly 20% average utilisation. Right on Oracle’s threshold, and in practice the VPN traffic on top pushes us comfortably over.
The log is a nice touch for troubleshooting:
2026-03-07 09:45:01 loading 4 CPUs for 60 seconds
2026-03-07 09:50:01 loading 4 CPUs for 60 seconds
2026-03-07 09:55:01 loading 4 CPUs for 60 seconds
It’s been running since late 2023. No more threatening emails from Oracle.
It is somewhat common for our clients to come to us for small website deployments. They’re after landing pages, or single page apps so they can put something up quickly at minimal cost.
There are options
Azure, as our platform of choice, offers many ways to deploy static content. We have talked about some ways to host simple pages before, but this time round, let’s throw BYO domains and SSL into the mix, evaluate upgrade potential, and compare costs. One extra goal we have set for ourselves was to build IaC via Terraform for each option so we can streamline our process further.
Since BYO domains require manual setup and validation, we opted to manually create a parent DNS zone, validate it prior to running Terraform and let the code automagically create child zone for our experiments. Real setups may differ.
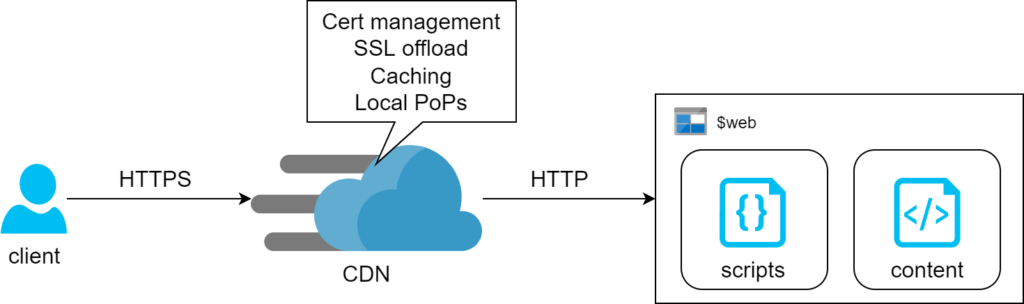
Storage + CDN
The first method relies on Azure Storage Account feature where it can serve content of a container via HTTP or HTTPS. There’s no operational cost for this feature – we only pay for consumed storage. The drawback of this design is lack of support for managed SSL certs on custom domains. Prescribed architecture works around this by adding CDN in front of it and we found that the associated cost is likely going to be negligible for simple static pages (we’re talking $0.13 per 100Gb on top of standard egress charges). That said, the egress bill itself can potentially blow out if left unchecked.
A few notes on automation
Switching static website feature is considered a data plane exercise, so ARM templates are of little help. Terraform, however supports this with just a couple lines of config:
Secondly, CDN requires two CNAME domains for custom domain to work: the subdomain itself and one extra for verification. Nothing overly complicated, we just need to make sure we script both:
resource "azurerm_dns_cname_record" "static" {
  name                = "storage-account"
  zone_name           = azurerm_dns_zone.static.name
  resource_group_name = azurerm_resource_group.main.name
  ttl                 = 60
  record              = azurerm_cdn_endpoint.main.host_name
}

resource "azurerm_dns_cname_record" "static_cdnverify" {
  name                = "cdnverify.storage-account"
  zone_name           = azurerm_dns_zone.static.name
  resource_group_name = azurerm_resource_group.main.name
  ttl                 = 60
  record              = "cdnverify.${azurerm_cdn_endpoint.main.host_name}"
}
Finally, CDN takes a little while to deploy a custom domain (seems to get stuck with verification) – ours took 10 minutes to complete this step.
Static Web App
This is probably the most appropriate way to host static content in Azure. Not only it supports serving content, it also comes with built-in Functions and Authentication. We also get CDN capabilities out of the box and on top of that it is usable on free tier. This definitely is our platform of choice.
Since we’ve already covered Static Web Apps we’d just briefly touch upon automating it with Terraform. The only complication here is that native azurerm_static_site is perfectly capable of standing up the resource but has no idea on how to deploy content. Since there’s no supported way of manually uploading content, we opted for docker deployment. Fitting it back into the pipeline was a bit of a hack, which is essentially a shell script to run when content changes:
resource "null_resource" "publish_swa" {
    triggers = {
      script_checksum = sha1(join("", [for f in fileset("content", "*"): filesha1("content/${f}")])) // recreate resource on file checksum change. This will always trigger a new build, so we don't care about the state as much
    }
    provisioner "local-exec" {
        working_dir = "${path.module}"
        interpreter = ["bash", "-c"]
        command = <<EOT
docker run --rm -e INPUT_AZURE_STATIC_WEB_APPS_API_TOKEN=${azurerm_static_site.main.api_key} -e DEPLOYMENT_PROVIDER=DevOps -e GITHUB_WORKSPACE=/working_dir -e INPUT_APP_LOCATION=. -v `pwd`/content:/working_dir mcr.microsoft.com/appsvc/staticappsclient:stable ./bin/staticsites/StaticSitesClient upload --verbose true
EOT
    }
// the block above assumes static content sits in `./content` directory. Using `pwd` with backticks is particularly important as terraform attempts parsing ${pwd} syntax, while we need to pass it into the shell
    depends_on = [
      azurerm_static_site.main
    ]
}
App Service
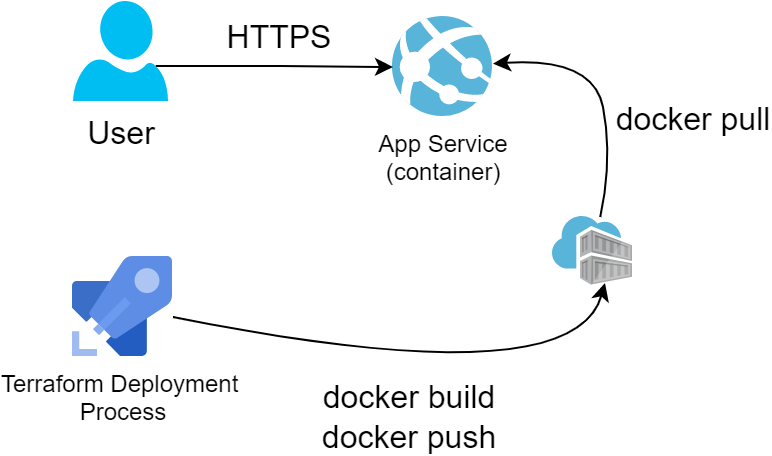
Finally comes the totally overengineered approach that will also be the most expensive and offers no regional redundancy by default. Using App Service makes no sense for hosting simple static pages but may come in handy as a pattern for more advanced scenarios like containers or server-side-rendered web applications.
Notes on building it up
For this exercise we opted to host our content in a simple nginx docker container. Linux App Service plans with Custom Domain and SSL support start from $20/month, so they are not cheap. We started with scaffolding a Container Registry, where we’d push a small container so that App Service can pull it on startup:
FROM nginx:alpine
WORKDIR /usr/share/nginx/html/
COPY index.html .
COPY ./nginx.conf /etc/nginx/nginx.conf # there's minimal nginx config, check out github
EXPOSE 80 # we only care to expose HTTP endpoint, so no certs are needed for nginx at this stage
We picked Nginx because of its simplicity and low overheads to illustrate our point. But since we can containerise just about anything, this method becomes useful for more complicated deployments.
resource "null_resource" "build_container" {
    triggers = {
      script_checksum = sha1(join("", [for f in fileset("content", "*"): filesha1("content/${f}")])) // the operation will kick in on change to any of the files in content directory
    }

// normal build-push flow for private registry
    provisioner "local-exec" { command = "docker login -u ${azurerm_container_registry.acr.admin_username} -p ${azurerm_container_registry.acr.admin_password} ${azurerm_container_registry.acr.login_server}" }
    provisioner "local-exec" { command = "docker build ./content/ -t ${azurerm_container_registry.acr.login_server}/static-site:latest" }
    provisioner "local-exec" { command = "docker push ${azurerm_container_registry.acr.login_server}/static-site:latest" }
    provisioner "local-exec" { command = "docker logout ${azurerm_container_registry.acr.login_server}" }
    depends_on = [
      azurerm_container_registry.acr
    ]
}

resource "azurerm_app_service" "main" {
  name                = "${var.prefix}-app-svc"
  location            = azurerm_resource_group.main.location
  resource_group_name = azurerm_resource_group.main.name
  app_service_plan_id = azurerm_app_service_plan.main.id

  app_settings = {
    WEBSITES_ENABLE_APP_SERVICE_STORAGE = false // this is required for Linux app service plans
    DOCKER_REGISTRY_SERVER_URL      = azurerm_container_registry.acr.login_server // the convenience of rolling ACR with terraform is that we literally have all the variables already available
    DOCKER_REGISTRY_SERVER_USERNAME = azurerm_container_registry.acr.admin_username // App Service uses admin account to pull container images from ACR. We have to enable it when defining the resource
    DOCKER_REGISTRY_SERVER_PASSWORD = azurerm_container_registry.acr.admin_password
  }

  site_config {
    linux_fx_version = "DOCKER|${azurerm_container_registry.acr.name}.azurecr.io/static-site:latest"
    always_on        = "true" // this is also required on Linux app service plans
  }

  depends_on = [
    null_resource.build_container
  ]
}
Conclusion
Going through this exercise, we’ve built a bit of a decision matrix on which service to use:
This is the third part of the series following our humble endeavors to automate Terraform deployment tasks. First part here, second part here. With housekeeping out of the way, let’s get on to the content.
Now that we’ve got the Terraform part sorted, we’d like to take this project to a logical conclusion and build a reusable template for our future endeavors.
Compile or script?
Our initial idea was to write a small console app that would gather parameters and make all API calls. But this repository got us thinking, that it’s way more efficient to be able to just run the script off GitHub. So, we went to the drawing board and ended up with a Bash script. It ain’t much but it’s honest work.
Ultimately the script goes to create an ADO Project, imports its own GitHub repo into a newly created project and proceeds to set up the pipeline.
Streamlining process
With this tooling, we can now automate most of our process. We’d start by obtaining the parameters and setting up required credentials:
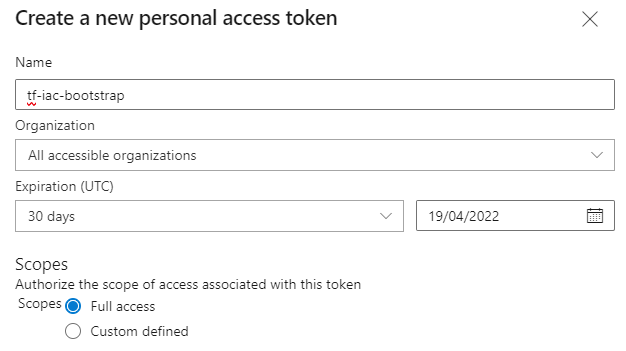
In ADO we’ll need to create and grab a PAT of a user with permissions to manage the organization
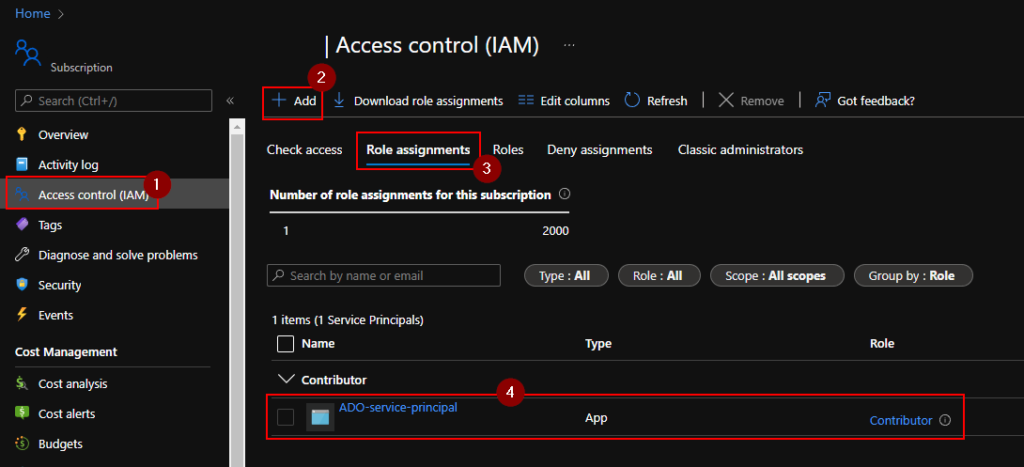
By default, the principal has no permissions, so we’ll need to give it something like Contributor access on a Subscription we want to manage
Finally, it’s good practice to name Azure resources in such a way that it makes sense later. We come up with a distinct prefix for Terraform state storage account. Since storage accounts have strict naming policies, our prefix must be 2-13 characters long and must only contain alphanumerics.
Once all prep work is done, running script should produce an ADO project:
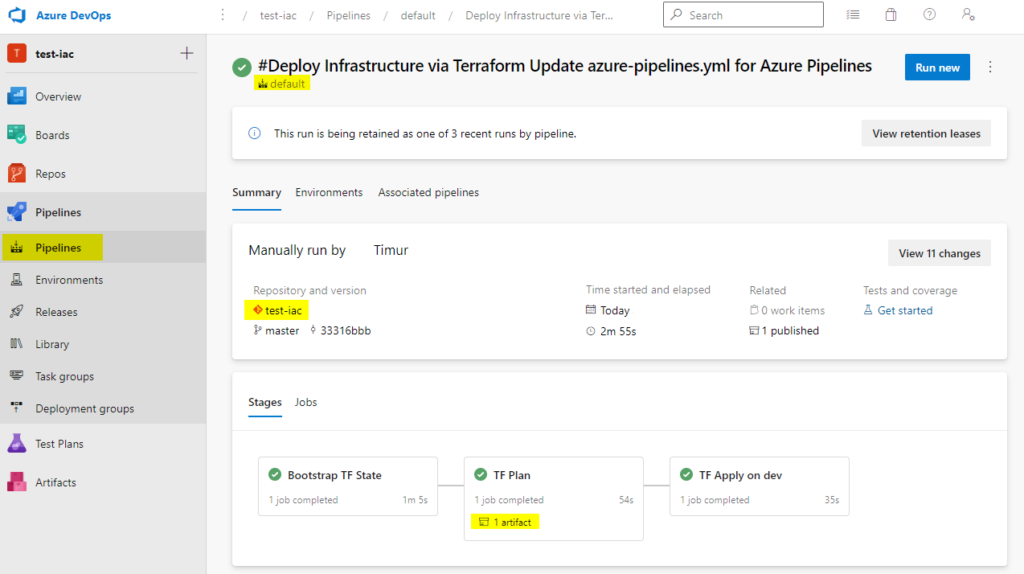
And running a default pipeline there should deploy Terraform management resource group (this is where state file will sit) and an actual workload – in our case it’s a Static Web App
Conclusion
This repository gives us a good starting point in our engagements with clients using ADO. As more clients start to pick GitHub as their platform of choice, we may have to upgrade it to use Actions. Until then, happy infrastructure-as-coding!
This is the second part of the series following our humble endeavors to automate Terraform deployment tasks. First part here. With housekeeping out of the way, let’s get on to the content.
For purposes of this exercise, it does not matter what we want to deploy. Can be a simple Web App or full fat Landing Zone. The pipeline itself remains unchanged.
Sample Infrastructure
Since we want an absolute minimum, we’ll go with one resource group and one Static Web App:
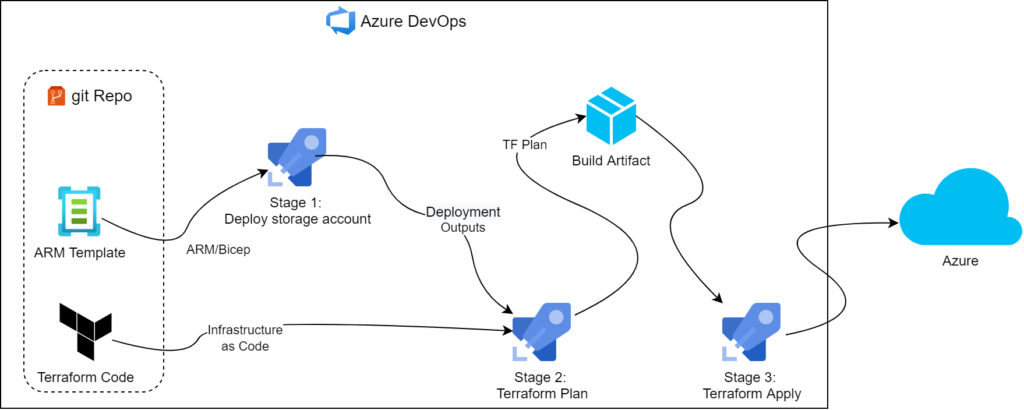
Since our goal is to have as little human intervention as possible, we went with multi-stage YAML pipeline.
the YAML may look something like that:
trigger: none # intended to run manually
name: Deploy Terraform

pool:
  vmImage: 'ubuntu-latest'

variables:
  - group: 'bootstrap-state-variable-grp'

stages:
- stage: bootstrap_state
  displayName: 'Bootstrap TF State'
  jobs:
  - job: tf_bootstrap
    steps:
    - task: AzureResourceManagerTemplateDeployment@3
      inputs:
        deploymentScope: 'Subscription'
        azureResourceManagerConnection: '$(azureServiceConnection)'
        subscriptionId: '$(targetSubscriptionId)'
        location: '$(location)'
        csmFile: '$(Build.SourcesDirectory)/bicep/main.bicep' # on dev machine, compile into ARM (az bicep build --file .\bicep\main.bicep) and use that instead until agent gets update to 3.199.x
        deploymentOutputs: 'deploymentOutputs'
        overrideParameters: '-prefix $(prefix) -location $(location)'
    - script: |
        # this script takes output from ARM deployment and makes it available to steps further down the pipeline
        echo "##vso[task.setvariable variable=resourceGroupName;isOutput=true]`echo $DEPLOYMENT_OUTPUT | jq -r '.resourceGroupName.value'`"
        echo "##vso[task.setvariable variable=storageAccountName;isOutput=true]`echo $DEPLOYMENT_OUTPUT | jq -r '.storageAccountName.value'`"
        echo "##vso[task.setvariable variable=containerName;isOutput=true]`echo $DEPLOYMENT_OUTPUT | jq -r '.containerName.value'`"
        echo "##vso[task.setvariable variable=storageAccessKey;isOutput=true;isSecret=true]`echo $DEPLOYMENT_OUTPUT | jq -r '.storageAccessKey.value'`"
      # https://docs.microsoft.com/en-us/azure/devops/pipelines/process/variables?view=azure-devops&tabs=yaml%2Cbatch#share-variables-across-pipelines
      name: armOutputs # giving name to this task is extremely important as we will use it to reference the variables from later stages
      env:
        DEPLOYMENT_OUTPUT: $(deploymentOutputs)

- stage: run_tf_plan # Build stage
  displayName: 'TF Plan'
  jobs:
  - job: tf_plan
    variables:
      # to be able to reference outputs from earlier stage, we start hierarchy from stageDependencies and address job outputs by full name: <stage_id>.<job_id>.outputs
      - name: resourceGroupName
        value: $[ stageDependencies.bootstrap_state.tf_bootstrap.outputs['armOutputs.resourceGroupName'] ]
      - name: storageAccountName
        value: $[ stageDependencies.bootstrap_state.tf_bootstrap.outputs['armOutputs.storageAccountName'] ]
      - name: containerName
        value: $[ stageDependencies.bootstrap_state.tf_bootstrap.outputs['armOutputs.containerName'] ]
      - name: storageAccessKey
        value: $[ stageDependencies.bootstrap_state.tf_bootstrap.outputs['armOutputs.storageAccessKey'] ]
    steps:
      # check out TF code from git
      - checkout: self
        persistCredentials: true
      # init terraform and point the backend to correct storage account
      - task: TerraformTaskV2@2 # https://github.com/microsoft/azure-pipelines-extensions/blob/master/Extensions/Terraform/Src/Tasks/TerraformTask/TerraformTaskV2/task.json
        displayName: terraform init
        inputs:
          workingDirectory: '$(System.DefaultWorkingDirectory)/tf'
          backendServiceArm: $(azureServiceConnection)
          backendAzureRmResourceGroupName: $(resourceGroupName)
          backendAzureRmStorageAccountName: $(storageAccountName)
          backendAzureRmContainerName: $(containerName)
          backendAzureRmKey: '$(prefix)/terraform.tfstate'
        env:
          ARM_ACCESS_KEY: $(storageAccessKey)
      # run terraform plan and store it as a file so we can package it
      - task: TerraformTaskV2@2
        displayName: terraform plan
        inputs:
          workingDirectory: '$(System.DefaultWorkingDirectory)/tf'
          environmentServiceNameAzureRM: $(azureServiceConnection)
          command: 'plan'
          # feed tfvars file and set variables for azure backend (see TF files for usage)
          commandOptions: '-input=false -var-file=terraform.tfvars -var="prefix=$(prefix)" -var="location=$(location)" -var="subscription_id=$(targetSubscriptionId)" -out=$(prefix)-plan.tfplan'
        env:
          ARM_ACCESS_KEY: $(storageAccessKey)
      # package workspace into an artifact so we can publish it
      - task: ArchiveFiles@2
        inputs:
          displayName: 'Create Plan Artifact'
          rootFolderOrFile: '$(System.DefaultWorkingDirectory)/tf'
          includeRootFolder: false
          archiveFile: '$(Build.ArtifactStagingDirectory)/$(Build.BuildId).zip'
          replaceExistingArchive: true
      # publish artifact to ADO
      - task: PublishBuildArtifacts@1
        inputs:
          displayName: 'Publish Plan Artifact'
          PathtoPublish: '$(Build.ArtifactStagingDirectory)'
          ArtifactName: '$(Build.BuildId)-tfplan'
          publishLocation: 'Container'

- stage: run_tf_apply # Deploy stage
  dependsOn:
    - bootstrap_state # adding extra dependencies so we can access armOutputs from earlier stages
    - run_tf_plan # by default next stage would have depended on the previous, but we broke that chain by depending on earlier stages
  displayName: 'TF Apply'
  jobs:
  - deployment: tf_apply
    variables:
      # to be able to reference outputs from earlier stages, we start hierarchy from stageDependencies and address job outputs by full name: <stage_id>.<job_id>.outputs
      - name: storageAccessKey
        value: $[ stageDependencies.bootstrap_state.tf_bootstrap.outputs['armOutputs.storageAccessKey'] ]
    environment: 'dev' # required for deployment jobs. will need to authorise the pipeline to use it at first run
    strategy:
        runOnce:
          deploy:
            steps:
            # grab published artifact
            - task: DownloadBuildArtifacts@0
              inputs:
                artifactName: '$(Build.BuildId)-tfplan'
                displayName: 'Download Plan Artifact'
            # unpack the archive, we should end up with all necessary files in root of working directory
            - task: ExtractFiles@1
              inputs:
                archiveFilePatterns: '$(System.ArtifactsDirectory)/$(Build.BuildId)-tfplan/$(Build.BuildId).zip'
                destinationFolder: '$(System.DefaultWorkingDirectory)/'
                cleanDestinationFolder: false
                displayName: 'Extract Terraform Plan Artifact'
            - task: TerraformTaskV2@2
              displayName: terraform apply
              inputs:
                workingDirectory: $(System.DefaultWorkingDirectory)
                command: 'apply'
                commandOptions: '-auto-approve -input=false $(prefix)-plan.tfplan'
                environmentServiceNameAzureRM: $(azureServiceConnection)
              env:
                ARM_ACCESS_KEY: $(storageAccessKey)
Couple of notes regarding the pipeline
The pipeline is pretty straightforward so instead of going through it line by line, we just wanted to point out a few things that really helped us put this together
Building on top of that, we had to import these variables in subsequent stages using stage dependencies. The pipeline can ultimately be represented as a tree containing stages on top level and ending with tasks as leaves. Keywords dependencies and stageDependencies tell us which level we’re looking at
For this trick to work, the requesting stage must depend on the stage where variables are exported from. By default, subsequent stages depend on the stages immediately preceding them. But in more complicated scenarios we can use dependsOn parameter and specify it ourselves.
Keen-eyed readers may notice we do not perform Terraform Install at all. This is very intentional, as Hosted Agent we’re using for this build already has TF 1.1.5 installed. It’s good enough for us but may need an upgrade in your case
The same point applies to using jq in our JSON parsing script – it’s already in there but your mileage may vary
Conclusion
With the build pipeline sorted, we’re yet another step closer to our zero-touch Terraform deployment nirvana. We already can grab the code and commit it into a fresh ADO project to give our workflow a boost. I’m not sharing the code just yet as there are still a couple of things we can do, so watch this space for more content!
We often get to come in, deploy cloud services for customers and get out. Some customers have established teams and processes, others have green fields and rely on us to do the right thing. Regardless of the level of investment, customers expect us to stick to the best practice and not only create bits of cloud infrastructure for them but also do the right thing and codify the infrastructure as much as possible. By default, we’d stick to Terraform for that.
Storing state
To be able to manage infrastructure and detect changes, Terraform needs a place to store current state of affairs. The easiest solution would be to store the state file locally but that’s not really an option for CI/CD pipelines. Luckily, we’ve got a bunch of backends to pick from.
This, however, leads to a chicken and egg situation where we can’t use Terraform to deploy storage backend without having access to storage backend where it can keep state file.
Bicep
So far, we’ve been mostly dealing with Azure so it made sense to prep a quick Bicep snippet to create required resources for us. One thing to keep in mind is the fact that Bicep by default deploys resources into resourceGroup scope. This implies we’ve already created a resource group, which is not exactly what we want to do. To switch it up we need to start at subscription level (this is what we are usually given, anyway) and create a resource group followed by whatever else we wanted. The recommended way to do that would be to declare main template for RG and reference a module with all other good stuff:
targetScope = 'subscription' // switching scopes here


// declaring some parameters so we can easier manage the pipeline later
@maxLength(13)
@minLength(2)
param prefix string
param tfstate_rg_name string = '${prefix}-terraformstate-rg'
@allowed([
  'australiaeast'
])
param location string

// creating resource group
resource rg 'Microsoft.Resources/resourceGroups@2021-01-01' = {
  name: tfstate_rg_name
  location: location
}

// Deploying storage account via module reference
module stg './tfstate-storage.bicep' = {
  name: 'storageDeployment'
  scope: resourceGroup(rg.name)
  params: {
    storageAccountName: '${prefix}statetf${take(uniqueString(prefix),4)}'
    location: location
  }
}
Assuming we just want to chuck all our assets into a repository and drive from there, it’d make sense to also write a simple ADO deployment pipeline. Previously we’d have to opt forAzureCLI task and do something like this:
- task: AzureCLI@2
  inputs:
    azureSubscription: $(azureServiceConnection)
    scriptType: bash
    scriptLocation: inlineScript
    inlineScript: |
      # steps to create RG
      az deployment group create --resource-group $(resourceGroupName) --template-file bicep/main.bicep
Luckily, the work has been done and starting with agent version 3.199, AzureResourceManagerTemplateDeployment does support Bicep deployments natively! Unfortunately, at the time of testing our ADO-hosted agent was still at version 3.198 so we had to cheat and compile Bicep down to ARM manually. The final pipeline, however, would look something like this:
trigger: none # intended to run manually
name: Deploy TF state backend via Bicep
pool:
vmImage: 'ubuntu-latest'
variables:
- group: "bootstrap-state-variable-grp" # define variable groups to point to correct subscription
steps:
- task: AzureResourceManagerTemplateDeployment@3
inputs:
deploymentScope: 'Subscription'
azureResourceManagerConnection: $(azureServiceConnection)
subscriptionId: $(targetSubscriptionId)
location: $(location)
templateLocation: 'Linked Artifact'
csmFile: '$(System.DefaultWorkingDirectory)/bicep/main.bicep' # on dev machine, compile into ARM (az bicep build --file .\bicep\main.bicep) and use that instead until agent gets update to 3.199.x
deploymentMode: 'Incremental'
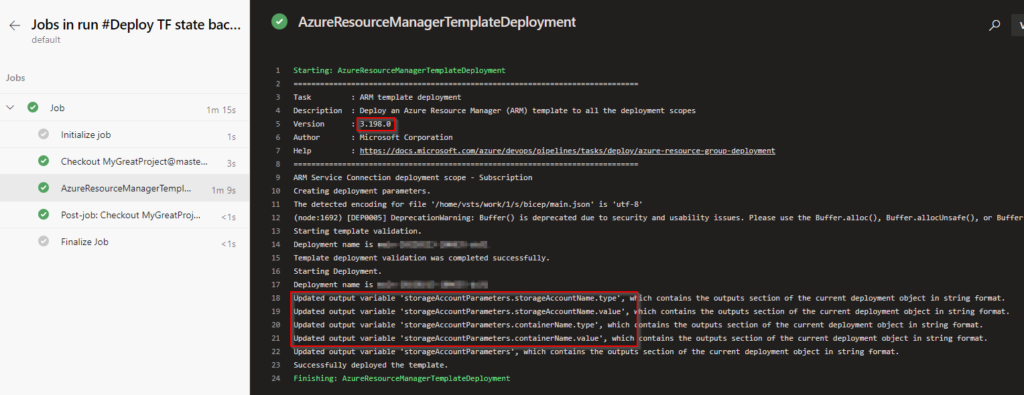
deploymentOutputs: 'storageAccountParameters'
overrideParameters: '-prefix $(prefix) -location $(location)'
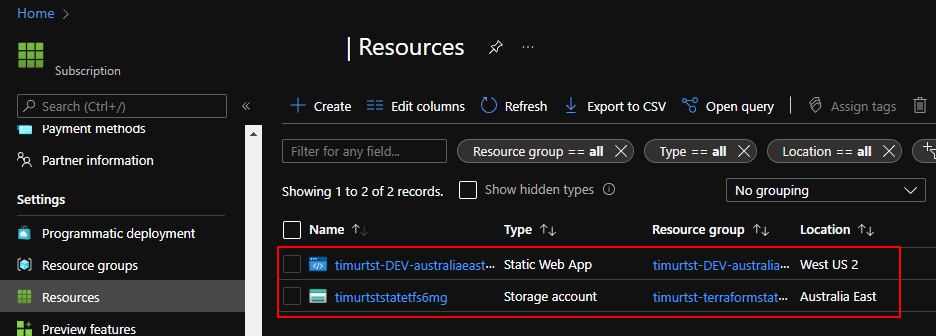
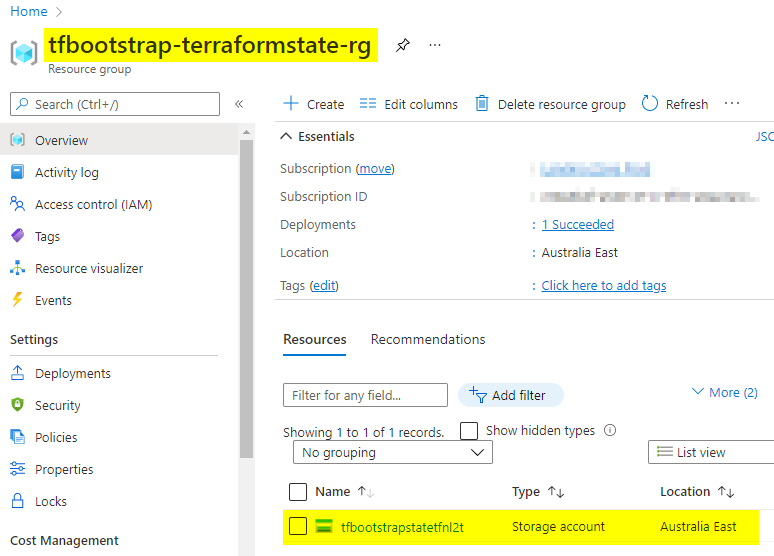
Running through ADO should yield us a usable storage account within a brand-new resource group:
Where to from here
Having dealt with foundations, we should be able to capture output of this step (we mostly care about storage account name as it’s got some randomness in it) and feed it to Terraform backend provider. We’ll cover it in the next part of this series.
Conclusion
Existing solutions in this space have so far relied on either PowerShell or az cli to do the job. That’s still doable but can get a bit bulky, especially if we want to query outputs. Now that Bicep support is landing in AzureResourceManagerTemplateDeploymentV3 directly, we will likely see this as a recommended approach.
Windows PowerShell is an extremely useful tool when it comes to quickly churning out useful bits of automation. If these scripts run unattended, we’d often sprinkle logs to aid troubleshooting. What one does with these logs totally depends on application, but we’ve seen some decent Sentinel deployments with alerting and hunting queries (which is beside the point of today’s post).
We recently had a mysterious issue where we tried ingesting a log file into Azure Log Analytics Workspace but it never came through…
Ingesting custom logs
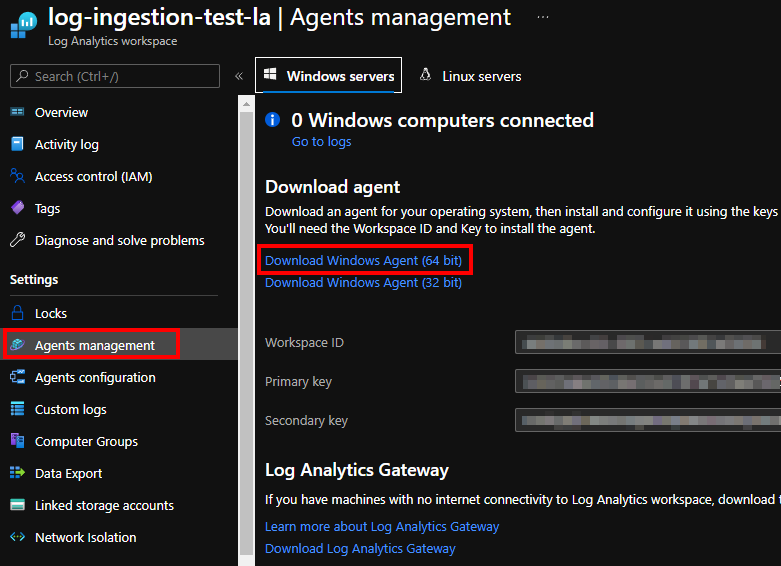
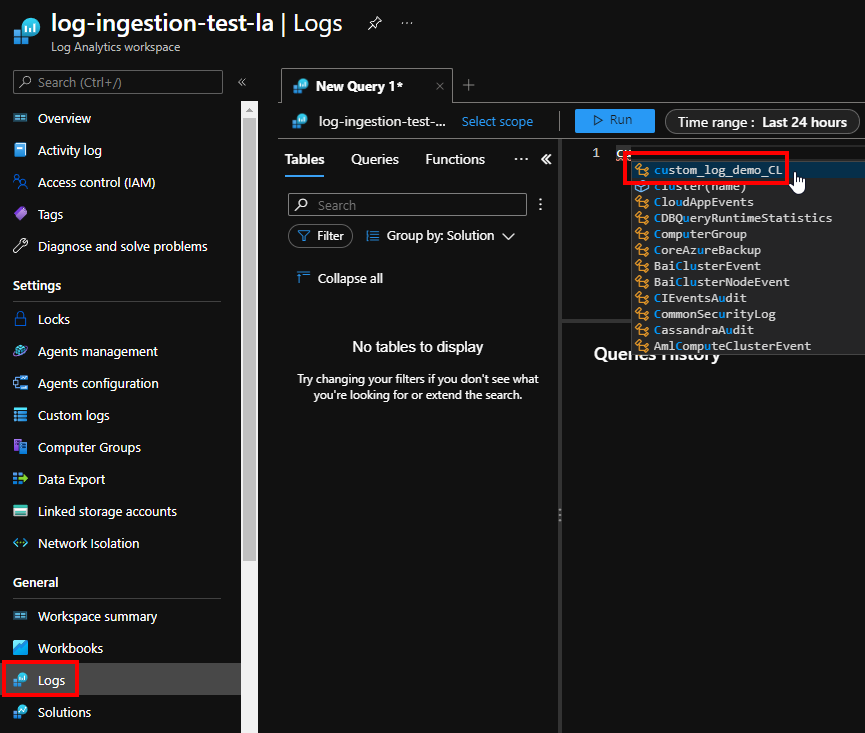
Generally speaking, this is a very simple operation. Spin up log analytics workspace and add a “Custom Logs” entry:
Finally, make sure to install Monitoring Agent on target machine and that’s it:
After a little while, new log entries would get beamed up to Azure:
Here we let our scripts run and went ahead to grab some drinks. But after a couple of hours and few bottles of fermented grape juice we realised that nothing happened…
What could possibly go wrong?
Having double- and triple- checked our setup everything looked solid. For the sake of completeness, our PowerShell script was doing something along the following lines:
$scriptDir = "."
$LogFilePath = Join-Path $scriptDir "log.txt"

# we do not overwrite the file. we always append
if (!(Test-Path $LogFilePath))
{
    $LogFile = New-Item -Path $LogFilePath -ItemType File
} else {
    $LogFile = Get-Item -Path $LogFilePath
}

 "$(Get-Date -Format "yyyy-MM-dd HH:mm:ss") Starting Processing" | Out-File $LogFile -Append

# do work

"$(Get-Date -Format "yyyy-MM-dd HH:mm:ss") Ending Processing" | Out-File $LogFile -Append
Nothing fancy, just making sure timestamps are in a supported format. We also made sure we do not rotate the file as log collection agent will not pick it up. So, we turned to the documentation:
The log must either have a single entry per line or use a timestamp matching one of the following formats at the start of each entry – ✓ check
The log file must not allow circular logging or log rotation, where the file is overwritten with new entries – ✓ check
For Linux, time zone conversion is not supported for time stamps in the logs – not our case
and finally, the log file must use ASCII or UTF-8 encoding. Other formats such as UTF-16 are not supported – let’s look at that a bit closer
Figuring this out
Looking at Out-File, we see that default Encoding is utf8NoBOM. This is exactly what we’re after, but examining our file revealed a troubling discrepancy:
That would explain why Monitoring Agent would not ingest our custom logs. Fixing this is rather easy, just set default output encoding at the start of the script: $PSDefaultParameterValues['Out-File:Encoding'] = 'utf8'.
But the question of how that could happen still remained…
Check your version
After a few more hours trying various combinations of inputs and PowerShell parameters, we checked $PSVersionTable.PSVersion and realised we ran PS5.1. This is where it started to click: documentation by default pointed us to the latest 7.2 LTS where the default encoding is different! Indeed, rewinding to PS5.1 reveals that the default used to be unicode: UTF-16 with the little-endian byte order.
Conclusion
Since PowerShell 7.x+ is not exclusive to Windows anymore, Microsoft seems to have accepted a few changes dependent on underlying behaviours of .NET frameworks these were built upon. There’s in fact an extensive list of breaking changes that mention encoding a few times. We totally support the need to advance tooling and converging tech. We, however, hope that as Monitoring Agent matures, more of these restrictions will get removed and this will not be an issue anymore. Until then – happy cloud computing!
Okay, despite roaring success we had with the previous attempt at this, setting up VS Code dev containers for AWS SAM proved to be quite a bit of a pain. And we’re still not sure if it’s worth it. But it was interesting to set up and may be useful in some circumstances, so here we go.
Some issues we ran into
The biggest issue by far was the fact that SAM heavily relies on containers which for us means we’ll have to go deeper and use docker-in-docker dev container as a starting point. The base image there comes with bare minimum software and dotnet SDK is not part of it. So, we’ll have to install everything ourselves:
#!/usr/bin/env bash

set -e

if [ "$(id -u)" -ne 0 ]; then
    echo -e 'Script must be run as root. Use sudo, su, or add "USER root" to your Dockerfile before running this script.'
    exit 1
fi

curl "https://awscli.amazonaws.com/awscli-exe-linux-x86_64.zip" -o "awscliv2.zip"
unzip awscliv2.zip
sudo ./aws/install
rm -rf ./aws
rm ./awscliv2.zip
echo "AWS CLI version `aws --version`"

curl -L "https://github.com/aws/aws-sam-cli/releases/latest/download/aws-sam-cli-linux-x86_64.zip" -o "aws-sam-cli-linux-x86_64.zip"
unzip aws-sam-cli-linux-x86_64.zip -d sam-installation
sudo ./sam-installation/install
echo "SAM version `sam --version`"
rm -rf ./sam-installation
rm ./aws-sam-cli-linux-x86_64.zip

wget https://packages.microsoft.com/config/debian/11/packages-microsoft-prod.deb -O packages-microsoft-prod.deb
sudo dpkg -i packages-microsoft-prod.deb
rm packages-microsoft-prod.deb
sudo apt-get update; \
  sudo apt-get install -y apt-transport-https && \
  sudo apt-get update && \
  sudo apt-get install -y dotnet-sdk-3.1

# Installing lambda tools was required to get lambda to work while I was testing different approaches. It may have become redundant after so many iterations and changes to the script, but probably does not hurt
dotnet tool install -g Amazon.Lambda.Tools
export PATH="$PATH:$HOME/.dotnet/tools"
This is fairly straightforward: install AWS CLI and SAM as described in the documentation, and then install dotnet SDK. All we need to do now, is call it from the main Dockerfile.
It also helps to pre-populate container with extensions we’re going to need anyway:
"extensions": [
	"ms-azuretools.vscode-docker",
	"amazonwebservices.aws-toolkit-vscode",
	"ms-dotnettools.csharp",
	"redhat.vscode-yaml",
	"zainchen.json" // this probably can be removed
],
Debugging experience
Apparently debugging AWS Lambda is slightly different from Azure functions in a sense that it’s not intended for invocation from a browser but rather accepts an event via built-in dispatcher. We could potentially spend more time on it and get it to work with browsers but that looked good enough for the first stab.
Building up the winning sequence
With all of the above in mind we ended up with roughly the following sequence to get debugging to work:
started with modified Docker-in-Docker template and added all tools
opened the container up and used AWS extension to generate lambda skeleton app (after a couple of failed attempts we settled on dotnetcore3.1 (image) template)
we then let OmniSharp run, pick up all C# projects and restore packages
after that we rebuilt container to reinitialise extensions and make sure we’re starting off afresh
Once we reopened the container, we use AWS extension again to generate launch configuration (it is important to let SAM know what version of dotnet we’re going to need. check out launch.json to verify)
Last time we took a peek under the hood of Static Web Apps, we discovered a docker container that allowed us to do custom deployments. This however left us with an issue where we could create staging environments but could not quite call it a day as we could not cleanup after ourselves.
There is more to custom deployments
Further inspection of GitHub actions config revealed there’s one more action that we could potentially exploit to get full advantage of custom workflows. It is called “close”:
name: Azure Static Web Apps CI/CD
....
jobs:
  close_pull_request_job:
    ... bunch of conditions here
    action: "close" # that is our hint!
With the above in mind, we can make an educated guess on how to invoke it with docker:
Running this indeed closes off an environment. That’s it!
Can we build an ADO pipeline though?
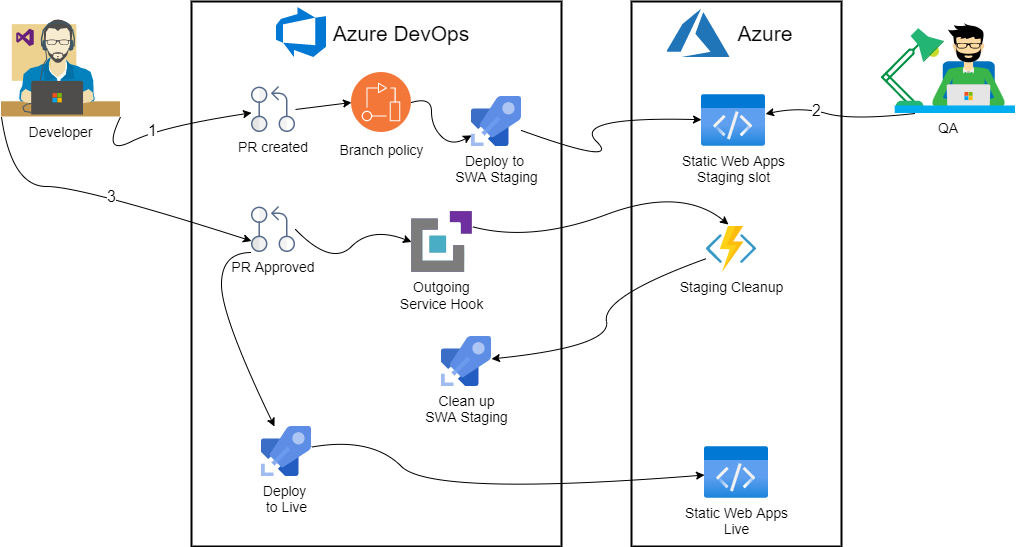
Just running docker containers is not really that useful as these actions are intended for CI/CD pipelines. Unfortunately, there’s no single config file we can edit to achieve it with Azure DevOps: we’d have to take a bit more hands on approach. Roughly the solution looks like so:
First, we’ll create a branch policy to kick off deployment to staging environment. Then we’ll use Service Hook to trigger an Azure Function on successful PR merge. Finally, stock standard Static Web Apps task will run on master branch when new commit gets pushed.
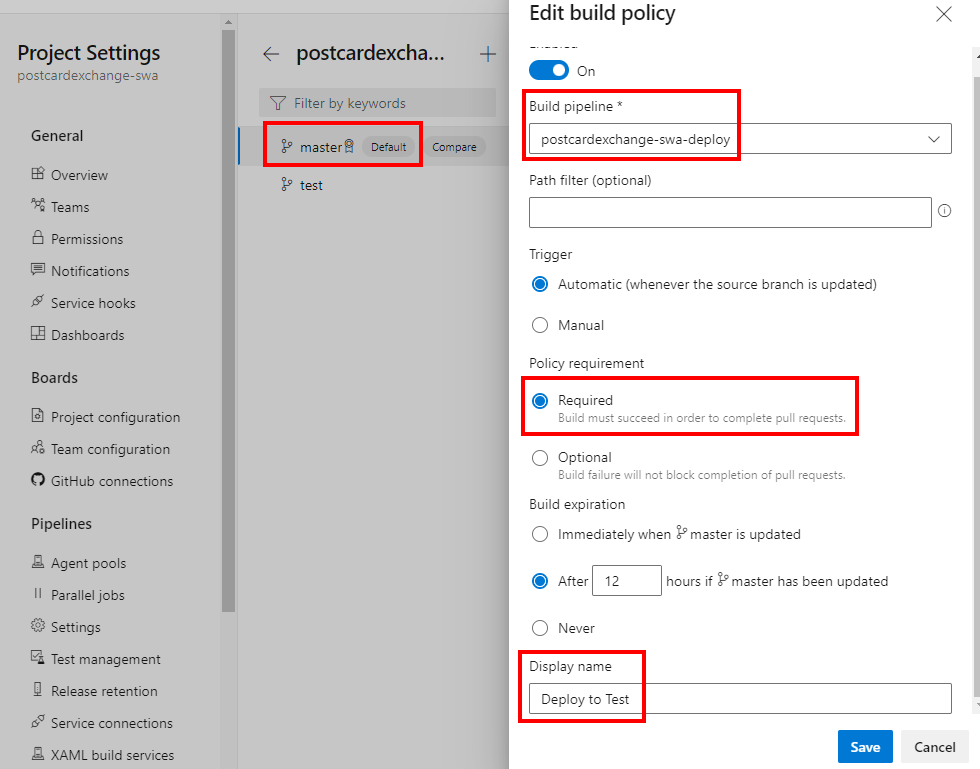
Branch policy
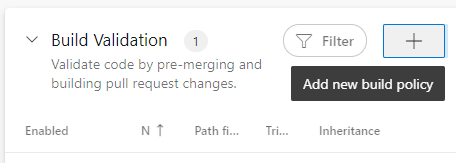
Creating branch policy itself is very straightforward: first we’ll need a separate pipeline definition:
In here we use a PR trigger, along with some variables to push through to Azure Static Web Apps. Apart from that, it’s a simple docker run that we have already had success with. To hook it up, we need a Build Validation check that would trigger this pipeline:
Teardown pipeline definition
Second part is a bit more complicated and requires an Azure Function to pull off. Let’s start by defining a pipeline that our function will run:
One thing to note here is manual trigger – we opt out of CI/CD. Then, we make note of environment variables that our function will have to populate.
Azure Function
It really doesn’t matter what sort of function we create. In this case we opt for C# code that we can author straight from the Portal for simplicity. We also need to generate a PAT so our function can call ADO.
#r "Newtonsoft.Json"

using System.Net;
using System.Net.Http.Headers;
using System.Text;
using Microsoft.AspNetCore.Mvc;
using Microsoft.Extensions.Primitives;
using Newtonsoft.Json;

private const string personalaccesstoken = "<your PAT>";
private const string organization = "<your org>";
private const string project = "<your project>";
private const int pipelineId = <your pipeline Id>;

public static async Task<IActionResult> Run([FromBody]HttpRequest req, ILogger log)
{
    log.LogInformation("C# HTTP trigger function processed a request.");
    string requestBody = await new StreamReader(req.Body).ReadToEndAsync();
    dynamic data = JsonConvert.DeserializeObject(requestBody);

    log.LogInformation($"eventType: {data?.eventType}");
    log.LogInformation($"message text: {data?.message?.text}");
    log.LogInformation($"pullRequestId: {data?.resource?.pullRequestId}");
    log.LogInformation($"sourceRefName: {data?.resource?.sourceRefName}");

    try
	{
		using (HttpClient client = new HttpClient())
		{
			client.DefaultRequestHeaders.Accept.Add(new System.Net.Http.Headers.MediaTypeWithQualityHeaderValue("application/json"));
			client.DefaultRequestHeaders.Authorization = new AuthenticationHeaderValue("Basic", ToBase64(personalaccesstoken));

			string payload = @"{
		""variables"": {
			""System.PullRequest.SourceBranch"": {
				""isSecret"": false,
            	""value"": """ + data?.resource?.sourceRefName + @"""
			},
			""System.PullRequest.PullRequestId"": {
				""isSecret"": false,
            	""value"": "+ data?.resource?.pullRequestId + @"
			}
		}
	}";
            var url = $"https://dev.azure.com/{organization}/{project}/_apis/pipelines/{pipelineId}/runs?api-version=6.0-preview.1";
            log.LogInformation($"sending payload: {payload}");
            log.LogInformation($"api url: {url}");
			using (HttpResponseMessage response = await client.PostAsync(url, new StringContent(payload, Encoding.UTF8, "application/json")))
			{
				response.EnsureSuccessStatusCode();
				string responseBody = await response.Content.ReadAsStringAsync();
                return new OkObjectResult(responseBody);
			}
		}
	}
	catch (Exception ex)
	{
		log.LogError("Error running pipeline", ex.Message);
        return new JsonResult(ex) { StatusCode = 500 };
	}
}

private static string ToBase64(string input)
{
	return Convert.ToBase64String(System.Text.ASCIIEncoding.ASCII.GetBytes(string.Format("{0}:{1}", "", input)));
}
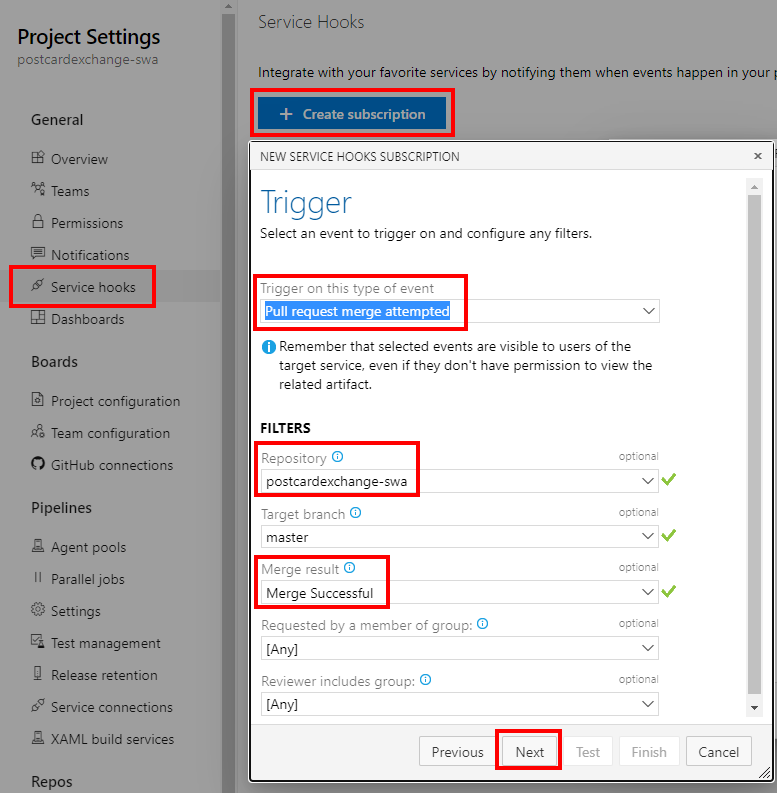
Service Hook
With all prep work done, all we have left to do is to connect PR merge event to Function call:
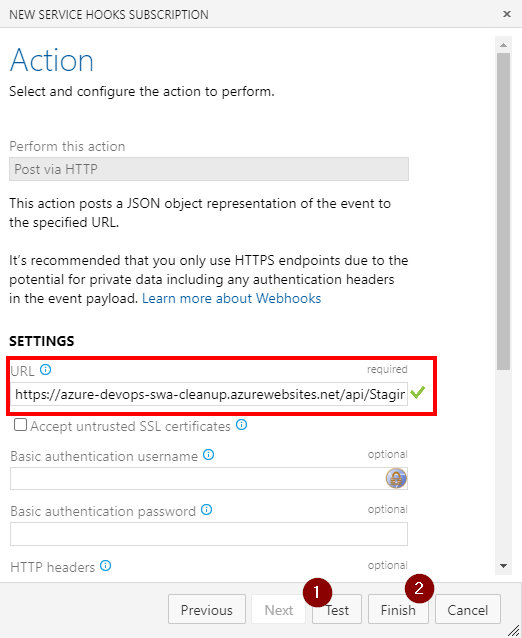
The function url should contain access key if that was defined. The easiest is probably to copy it straight from the Portal’s Code + Test blade:
It also may be a good idea to test connection on the second form before finishing up.
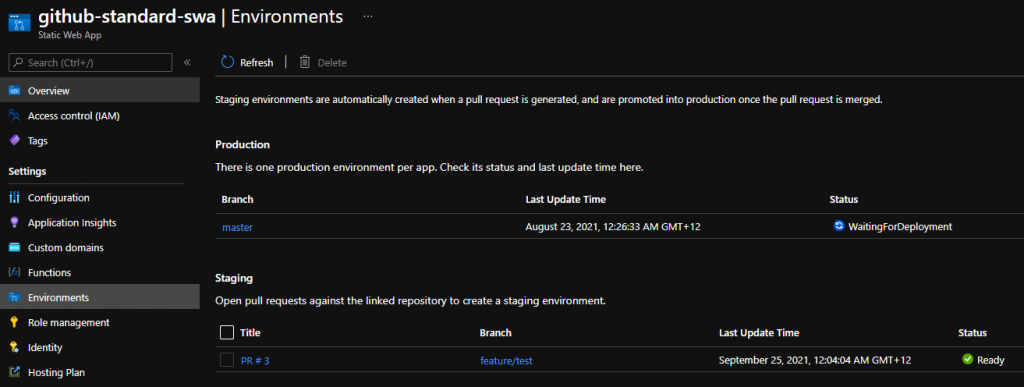
Conclusion
Once everything is connected, the pipelines should create/delete staging environments similar to what GitHub does. One possible improvement we could potentially do, would be to replace branch policy with yet another Service Hook to Function so that PR title gets correctly reflected on the Portal.
But I’ll leave it as a challenge for readers to complete.
Here’s an interesting gotcha that has kept us occupied for a little while. Our client wanted us to build an Azure DevOps pipeline that would build a container, tag it, and launch the image to do more work. As the result was not really worth pushing up to image registries, we decided to go fully local.
Setting up agent pool
Our client had further constraint that prevented them from using managed agents so first thing we had to do was to define a local pool. The process was uneventful, so we thought we’re off to a good start.
Creating Azure DevOps pipeline
Our first stab yielded a pipeline definition along the following lines:
trigger:
  - none

jobs:
  - job: test
    pool:
      name: local-linux-pool
    displayName: Build Cool software
    steps:
      - task: Bash@3
        displayName: Prune leftover containers
        inputs:
          targetType: inline
          script: |
            docker system prune -f -a

      - task: Docker@2
        displayName: Build worker container
        inputs:
          command: build
          Dockerfile: 'container/Dockerfile'
          tags: |
            supercool/test-app # tagging container would simplify our next step and avoid us headaches of trying to figure out correct ID

      - bash: |
          docker run --name builderContainer -it --rm supercool/test-app:latest # we assume latest is the correct tag here
Nothing fancy here. We clean the environment before each run (this would be optional but helped troubleshooting). Then we build a container from a Dockerfile we found in source control. To make sure we run the right thing on next step we want to tag it.
But then it went sideways…
Unable to find image 'supercool/test-app:latest' locally
docker: Error response from daemon: pull access denied for test-app, repository does not exist or may require 'docker login': denied: requested access to the resource is denied.
This of course means docker could not detect a local image and went off to pull it from the default registry. And we don’t want that!
Upon further inspection we found command line that builds container DOES NOT tag it!
Luckily, DockerV2 is Open Source and freely available on GitHub. Looking at the code, we notice an interesting error message: "NotAddingAnyTagsToBuild": "Not adding any tags to the built image as no repository is specified." Is that our clue? Seems like it may be. Let’s keep digging.
Further inspection reveals for tags to get applied, task must be able to infer image name:
And that information must come from a repository input parameter.
Repository – (Optional) Name of repository within the container registry corresponding to the Docker registry service connection specified as input for containerRegistry
A further peek into the source code, however, reveals that developers have kindly thought about local tagging:
public getQualifiedImageNamesFromConfig(repository: string, enforceDockerNamingConvention?: boolean) {
        let imageNames: string[] = [];
        if (repository) {
            let regUrls = this.getRegistryUrlsFromDockerConfig();
            if (regUrls && regUrls.length > 0) {

                // not our case, skipping for brevity
            }
            else {
                // in case there is no login information found and a repository is specified, the intention
                // might be to tag the image to refer locally.
                let imageName = repository;
                if (enforceDockerNamingConvention) {
                    imageName = imageUtils.generateValidImageName(imageName);
                }

                imageNames.push(imageName);
            }
        }

        return imageNames;
    }
Now we can solve it
Adding repository input to our task without specifying containerRegistry should get us the desired result:
...
      - task: Docker@2
        displayName: Build worker container
        inputs:
          command: build
          Dockerfile: 'container/Dockerfile'
          repository: supercool/test-app # moving this from tag input to repository does magic!
...
This scenario, however far-fetched it may appear, seems to be fully supported. At least on the code level. Documentation is lacking a little bit, but I understand how this nuance may be hard to convey in 1-2 paragraphs when there’s so much else to cover.
Playing with Static Web Apps is lots of fun. However, setting up a list of required libraries and tools can get a little bit daunting. On top of that, removing it will likely leave a messy residue.
Use VS Code Dev containers then
So, let us assume WSL and Docker are already installed (Microsoft should consider shipping these features pre-installed, really). Then we can quickly grab VS Code and spin up a development container.
Turns out, Microsoft have already provided a very good starting point. So, all we need to do is:
start a blank workspace folder, hit F1
type “Add Development Container” and select the menu item
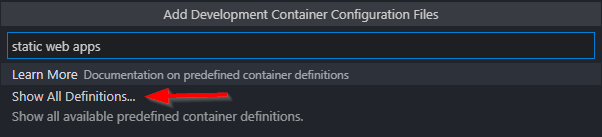
type something and click “Show All Definitions”
Select “Azure Static Web Apps”
Press F1 once more and run “Remote-Containers: Reopen Folder in Container”
At the very minimum
To be valid, Static Web Apps require an index.html file. Let’s assume we’ve got static frontend sorted. Now we also want to add an API:
vscode ➜ /workspaces/vs-dev-containers-demo $ mkdir api && cd api
vscode ➜ /workspaces/vs-dev-containers-demo/api $ func init
vscode ➜ /workspaces/vs-dev-containers-demo/api $ func new -l C# -t HttpTrigger -n HelloWorld
nothing fancy, but now we can start everything with swa start:
vscode ➜ /workspaces/vs-dev-containers-demo $ swa start --api api
VS Code would go ahead and download recommended extensions and language packs, so this should just work.
We want better dev experience
And this is where custom tasks and launch configurations would come in handy. We want VS Code to run swa emulator for us and attach to running instance of Functions: