AWS Lambda Dev – environment in 120 seconds

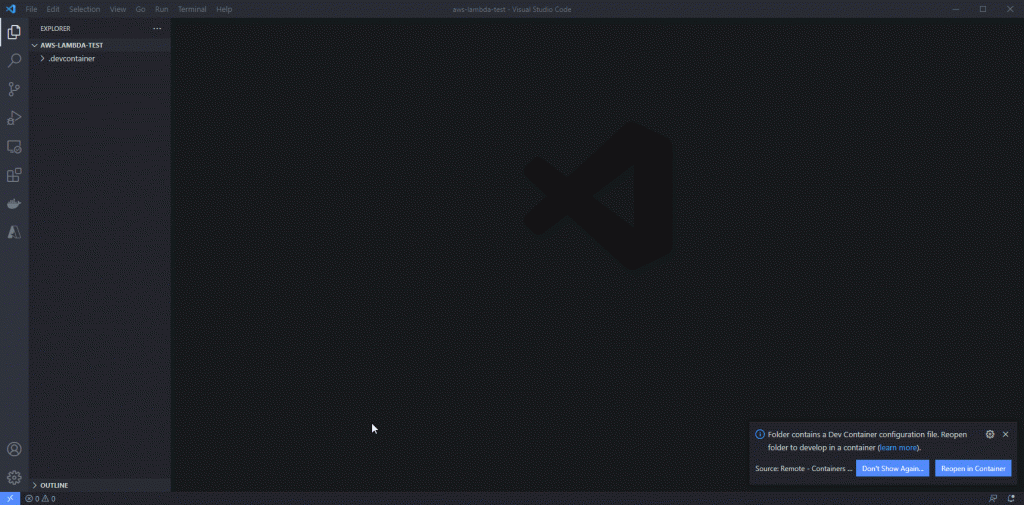
Okay, despite roaring success we had with the previous attempt at this, setting up VS Code dev containers for AWS SAM proved to be quite a bit of a pain. And we’re still not sure if it’s worth it. But it was interesting to set up and may be useful in some circumstances, so here we go.

Some issues we ran into

The biggest issue by far was the fact that SAM heavily relies on containers which for us means we’ll have to go deeper and use docker-in-docker dev container as a starting point. The base image there comes with bare minimum software and dotnet SDK is not part of it. So, we’ll have to install everything ourselves:

#!/usr/bin/env bash

set -e

if [ "$(id -u)" -ne 0 ]; then
    echo -e 'Script must be run as root. Use sudo, su, or add "USER root" to your Dockerfile before running this script.'
    exit 1
fi

curl "https://awscli.amazonaws.com/awscli-exe-linux-x86_64.zip" -o "awscliv2.zip"
unzip awscliv2.zip
sudo ./aws/install
rm -rf ./aws
rm ./awscliv2.zip
echo "AWS CLI version `aws --version`"

curl -L "https://github.com/aws/aws-sam-cli/releases/latest/download/aws-sam-cli-linux-x86_64.zip" -o "aws-sam-cli-linux-x86_64.zip"
unzip aws-sam-cli-linux-x86_64.zip -d sam-installation
sudo ./sam-installation/install
echo "SAM version `sam --version`"
rm -rf ./sam-installation
rm ./aws-sam-cli-linux-x86_64.zip

wget https://packages.microsoft.com/config/debian/11/packages-microsoft-prod.deb -O packages-microsoft-prod.deb
sudo dpkg -i packages-microsoft-prod.deb
rm packages-microsoft-prod.deb
sudo apt-get update; \
  sudo apt-get install -y apt-transport-https && \
  sudo apt-get update && \
  sudo apt-get install -y dotnet-sdk-3.1

# Installing lambda tools was required to get lambda to work while I was testing different approaches. It may have become redundant after so many iterations and changes to the script, but probably does not hurt
dotnet tool install -g Amazon.Lambda.Tools
export PATH="$PATH:$HOME/.dotnet/tools"

This is fairly straightforward: install AWS CLI and SAM as described in the documentation, and then install dotnet SDK. All we need to do now, is call it from the main Dockerfile.

It also helps to pre-populate container with extensions we’re going to need anyway:

"extensions": [
	"ms-azuretools.vscode-docker",
	"amazonwebservices.aws-toolkit-vscode",
	"ms-dotnettools.csharp",
	"redhat.vscode-yaml",
	"zainchen.json" // this probably can be removed
],

Debugging experience

Apparently debugging AWS Lambda is slightly different from Azure functions in a sense that it’s not intended for invocation from a browser but rather accepts an event via built-in dispatcher. We could potentially spend more time on it and get it to work with browsers but that looked good enough for the first stab.

Building up the winning sequence

With all of the above in mind we ended up with roughly the following sequence to get debugging to work:

  1. started with modified Docker-in-Docker template and added all tools
  2. opened the container up and used AWS extension to generate lambda skeleton app (after a couple of failed attempts we settled on dotnetcore3.1 (image) template)
  3. we then let OmniSharp run, pick up all C# projects and restore packages
  4. after that we rebuilt container to reinitialise extensions and make sure we’re starting off afresh
  5. Once we reopened the container, we use AWS extension again to generate launch configuration (it is important to let SAM know what version of dotnet we’re going to need. check out launch.json to verify)
  6. And finally, we run it

Action!

As always, code is in Github.

AWS X-Ray (but a bit more salesy)

Some time ago we had the pleasure of putting together a proposal for a client who we know loves a good story. Engagement ended up not going ahead, but this got us thinking whether we can take a random piece of tech and write it up in a slightly more salesy way. Since we don’t usually work with AWS we thought it may be a good time to try AWS X-Ray.

3-2-1 Action!

It is hard to know what is happening around you when it’s dark…

You have built and deployed an app. You are pretty confident that everything is up and running and your team had gone through the core functionality a few times before the release. You take the phone, dial your head of marketing, and tell them to submit that promotional article on to HackerNews. You know this is going to attract heaps of attention, but you are ready to be the next big thing…

But how are you going to know if your users are happy with the service? Will you spot a performance bottleneck when it happens? Or you will allow the site to crash and ruin the first impression for everyone?

Do you have the tools to track how your users interact with the app: what features they use, what should you build next? Are your developers able to pick up the logs and exception traces and investigate issues as they arise? It is really hard to answer any of these questions without having visibility into your system. Application performance monitoring tools are expensive to build and hard to maintain.

Now to the technical part

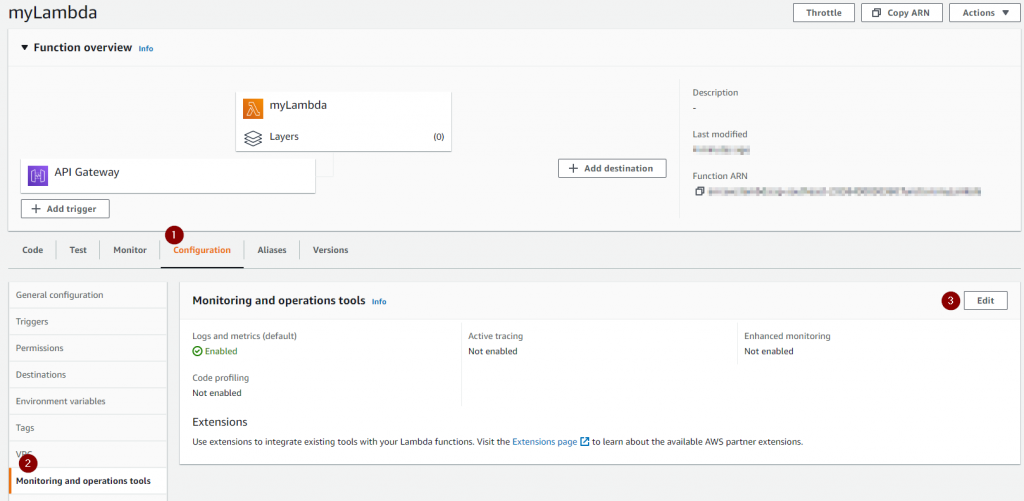
On the management portal we’ve got a lambda, sitting behind an API gateway so that we can call it via HTTP. X-Ray integrates with Lambda out of the box, so all we have to do is enable it.

adding X-Ray support to Lambda (step 1)
adding X-Ray support to Lambda (step 2)

The customer facing application is a .NET MVC website hosted on Elastic Beanstalk. One advantage of doing it that way is that it also takes care of installing the X-Ray agent – we would need to do it ourselves otherwise.

enabling X-Ray on Elastic Beanstalk

Adding Xray support to .net projects is very straightforward. We’d just need to instrument our code a little bit: Firstly – We install official NuGet packages. Secondly we add a couple of lines of code to Startup class. If we also want to capture SQL that entity framework generates – we’d need to make sure we do not forget to add an interceptor here. And…that’s it – after deploying everything – we should be all set!

public class Startup
{
	public Startup(IConfiguration configuration)
	{
		Configuration = configuration;
		AWSXRayRecorder.InitializeInstance(Configuration);
		AWSSDKHandler.RegisterXRayForAllServices();
		AWSXRayRecorder.Instance.ContextMissingStrategy = ContextMissingStrategy.LOG_ERROR;
	}

	public void Configure(IApplicationBuilder app, IWebHostEnvironment env)
	{
		app.UseXRay("x-ray-test-app");
		if (env.IsDevelopment())
		{
			app.UseDeveloperExceptionPage();
		}
		..........
	}
}

Now we can go ahead, put on our customer hat and browse the website. We’ll land on index page and check out the menu. We’ll also call a secret endpoint that generates an exception. Having generated enough activity we should be able to see the application map!

aws x-ray sample application map

As you can see, we’ve got all our components laid out in front of us. We’ve also got latencies of each link and amount of successful/failed requests.

Drilling down to traces allows us to see even more data on how users interact with our app. If there was a Database involved – we’d get to see SQL too. It doesn’t stop here – X-Ray exposes a set of APIs that allow developers build even more analysis and visualization apps.

To conclude

XRay is easy to use, it gives you insight to dive deep into how your system functions.

It is integrated with EC2, Container Service, Lambda and Beanstalk and lets the developers focus on what really matters – making your startup a success story.

Serverless face-off: AWS Lambda

We have discussed some high-level approach differences between Azure and AWS with regards to Lambda.

This time round we will expand on our scenario a bit and attempt to get our static site to call a serverless endpoint.

This article aims to cover brief step by step process of creating a simple backend for our static website to call.

There are a few things we’d have to keep in mind while going through this exercise:

  • no custom domains – setting HTTPS up with our own domain is a whole different topic – watch this space
  • even though we primarily develop on .NET platform, we’d resort to Node.JS here. Main reason for this choice being – inconsistencies between platform features: for example, cloud console built-in editor is only available for interpreted languages with AWS, while with Azure, .NET is a first-class citizen and gets full editing support.
  • no CI/CD – we want something very simple to get the point across.
  • online portal only – again, it’s best practice to codify infrastructure and deployment, but we set something up quick and dirty. Think Startup Weekend

Hosting static website on AWS

Starting with the frontend, we’d throw a small front page up into the cloud. Upload the files to S3 and make sure to enable read-only public access to the files in bucket as we’d not go through more fine-grained ACLs here.

Creating a quick Lambda

Now onto the main attraction. We’d head over to Lambda and proceed to “Author from scratch”. As we’ve already established, choice of runtime would impact our ability to move quickly and code it on the portal. So, we’d venture onto totally unknown Node.js territory here.

To get a response we need to define a function named handler and export it. In fact, the name is configurable, but we’ll stick to the default.

Since we don’t need to change a lot, here’s our complete test code:

exports.handler = async (event, context) => {
     const response = {
         statusCode: 200,
         isBase64Encoded: false,
         body: JSON.stringify({event, context}),
         headers: {
             "Content-Type": "application/json",
             "Access-Control-Allow-Headers" : "",             "Access-Control-Allow-Origin": "",
             "Access-Control-Allow-Methods": "OPTIONS,POST,GET"
         }
     };
     return response;
 };

Notice how we add a bunch of headers for CORS? Well, that’s a requirement for ELB to work. Can skip it if going API Gateway path. Deploy it, and let’s move on to defining how our function can get called.

Defining a trigger

There quite are quite a few ways this function can get invoked, but we only care about HTTP. Two obvious options for this would be to either stand up an API Gateway or use Elastic Load Balancer. Shall we try both?

API Gateway

API Gateway has been the preferred method of fronting lambdas since the beginning of time. It supports authentication and allows great control over the process. Since API Gateway is specifically designed to serve HTTP requests and forward them along, we only need to make a few choices like

  • whether we want full control over REST or simple HTTP will do and
  • what kind of authentication we’d like on the endpoints.

Elastic Load Balancer

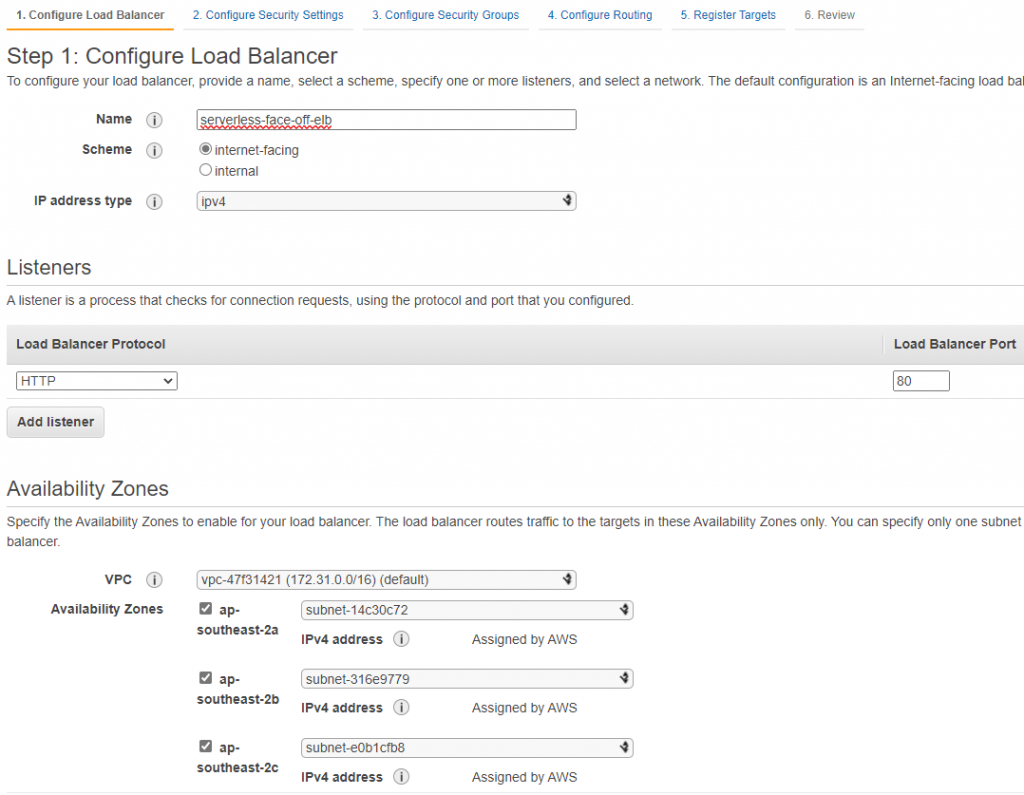
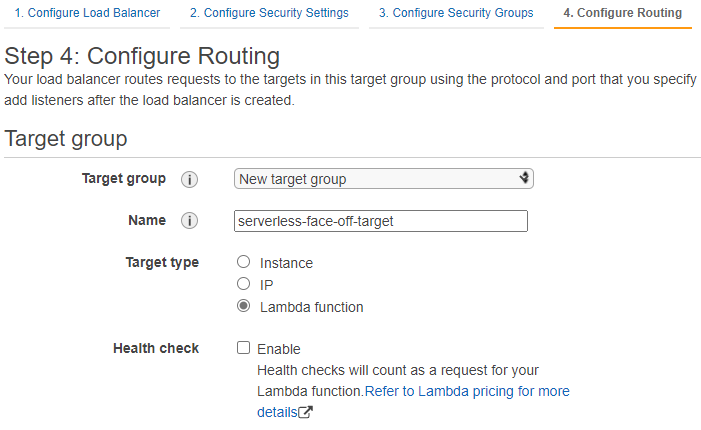
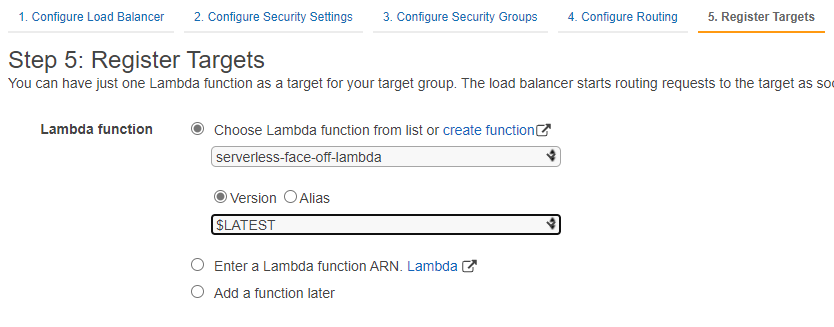
As of late 2018, AWS also supports a more “lightweight” option of having ELB target a lambda when called on a predefined path. On the surface setting up ELB looks more involved as we’d have to configure a lot of networking. Don’t forget to open inbound port 80 in your security group!

Conclusion

Creating a lambda with AWS is extremely easy if you pick the right runtime. A choice of triggers makes it a bit harder to pick one that suits better. Here’s a list of points to consider:

API GatewayELB
CORSyes, can edit on the portalno, but need to modify lambda to return correct headers
SSLHTTPS onlyHTTP/HTTPS or both
AuthNyes (IAM)no
Throttlingyesno

and sample responses FYI:

API Gateway
ELB

Serverless face-off: Azure vs AWS overview

With the explosive growth of online services, we’ve seen over 2020, it’s clear the Public Cloud is going to pervade our lives increasingly. The Internet is full of articles listing differences between platforms. But when we look closer, it all seems to fall into same groups: compute, storage, and networking. Yes, naming is different, but fundamentals are pretty much identical between all major providers.

Last time

We explored a few differences between AWS S3 and Azure Storage. On paper both Azure and AWS offers are comparable: Azure has Functions and AWS calls theirs Lambda. But subtle differences begin to show up right from the beginning…

Creating resources Azure vs AWS

Without even getting into writing any code yet we are greeted by the first difference: AWS allows to either create standalone functions or to provision Lambda Apps that are basically CloudFormation templates for a function and all related resources such as CodeCommit repo, S3 Bucket and project pipeline for CICD. Azure on the other hand always prompts to structure functions by sitting them inside a Function App. The reason for doing that is, however, slightly different: Function App is a collection of functions that share the same App Service Plan.

Serverless Invocation

AWS does not assume any triggers and we’d need to add one ourselves. Adding an API Gateway as a trigger is totally possible and allows for HTTPS setup if need be. But because trigger is external to the function – we need to pay closer attention to data contract: API reference is helpful but the default API gateway response of 500 makes it hard to troubleshoot.

Portal editor functionality

Another obvious difference between the platforms is built-in code editor experience. In AWS it is only an option for interpreted language runtimes (such as Node.js, Python and Ruby):

finding code editor in AWS portal is very easy
if runtime is not supported, you would get a blue message

Azure has its own set of supported runtimes. And of course, things like .NET and PowerShell get full support. There’s however one gotcha to keep in mind: Linux hosting plans get limited feature set:

rich experience editing code in Azure
even though .net is a first party runtime - using Linux to host it ruins the experience

.NET version support

AWS supports .NET Core 2.1 and 3.1 and conveniently provides selection controls, while Azure by default only allows for version 3.1 for newly created function apps:

AWS is an open book: picking runtime version is easy
Azure makes it a no-choice and might look very limiting, but read on...

At first look such omission is very surprising as one would expect more support from Microsoft. This however is explained in the documentation: .NET version is tied to Functions Runtime version and there is a way to downgrade all the way down to v1.x (which runs on .NET 4.7!):

it is possible to downgrade Function Runtime version. but there are limitations and gotchas

Overall

AspectAWSAzure
Language support.NET Core 2.1, .NET Core 3.1, Go, Java, Node.Js, Python, Ruby, PowerShell Core.NET Core 3.1, .NET Core 2.2, .NET 4.7, Node.Js, Python, Java, PowerShell Core
OSLinuxWindows or Linux (depending on runtime and plan type)
TriggersAPI Gateway, ELB, heaps moreBuilt-in HTTP/Timer, heaps more
HierarchyFunction or Function appFunction App
Portal code editor support Node.JS, Ruby, PythonNode.js, .NET, PowerShell Core,

Cloud face-off: hosting static website

With the explosive growth of online services we’ve seen over 2020, it’s pretty clear the Public Cloud is going to pervade our lives more and more. The Internet is full of articles listing differences between platforms. But when we look closer, it all seems to pretty much fall into same groups: compute, storage and networking. Yes, naming is is different, but fundamentals are pretty much identical between all major providers.

Or are they?

Today we’re going to try and compare two providers by attempting to achieve the same basic goal – hosting a static web page.

the web page is going to be extremely simple:

<html>
     <body ng-app="myApp" ng-controller="myCtrl">
     <h2>Serverless API endpoint</h2>
     <input type="text" ng-model="apiUrl" /><button ng-click="fetch(apiUrl)" >Fetch</button>
         <h2>Function output below</h2>
         <pre>
             {{ eventBody| json }}
         </pre>
         <script type="text/javascript" src="https://cdnjs.cloudflare.com/ajax/libs/angular.js/1.8.2/angular.min.js" />
     </body>
 </html>

S3

With AWS, static website hosting is a feature of S3. All we need to do is create a bucket, upload our files and enable “Static website hosting” in Properties:

these warnings seems to hint at something…

One may think that this is all we have to do. But that huge information message on the page seems to be hinting at the fact that we might need to enable public access to the bucket. Let us test our theory:

indeed, there’d be no public access to our static assets by default

okay, this is fair enough – making a bucket secure by default is a good idea. One point to note here, is that enabling public access on this only bucket will not be enough. We will also need to disable “Block Public Access” on account level, which seems a bit too extreme at first. But hey, you cannot be too secure, right. AWS goes to great lengths to make it very obvious when customers do something potentially dangerous. Anyway, we’d go and enable the public access on account and bucket as instructed:

The first thing that jumps out here is a “Not Secure” warning. Indeed, S3 exposes the website via good old HTTP. And if we wanted secure transport – we’d have to opt for CloudFront.

Storage account

With Azure, the very first thing that we’d get to deal with would be the naming convention: Storage Account names can only contain lowercase letters and numbers. So right out of the gate, we’ll have to strip all dashes from our name of choice. Going through the wizard it’s relatively easy to miss the “Networking” section, but it’s exactly here we get to chose if our account will have public access or not. And by default it will be! So if you want it – you’ll have to tweak the security. Anyway, moving on to “Advanced” tab, we’re presented with another key difference: Storage Account endpoints use HTTPS by default.

Having created the account we should first enable the “Static Website hosting” option.

Reason for this order is that Azure creates a special container called $web, that we’ll then upload files to. But after we have done that – it’s pretty much done:

CORS

Both AWS and Azure allow configuring CORS for static websites. AWS is pretty upfront about it in their docs. Azure however makes a specific callout that CORS is not supported on static websites. My testing, however, indicates that it seems to work as intended. Consider the following scenario. We’d use the same website, but add a web font. And load it from across the other cloud: so Azure copy of the site will attempt to source the font from AWS and vice versa:

<link rel="stylesheet" href="css/stylesheet-aws.css" type="text/css" charset="utf-8" />
<style type="text/css">
body {
font-family: "potta_oneregular"
}
</style>

and the stylesheet would look like so (note the URL pointing to Azure):

@font-face {
     font-family: 'potta_oneregular';
     src: url('https://cloudfaceoffworkload.z26.web.core.windows.net/css/pottaone-regular-webfont.woff2') format('woff2'),
          url('https://cloudfaceoffworkload.z26.web.core.windows.net/css/pottaone-regular-webfont.woff') format('woff');
     font-weight: normal;
     font-style: normal;
 }

initially, this set up indeed results in a CORS error:

but the fix is very easy, just set up CORS in Azure:

and we get a fully working cross-origin resource consumption:

Doing it the other way around is a bit more complicated. Even though AWS allows us to configure policies, lack of HTTPS endpoint means browsers will likely refuse to load the fonts and we’d be forced onto CloudFront (which has its own benefits, but that would be a completely different story).

Summary

AspectAWS S3Azure Storage Account
Public by defaultnoyes
HTTPS with own domain namenoyes
Allows for human-readable namesyesnot really
CORS supportconfigurablenot supported by static websites (despite what the docs claim)