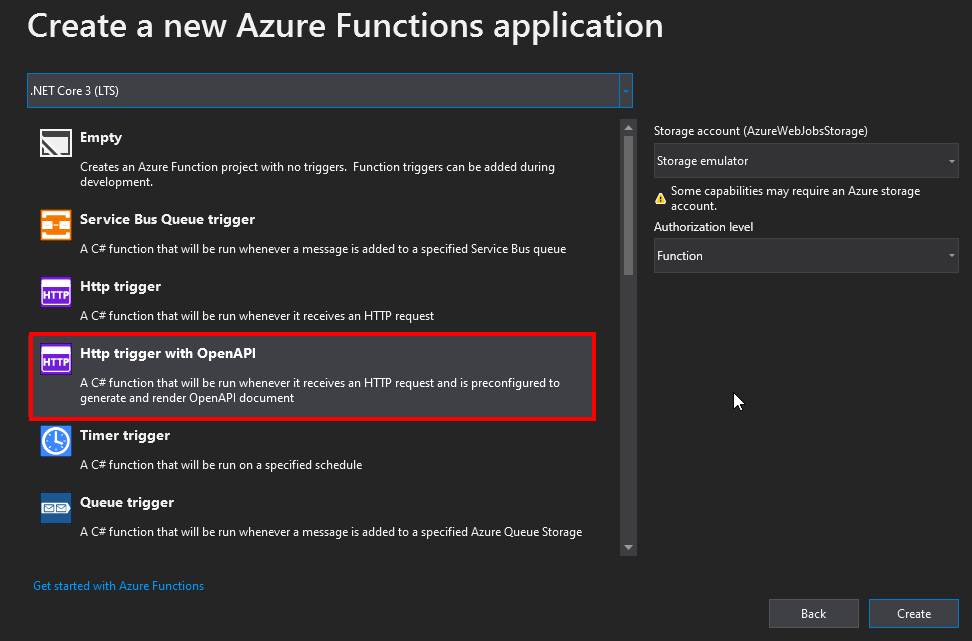
Creating Swagger-enabled Azure Functions is not that hard to do. Visual Studio literally comes with a template for that:
Inspecting the newly created project we see that it comes down to one NuGet package. It magically hooks into IWebJobsStartup and registers additional routes for Swagger UI and OpenAPI document. When run, it reflects upon suitable entry points in the assembly and builds required responses on the fly. Elegant indeed.
Installing Entity Framework
Now, suppose, we need to talk to Azure SQL. So, we’d like to add EF Core to the mix. As much as we love to go for latest and greatest, unfortunately it’s a bit messy at the moment. Instead let’s get a bit more conservative and stick to EFCore 3.1.
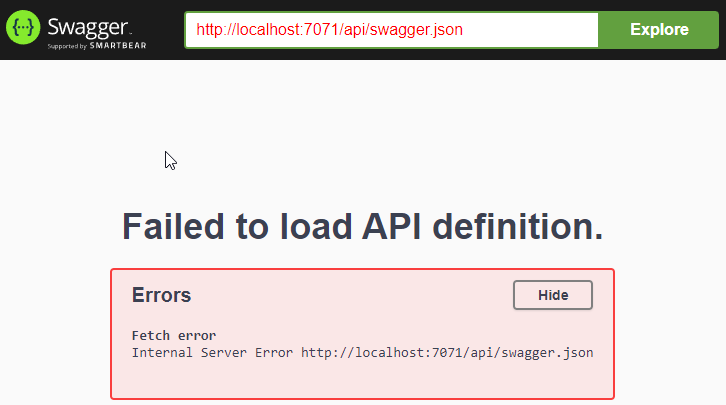
We did not expect that, did we?
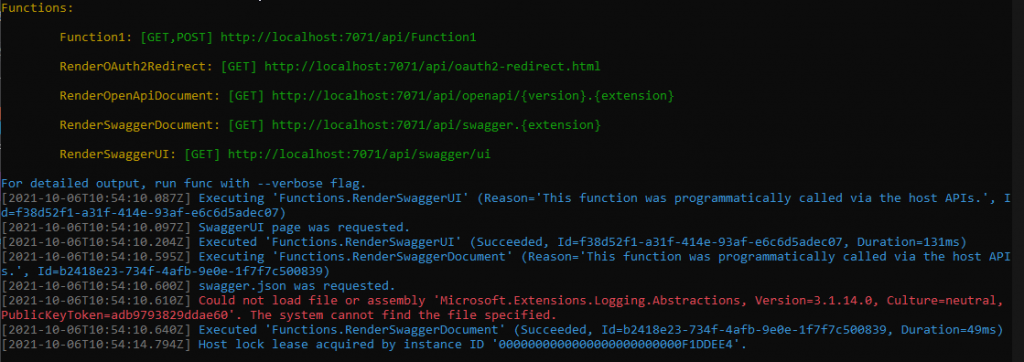
The error message is pretty clear: the assembly somehow did not get copied to the output location. And indeed, the file was missing:
Apparently when VS builds the function, it makes a second copy of the libraries it thinks are required. And in our case, it decided it’s not picking up the dependency. Adding <_FunctionsSkipCleanOutput>true</_FunctionsSkipCleanOutput> to the project file will fix that:
Are there yet?
Probably, but there’s a catch: our deployment package just got bigger. Alternatively, we could downgrade EF Core to 3.1.13 which happens to use the same version of Microsoft.Extensions.Logging.Abstractions. This way we’d avoid having to hack project files at expense or limiting ourselves to an older version of EF Core. Ultimately, we hope OpenAPI extension picks up the slack and goes GA soon. For now, looks like we’ll have to stick to it.
Quite a few recent engagements saw us developing APIs for clients. Setting these projects up is a lot of fun at first. After a few deployments, however, we felt there should be a way to optimise our workflow and bootstrap environments a bit quicker.
We wanted to craft a skeleton project that would provide structure and repeatability. After quick validation we decided that Weather Forecast project is probably good enough as API starting point. With that part out of the way we also needed to have a client application that we could use while developing and handing the API over to the client.
Our constraints
Given the purpose of our template we also had a few more limitations:
Clean desk policy – the only required tools are Docker and VS Code (and lots or RAM! but that would be another day’s problem). Everything else should be transient and should leave no residue on host system.
Offline friendly – demos and handovers can happen on-site, where we won’t necessarily have access to corporate WiFi or wired network
Open Source – not a constraint per se, but very nice to have
With that in mind, our first candidate Postman was out, and after scratching heads for a little while we stumbled upon Hoppscotch. A “light-weight, web-based API development suite” as it says on the tin, it seems to deliver most of the features we’d use.
Setting up with Docker
There are heaps of examples on how to use Hoppscotch, but we haven’t seen a lot regarding self-hosting. Probably, because it’s fairly straightforward to get started:
docker run -it --rm -p3000 hoppscotch/hoppscotch
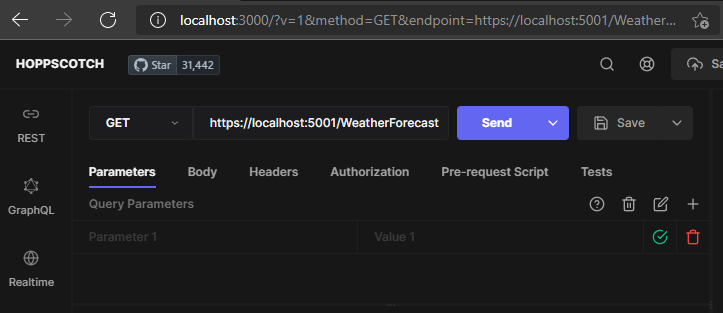
After that we should be able to just visit localhost:3000 and see the sleek UI:
hoppscotch UI
Building containers
Before we get too far ahead, let’s codify the bits we already know. We start VS Code and browse through a catalog of available dev containers… This time round we needed to set up and orchestrate at least two: we’ve got our app as well as Hoppscotch sitting in the same virtual network. That led us to opt for docker-from-docker-compose container template. On top of that, we enhanced it with dotnet SDK installation like our AWS Lambda container.
Finally, the docker-compose.yml needs Hoppscotch service definition at the bottom:
Should be smooth sailing from here: reopen in container, create a web API project and test away! Right?
A few quirks to keep in mind
As soon as we fired up the UI and tried making simple requests, we realised that Hoppscotch is not immune to CORS restrictions. Developers offer a couple of ways to fix this:
enable CORS in the API itself – that’s what we ended up doing for now
set up browser extension, but we couldn’t go that route as it would moot our clean desk policy. It also it not yet available in Microsoft Edge extension store
finally, we can use proxyscotch but that looked like a rabbit hole we may want to explore later.
Authentication mechanism support is hopefully coming, so we’ll watch that space.
There’s one more interesting behaviour that caught us off guard: the client would silently fail SSL certificate check until we manually trusted the host in another tab. There are other more technical solutions but the easiest for now is to avoid SSL in development.
Hoppscotch ssl trust error
Conclusion
Once again, we used our weapon of choice and produced an artifact that enables us to develop and test containerised APIs faster!
Okay, despite roaring success we had with the previous attempt at this, setting up VS Code dev containers for AWS SAM proved to be quite a bit of a pain. And we’re still not sure if it’s worth it. But it was interesting to set up and may be useful in some circumstances, so here we go.
Some issues we ran into
The biggest issue by far was the fact that SAM heavily relies on containers which for us means we’ll have to go deeper and use docker-in-docker dev container as a starting point. The base image there comes with bare minimum software and dotnet SDK is not part of it. So, we’ll have to install everything ourselves:
#!/usr/bin/env bash

set -e

if [ "$(id -u)" -ne 0 ]; then
    echo -e 'Script must be run as root. Use sudo, su, or add "USER root" to your Dockerfile before running this script.'
    exit 1
fi

curl "https://awscli.amazonaws.com/awscli-exe-linux-x86_64.zip" -o "awscliv2.zip"
unzip awscliv2.zip
sudo ./aws/install
rm -rf ./aws
rm ./awscliv2.zip
echo "AWS CLI version `aws --version`"

curl -L "https://github.com/aws/aws-sam-cli/releases/latest/download/aws-sam-cli-linux-x86_64.zip" -o "aws-sam-cli-linux-x86_64.zip"
unzip aws-sam-cli-linux-x86_64.zip -d sam-installation
sudo ./sam-installation/install
echo "SAM version `sam --version`"
rm -rf ./sam-installation
rm ./aws-sam-cli-linux-x86_64.zip

wget https://packages.microsoft.com/config/debian/11/packages-microsoft-prod.deb -O packages-microsoft-prod.deb
sudo dpkg -i packages-microsoft-prod.deb
rm packages-microsoft-prod.deb
sudo apt-get update; \
  sudo apt-get install -y apt-transport-https && \
  sudo apt-get update && \
  sudo apt-get install -y dotnet-sdk-3.1

# Installing lambda tools was required to get lambda to work while I was testing different approaches. It may have become redundant after so many iterations and changes to the script, but probably does not hurt
dotnet tool install -g Amazon.Lambda.Tools
export PATH="$PATH:$HOME/.dotnet/tools"
This is fairly straightforward: install AWS CLI and SAM as described in the documentation, and then install dotnet SDK. All we need to do now, is call it from the main Dockerfile.
It also helps to pre-populate container with extensions we’re going to need anyway:
"extensions": [
	"ms-azuretools.vscode-docker",
	"amazonwebservices.aws-toolkit-vscode",
	"ms-dotnettools.csharp",
	"redhat.vscode-yaml",
	"zainchen.json" // this probably can be removed
],
Debugging experience
Apparently debugging AWS Lambda is slightly different from Azure functions in a sense that it’s not intended for invocation from a browser but rather accepts an event via built-in dispatcher. We could potentially spend more time on it and get it to work with browsers but that looked good enough for the first stab.
Building up the winning sequence
With all of the above in mind we ended up with roughly the following sequence to get debugging to work:
started with modified Docker-in-Docker template and added all tools
opened the container up and used AWS extension to generate lambda skeleton app (after a couple of failed attempts we settled on dotnetcore3.1 (image) template)
we then let OmniSharp run, pick up all C# projects and restore packages
after that we rebuilt container to reinitialise extensions and make sure we’re starting off afresh
Once we reopened the container, we use AWS extension again to generate launch configuration (it is important to let SAM know what version of dotnet we’re going to need. check out launch.json to verify)
Last time we took a peek under the hood of Static Web Apps, we discovered a docker container that allowed us to do custom deployments. This however left us with an issue where we could create staging environments but could not quite call it a day as we could not cleanup after ourselves.
There is more to custom deployments
Further inspection of GitHub actions config revealed there’s one more action that we could potentially exploit to get full advantage of custom workflows. It is called “close”:
name: Azure Static Web Apps CI/CD
....
jobs:
  close_pull_request_job:
    ... bunch of conditions here
    action: "close" # that is our hint!
With the above in mind, we can make an educated guess on how to invoke it with docker:
Running this indeed closes off an environment. That’s it!
Can we build an ADO pipeline though?
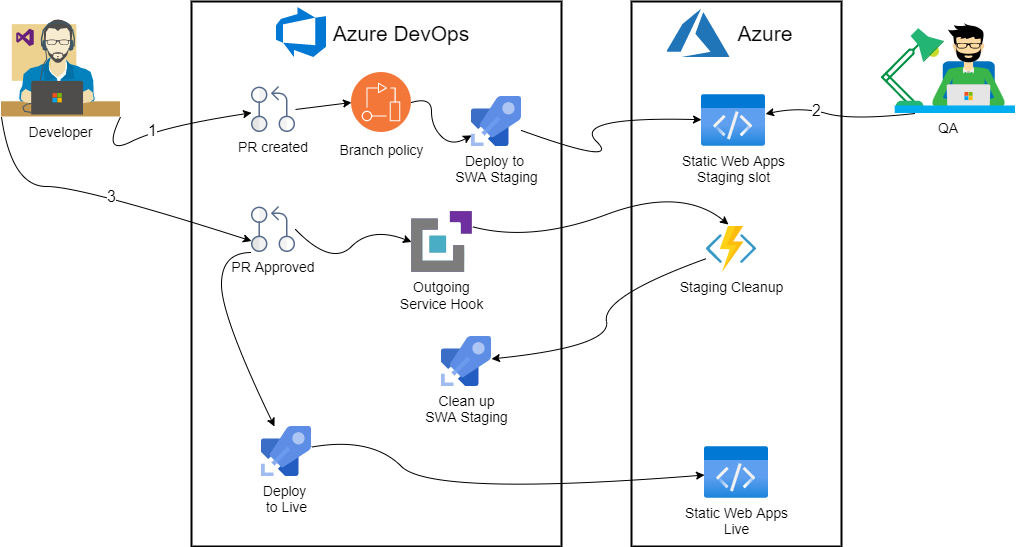
Just running docker containers is not really that useful as these actions are intended for CI/CD pipelines. Unfortunately, there’s no single config file we can edit to achieve it with Azure DevOps: we’d have to take a bit more hands on approach. Roughly the solution looks like so:
First, we’ll create a branch policy to kick off deployment to staging environment. Then we’ll use Service Hook to trigger an Azure Function on successful PR merge. Finally, stock standard Static Web Apps task will run on master branch when new commit gets pushed.
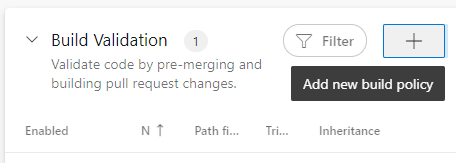
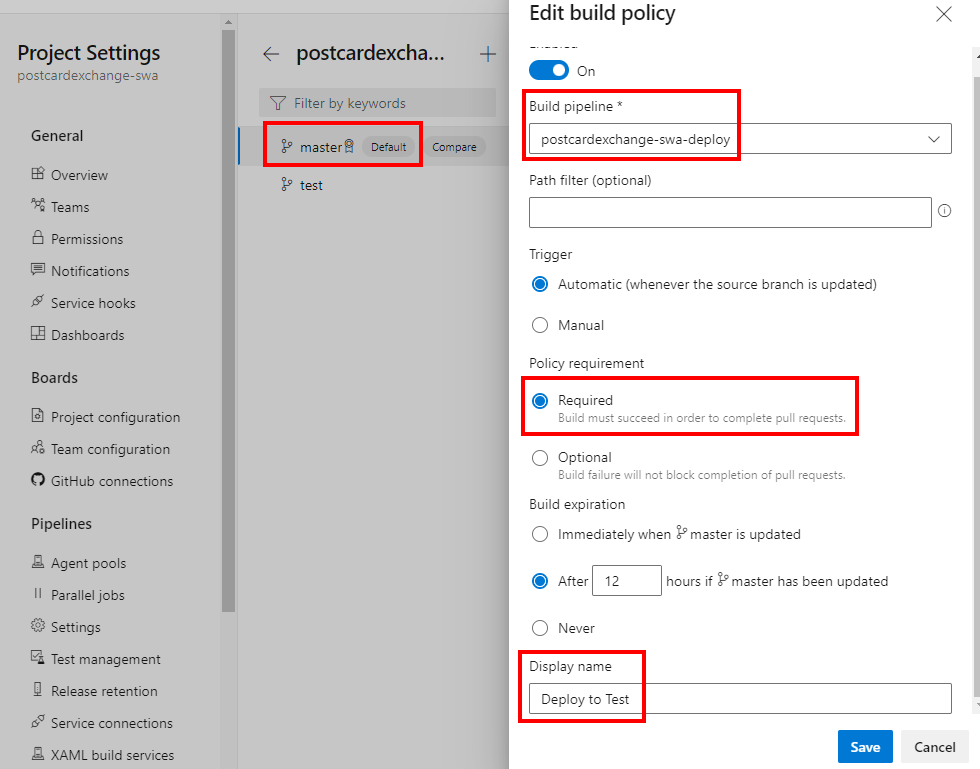
Branch policy
Creating branch policy itself is very straightforward: first we’ll need a separate pipeline definition:
In here we use a PR trigger, along with some variables to push through to Azure Static Web Apps. Apart from that, it’s a simple docker run that we have already had success with. To hook it up, we need a Build Validation check that would trigger this pipeline:
Teardown pipeline definition
Second part is a bit more complicated and requires an Azure Function to pull off. Let’s start by defining a pipeline that our function will run:
One thing to note here is manual trigger – we opt out of CI/CD. Then, we make note of environment variables that our function will have to populate.
Azure Function
It really doesn’t matter what sort of function we create. In this case we opt for C# code that we can author straight from the Portal for simplicity. We also need to generate a PAT so our function can call ADO.
#r "Newtonsoft.Json"

using System.Net;
using System.Net.Http.Headers;
using System.Text;
using Microsoft.AspNetCore.Mvc;
using Microsoft.Extensions.Primitives;
using Newtonsoft.Json;

private const string personalaccesstoken = "<your PAT>";
private const string organization = "<your org>";
private const string project = "<your project>";
private const int pipelineId = <your pipeline Id>;

public static async Task<IActionResult> Run([FromBody]HttpRequest req, ILogger log)
{
    log.LogInformation("C# HTTP trigger function processed a request.");
    string requestBody = await new StreamReader(req.Body).ReadToEndAsync();
    dynamic data = JsonConvert.DeserializeObject(requestBody);

    log.LogInformation($"eventType: {data?.eventType}");
    log.LogInformation($"message text: {data?.message?.text}");
    log.LogInformation($"pullRequestId: {data?.resource?.pullRequestId}");
    log.LogInformation($"sourceRefName: {data?.resource?.sourceRefName}");

    try
	{
		using (HttpClient client = new HttpClient())
		{
			client.DefaultRequestHeaders.Accept.Add(new System.Net.Http.Headers.MediaTypeWithQualityHeaderValue("application/json"));
			client.DefaultRequestHeaders.Authorization = new AuthenticationHeaderValue("Basic", ToBase64(personalaccesstoken));

			string payload = @"{
		""variables"": {
			""System.PullRequest.SourceBranch"": {
				""isSecret"": false,
            	""value"": """ + data?.resource?.sourceRefName + @"""
			},
			""System.PullRequest.PullRequestId"": {
				""isSecret"": false,
            	""value"": "+ data?.resource?.pullRequestId + @"
			}
		}
	}";
            var url = $"https://dev.azure.com/{organization}/{project}/_apis/pipelines/{pipelineId}/runs?api-version=6.0-preview.1";
            log.LogInformation($"sending payload: {payload}");
            log.LogInformation($"api url: {url}");
			using (HttpResponseMessage response = await client.PostAsync(url, new StringContent(payload, Encoding.UTF8, "application/json")))
			{
				response.EnsureSuccessStatusCode();
				string responseBody = await response.Content.ReadAsStringAsync();
                return new OkObjectResult(responseBody);
			}
		}
	}
	catch (Exception ex)
	{
		log.LogError("Error running pipeline", ex.Message);
        return new JsonResult(ex) { StatusCode = 500 };
	}
}

private static string ToBase64(string input)
{
	return Convert.ToBase64String(System.Text.ASCIIEncoding.ASCII.GetBytes(string.Format("{0}:{1}", "", input)));
}
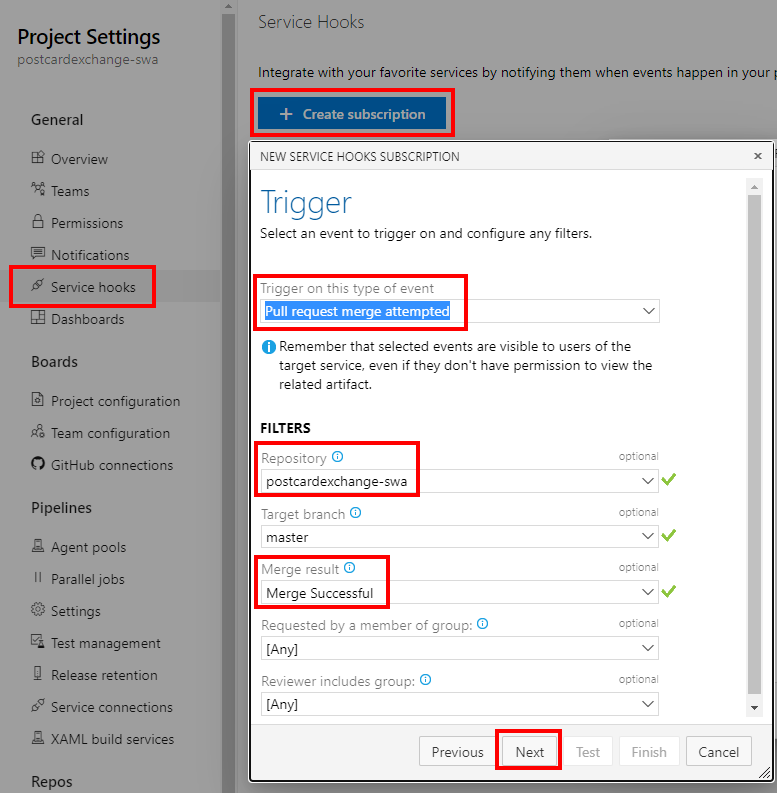
Service Hook
With all prep work done, all we have left to do is to connect PR merge event to Function call:
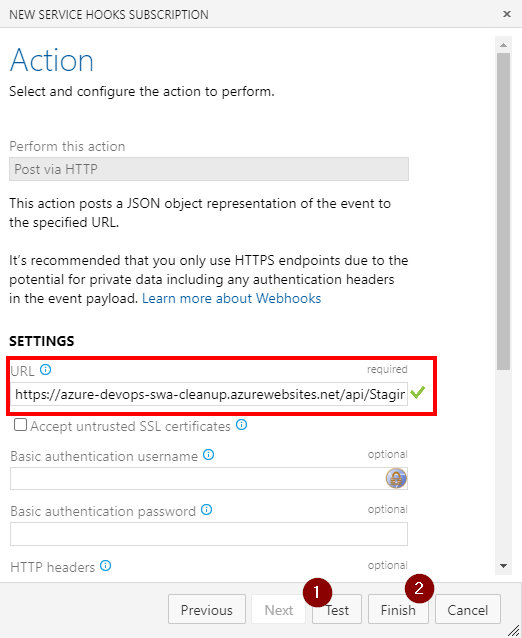
The function url should contain access key if that was defined. The easiest is probably to copy it straight from the Portal’s Code + Test blade:
It also may be a good idea to test connection on the second form before finishing up.
Conclusion
Once everything is connected, the pipelines should create/delete staging environments similar to what GitHub does. One possible improvement we could potentially do, would be to replace branch policy with yet another Service Hook to Function so that PR title gets correctly reflected on the Portal.
But I’ll leave it as a challenge for readers to complete.
Here’s an interesting gotcha that has kept us occupied for a little while. Our client wanted us to build an Azure DevOps pipeline that would build a container, tag it, and launch the image to do more work. As the result was not really worth pushing up to image registries, we decided to go fully local.
Setting up agent pool
Our client had further constraint that prevented them from using managed agents so first thing we had to do was to define a local pool. The process was uneventful, so we thought we’re off to a good start.
Creating Azure DevOps pipeline
Our first stab yielded a pipeline definition along the following lines:
trigger:
  - none

jobs:
  - job: test
    pool:
      name: local-linux-pool
    displayName: Build Cool software
    steps:
      - task: Bash@3
        displayName: Prune leftover containers
        inputs:
          targetType: inline
          script: |
            docker system prune -f -a

      - task: Docker@2
        displayName: Build worker container
        inputs:
          command: build
          Dockerfile: 'container/Dockerfile'
          tags: |
            supercool/test-app # tagging container would simplify our next step and avoid us headaches of trying to figure out correct ID

      - bash: |
          docker run --name builderContainer -it --rm supercool/test-app:latest # we assume latest is the correct tag here
Nothing fancy here. We clean the environment before each run (this would be optional but helped troubleshooting). Then we build a container from a Dockerfile we found in source control. To make sure we run the right thing on next step we want to tag it.
But then it went sideways…
Unable to find image 'supercool/test-app:latest' locally
docker: Error response from daemon: pull access denied for test-app, repository does not exist or may require 'docker login': denied: requested access to the resource is denied.
This of course means docker could not detect a local image and went off to pull it from the default registry. And we don’t want that!
Upon further inspection we found command line that builds container DOES NOT tag it!
Luckily, DockerV2 is Open Source and freely available on GitHub. Looking at the code, we notice an interesting error message: "NotAddingAnyTagsToBuild": "Not adding any tags to the built image as no repository is specified." Is that our clue? Seems like it may be. Let’s keep digging.
Further inspection reveals for tags to get applied, task must be able to infer image name:
And that information must come from a repository input parameter.
Repository – (Optional) Name of repository within the container registry corresponding to the Docker registry service connection specified as input for containerRegistry
A further peek into the source code, however, reveals that developers have kindly thought about local tagging:
public getQualifiedImageNamesFromConfig(repository: string, enforceDockerNamingConvention?: boolean) {
        let imageNames: string[] = [];
        if (repository) {
            let regUrls = this.getRegistryUrlsFromDockerConfig();
            if (regUrls && regUrls.length > 0) {

                // not our case, skipping for brevity
            }
            else {
                // in case there is no login information found and a repository is specified, the intention
                // might be to tag the image to refer locally.
                let imageName = repository;
                if (enforceDockerNamingConvention) {
                    imageName = imageUtils.generateValidImageName(imageName);
                }

                imageNames.push(imageName);
            }
        }

        return imageNames;
    }
Now we can solve it
Adding repository input to our task without specifying containerRegistry should get us the desired result:
...
      - task: Docker@2
        displayName: Build worker container
        inputs:
          command: build
          Dockerfile: 'container/Dockerfile'
          repository: supercool/test-app # moving this from tag input to repository does magic!
...
This scenario, however far-fetched it may appear, seems to be fully supported. At least on the code level. Documentation is lacking a little bit, but I understand how this nuance may be hard to convey in 1-2 paragraphs when there’s so much else to cover.
Playing with Static Web Apps is lots of fun. However, setting up a list of required libraries and tools can get a little bit daunting. On top of that, removing it will likely leave a messy residue.
Use VS Code Dev containers then
So, let us assume WSL and Docker are already installed (Microsoft should consider shipping these features pre-installed, really). Then we can quickly grab VS Code and spin up a development container.
Turns out, Microsoft have already provided a very good starting point. So, all we need to do is:
start a blank workspace folder, hit F1
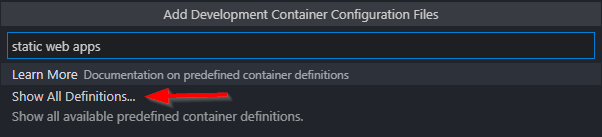
type “Add Development Container” and select the menu item
type something and click “Show All Definitions”
Select “Azure Static Web Apps”
Press F1 once more and run “Remote-Containers: Reopen Folder in Container”
At the very minimum
To be valid, Static Web Apps require an index.html file. Let’s assume we’ve got static frontend sorted. Now we also want to add an API:
vscode ➜ /workspaces/vs-dev-containers-demo $ mkdir api && cd api
vscode ➜ /workspaces/vs-dev-containers-demo/api $ func init
vscode ➜ /workspaces/vs-dev-containers-demo/api $ func new -l C# -t HttpTrigger -n HelloWorld
nothing fancy, but now we can start everything with swa start:
vscode ➜ /workspaces/vs-dev-containers-demo $ swa start --api api
VS Code would go ahead and download recommended extensions and language packs, so this should just work.
We want better dev experience
And this is where custom tasks and launch configurations would come in handy. We want VS Code to run swa emulator for us and attach to running instance of Functions:
A year and a half ago we posted an article on how we were able to plug into EF Core pipeline and inject our own IMethodCallTranslator. That let us leverage SQL-native encryption functionality with EF Core 3.1 and was ultimately a win. A lot has changed in the ecosystem, we’ve got .NET 5 and and .NET 6 coming up soon. So, we could not help but wonder…
Will it work with EF Core 6?
Apparently, EF6 is mostly an evolutionary step over EF5. That said, we totally missed previous version. So it is unclear to what extent the EF team has reworked their internal APIs. Most of the extensibility points we used were internal and clearly marked as “not for public consumption”. With that in mind, our concerns seemed valid.
Turns out, the code needs change…
The first issue we needed to rectify was implementing ShouldUseSameServiceProvider: from what I can tell, it’s needed to cache services more efficiently, but in our case setting it to default value seems to make sense.
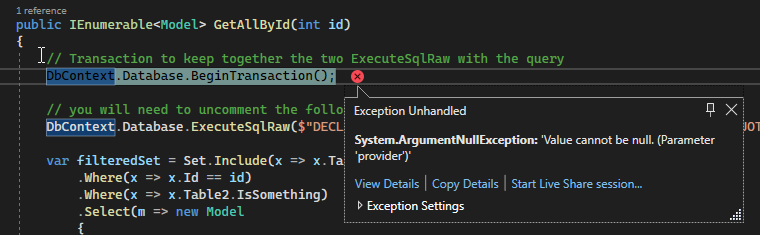
But that’s where things really went sideways:
Apparently adding our custom IDbContextOptionsExtension resets the cache and by the time EF arrives at Model initialisation, instance of DI container gets wiped, leaving us with a bunch of null references (including the one above).
One line fix
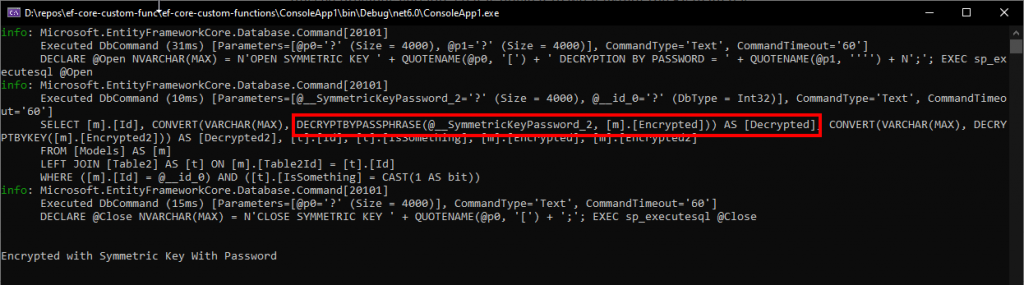
I am still unsure why EF so upset when we add new extension. Stepping through the code would likely provide me with the answer but I feel it’s not worth the effort. Playing around with service scopes I however noticed that many built-in services get registered using different extension method with Scoped lifecycle. This prompted me to try change my registration method signature and voila:
And as usual, fully functioning code sits on GitHub.
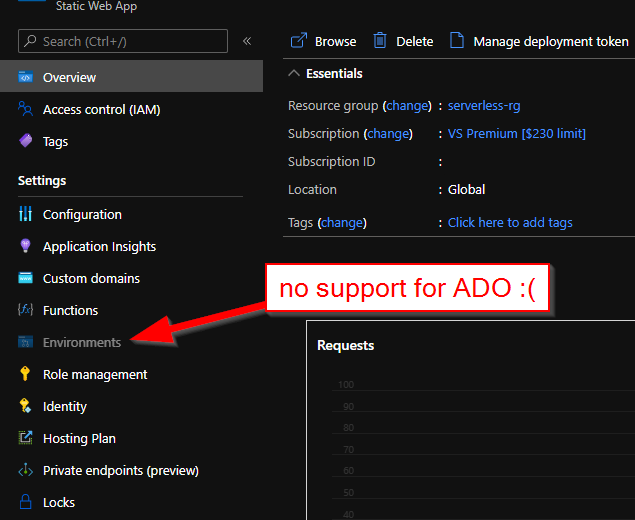
Despite Microsoft claims “First-class GitHub and Azure DevOps integration” with Static Web Apps, one is significantly easier to use than the other. Let’s take a quick look at how much features we’re giving up by sticking to Azure DevOps:
GitHub
ADO
Build/Deploy pipelines
Automatically adds pipeline definition to the repo
Requires manual pipeline setup
Azure Portal support
✓
✗
VS Code Extension
✓
✗
Staging environments and Pull Requests
✓
✗
Looks like a lot of functionality is missing. This however begs the question whether we can do something about it?
Turns out we can…sort of
Looking a bit further into ADO build pipeline, we notice that Microsoft has published this task on GitHub. Bingo!
The process seems to run a single script that in turn runs a docker image, something like this:
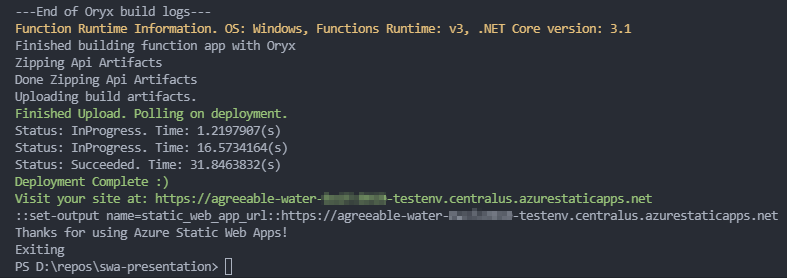
What exactly StaticSitesClient does is shrouded with mystery, but upon successful build (using Oryx) it creates two zip files: app.zip and api.zip. Then it uploads both to Blob storage and submits a request for ContentDistribution endpoint to pick the assets up.
It’s Docker – it runs anywhere
This image does not have to run at ADO or Github! We can indeed run this container locally and deploy without even committing the source code. All we need is a deployment token:
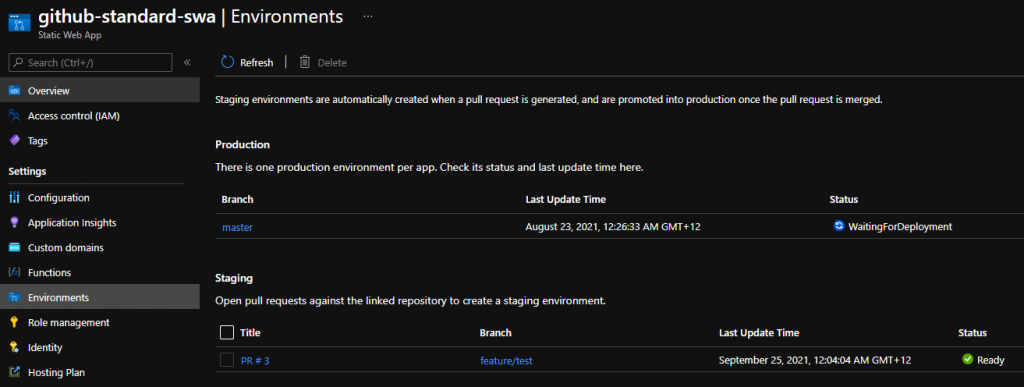
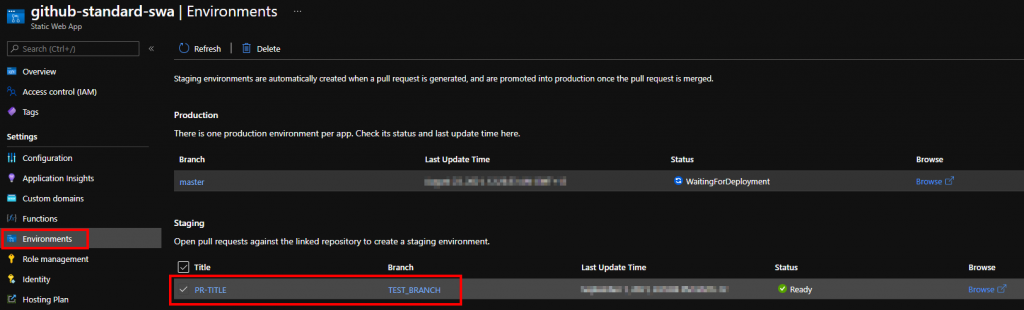
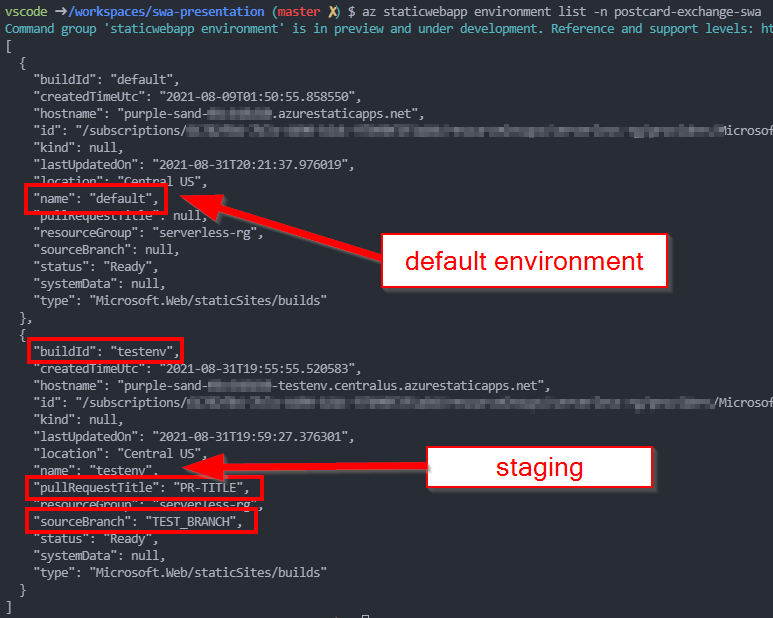
Also notice how this deployment created a staging environment:
Word of caution
Even though it seems like a pretty good little hack – this is not supported. The Portal would also bug out and refuse to display Environments correctly if the resource were created with “Other” workflow:
Portal
AZ CLI
Conclusion
Diving deep into Static Web Apps deployment is lots of fun. It may also help in situations where external source control is not available. For real production workloads, however, we’d recommend sticking with GitHub flow.
Let us put the keywords up front: Swashbuckle Basic authentication setup that works for Swashbuckle.WebApi installed on WebAPI projects (.NET 4.x). It’s also much less common to need Basic auth nowadays where proper mechanisms are easily available in all shapes and sizes. However, it may just become useful for internal tools or existing integrations.
Why?
Most tutorials online would cover the next gen library aimed specifically at ASP.Net Core, which is great (we’re all in for tech advancement), but sometimes legacy needs a prop up. If you are looking to add Basic Auth to ASP.NET Core project – look up AddSecurityDefinition and go from there. If legacy is indeed the in trouble – read on.
Setting it up
The prescribed solution is two steps: 1. add authentication scheme on SwaggerDocsConfig class 2. attach authentication to endpoints as required with IDocumentFilter or IOperationFilter
Assuming the installer left us with App_Start/SwaggerConfig.cs file, we’d arrive at:
public class SwaggerConfig
{
	public static void Register()
	{
		var thisAssembly = typeof(SwaggerConfig).Assembly;

		GlobalConfiguration.Configuration
			.EnableSwagger(c =>
				{
					...
					c.BasicAuth("basic").Description("Basic HTTP Authentication");
					c.OperationFilter<BasicAuthOpFilter>();
					...
				});
	}
}
and the most basic IOperationFilter would look like so:
public class BasicAuthOpFilter : IOperationFilter
{
	public void Apply(Operation operation, SchemaRegistry schemaRegistry, ApiDescription apiDescription)
	{
		operation.security = operation.security ?? new List<IDictionary<string, IEnumerable<string>>>();
		operation.security.Add(new Dictionary<string, IEnumerable<string>>()
							   {
								   { "basic", new List<string>() }
							   });
	}
}
The more we look at the new (GA as of May 2021)Azure Static Web Apps the more we think it makes sense to recommend this as a first step for startups and organisations looking to quickly validate their ideas. Yes, there was Blob Storage-based Static Website hosting capability (we looked at it earlier) but the newcomer is much more compelling option.
Enforcing DevOps culture
It’s easy to “just get it done” when all you need is a quick landing page or generated website. We’ve all been there – it takes a couple of clicks on the Portal to spin up required resources. Then drag-and-drop files to upload content and you’re done. Problems however strike later when the concept evolves past MVP stage. Team realises no one cared to keep track of change history and deployments are a pain.
Static Web Apps complicate things a bit by requiring you to deploy off source control. In the longer, however, benefits of version control and deployment pipeline will outweigh initial 5-minute hold up. I would point out, that the Portal makes it extremely easy to use GitHub and all demos online seem to encourage it.
ADO support is a fair bit fiddlier: deployments will work just as well, but we won’t be getting automatic staging branches support any time soon.
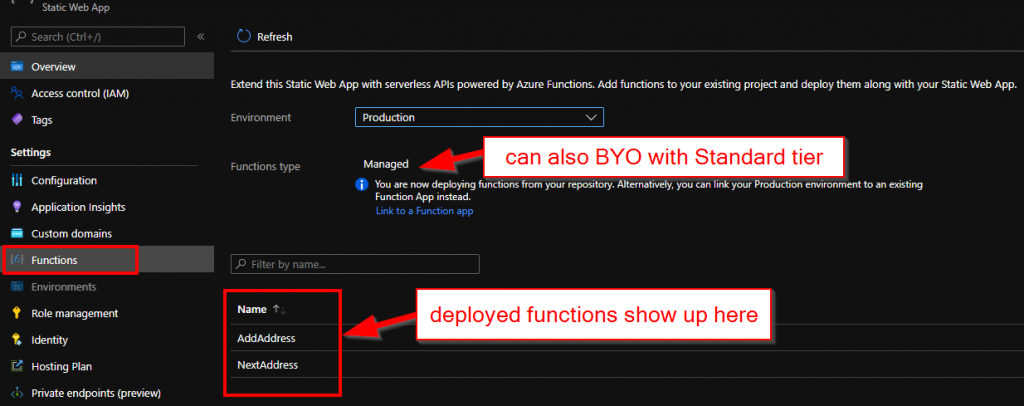
Integrated APIs
Out of the box, Static Web Apps supports Azure Functions that effectively become an API for the hosted website. There are some conventions in place but popping a Functions project under /api in the same repository would bootstrap everything like deployments, CORS and authentication context. Very neat indeed. After deployment available function show up on the portal
What would probably make experience even better if there was a way to test the API straight away.
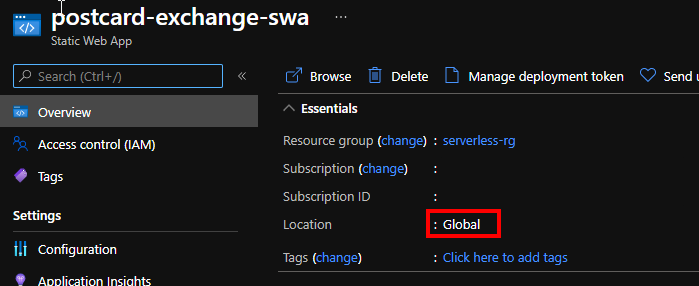
Global CDN
One small detail that is easy to overlook is the location of the newly created web app:
upon further investigation we discover that the domain name indeed maps to azurestaticapps.trafficmanager.net, and resolving it yields geographically sensible results. In our case we got Hong Kong, which is close, but could probably be further improved with rollout to Australia.
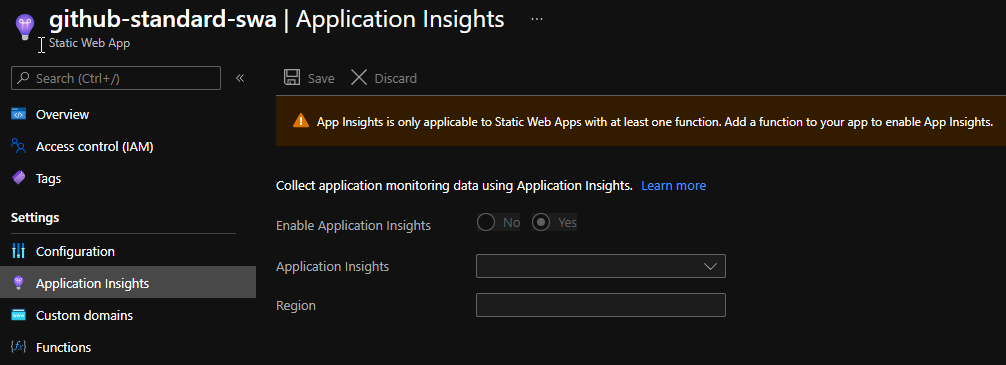
Application Insights support
Given how Azure Functions back the APIs here, it’s no surprise that Application Insights would come bundled. All we have to do – is to create an App Insights instance and select it. That however is also a limitation – only Functions are covered. Static content itself is not.
Clear upgrade path
Free plan decent for initial stages but comes with limitations, so after a while, you may consider upgrading. Switching to Standard tier enables extra features like BYO Functions, Managed Identity and custom Auth providers. This cover heaps more use cases so application can keep evolving.