Hosting Static Content with SSL on Azure

It is somewhat common for our clients to come to us for small website deployments. They’re after landing pages, or single page apps so they can put something up quickly at minimal cost.

There are options

Azure, as our platform of choice, offers many ways to deploy static content. We have talked about some ways to host simple pages before, but this time round, let’s throw BYO domains and SSL into the mix, evaluate upgrade potential, and compare costs. One extra goal we have set for ourselves was to build IaC via Terraform for each option so we can streamline our process further.

Since BYO domains require manual setup and validation, we opted to manually create a parent DNS zone, validate it prior to running Terraform and let the code automagically create child zone for our experiments. Real setups may differ.

Storage + CDN

The first method relies on Azure Storage Account feature where it can serve content of a container via HTTP or HTTPS. There’s no operational cost for this feature – we only pay for consumed storage. The drawback of this design is lack of support for managed SSL certs on custom domains. Prescribed architecture works around this by adding CDN in front of it and we found that the associated cost is likely going to be negligible for simple static pages (we’re talking $0.13 per 100Gb on top of standard egress charges). That said, the egress bill itself can potentially blow out if left unchecked.

A few notes on automation

Switching static website feature is considered a data plane exercise, so ARM templates are of little help. Terraform, however supports this with just a couple lines of config:

resource "azurerm_storage_account" "main" {
  name                     = "${replace(var.prefix, "/[-_]/", "")}${lower(random_string.storage_suffix.result)}"
  resource_group_name      = azurerm_resource_group.main.name
  location                 = azurerm_resource_group.main.location
  account_tier             = "Standard"
  account_replication_type = "LRS"

  static_website { // magic
    index_document = "index.html"
  }
}

Another neat thing with Terraform, it allows for uploading files to storage with no extra steps:

resource "azurerm_storage_blob" "main" {
  name                   = "index.html"
  storage_account_name   = azurerm_storage_account.main.name
  storage_container_name = "$web"
  type                   = "Block"
  content_type           = "text/html"
  source                 = "./content/index.html"
}

Secondly, CDN requires two CNAME domains for custom domain to work: the subdomain itself and one extra for verification. Nothing overly complicated, we just need to make sure we script both:

resource "azurerm_dns_cname_record" "static" {
  name                = "storage-account"
  zone_name           = azurerm_dns_zone.static.name
  resource_group_name = azurerm_resource_group.main.name
  ttl                 = 60
  record              = azurerm_cdn_endpoint.main.host_name
}

resource "azurerm_dns_cname_record" "static_cdnverify" {
  name                = "cdnverify.storage-account"
  zone_name           = azurerm_dns_zone.static.name
  resource_group_name = azurerm_resource_group.main.name
  ttl                 = 60
  record              = "cdnverify.${azurerm_cdn_endpoint.main.host_name}"
}

Finally, CDN takes a little while to deploy a custom domain (seems to get stuck with verification) – ours took 10 minutes to complete this step.

Static Web App

This is probably the most appropriate way to host static content in Azure. Not only it supports serving content, it also comes with built-in Functions and Authentication. We also get CDN capabilities out of the box and on top of that it is usable on free tier. This definitely is our platform of choice.

Since we’ve already covered Static Web Apps we’d just briefly touch upon automating it with Terraform. The only complication here is that native azurerm_static_site is perfectly capable of standing up the resource but has no idea on how to deploy content. Since there’s no supported way of manually uploading content, we opted for docker deployment. Fitting it back into the pipeline was a bit of a hack, which is essentially a shell script to run when content changes:

resource "null_resource" "publish_swa" {
    triggers = {
      script_checksum = sha1(join("", [for f in fileset("content", "*"): filesha1("content/${f}")])) // recreate resource on file checksum change. This will always trigger a new build, so we don't care about the state as much
    }
    provisioner "local-exec" {
        working_dir = "${path.module}"
        interpreter = ["bash", "-c"]
        command = <<EOT
docker run --rm -e INPUT_AZURE_STATIC_WEB_APPS_API_TOKEN=${azurerm_static_site.main.api_key} -e DEPLOYMENT_PROVIDER=DevOps -e GITHUB_WORKSPACE=/working_dir -e INPUT_APP_LOCATION=. -v `pwd`/content:/working_dir mcr.microsoft.com/appsvc/staticappsclient:stable ./bin/staticsites/StaticSitesClient upload --verbose true
EOT
    }
// the block above assumes static content sits in `./content` directory. Using `pwd` with backticks is particularly important as terraform attempts parsing ${pwd} syntax, while we need to pass it into the shell
    depends_on = [
      azurerm_static_site.main
    ]
}

App Service

Finally comes the totally overengineered approach that will also be the most expensive and offers no regional redundancy by default. Using App Service makes no sense for hosting simple static pages but may come in handy as a pattern for more advanced scenarios like containers or server-side-rendered web applications.

Notes on building it up

For this exercise we opted to host our content in a simple nginx docker container. Linux App Service plans with Custom Domain and SSL support start from $20/month, so they are not cheap. We started with scaffolding a Container Registry, where we’d push a small container so that App Service can pull it on startup:

FROM nginx:alpine
WORKDIR /usr/share/nginx/html/
COPY index.html .
COPY ./nginx.conf /etc/nginx/nginx.conf # there's minimal nginx config, check out github
EXPOSE 80 # we only care to expose HTTP endpoint, so no certs are needed for nginx at this stage

We picked Nginx because of its simplicity and low overheads to illustrate our point. But since we can containerise just about anything, this method becomes useful for more complicated deployments.
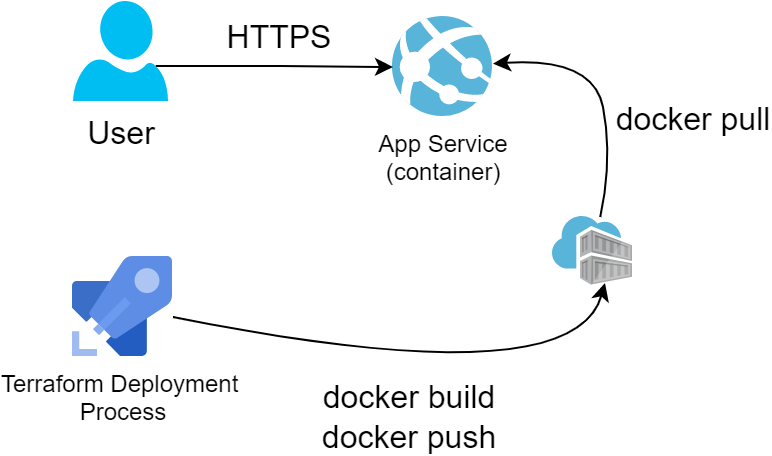
resource "null_resource" "build_container" {
    triggers = {
      script_checksum = sha1(join("", [for f in fileset("content", "*"): filesha1("content/${f}")])) // the operation will kick in on change to any of the files in content directory
    }

// normal build-push flow for private registry
    provisioner "local-exec" { command = "docker login -u ${azurerm_container_registry.acr.admin_username} -p ${azurerm_container_registry.acr.admin_password} ${azurerm_container_registry.acr.login_server}" }
    provisioner "local-exec" { command = "docker build ./content/ -t ${azurerm_container_registry.acr.login_server}/static-site:latest" }
    provisioner "local-exec" { command = "docker push ${azurerm_container_registry.acr.login_server}/static-site:latest" }
    provisioner "local-exec" { command = "docker logout ${azurerm_container_registry.acr.login_server}" }
    depends_on = [
      azurerm_container_registry.acr
    ]
}

resource "azurerm_app_service" "main" {
  name                = "${var.prefix}-app-svc"
  location            = azurerm_resource_group.main.location
  resource_group_name = azurerm_resource_group.main.name
  app_service_plan_id = azurerm_app_service_plan.main.id

  app_settings = {
    WEBSITES_ENABLE_APP_SERVICE_STORAGE = false // this is required for Linux app service plans
    DOCKER_REGISTRY_SERVER_URL      = azurerm_container_registry.acr.login_server // the convenience of rolling ACR with terraform is that we literally have all the variables already available
    DOCKER_REGISTRY_SERVER_USERNAME = azurerm_container_registry.acr.admin_username // App Service uses admin account to pull container images from ACR. We have to enable it when defining the resource
    DOCKER_REGISTRY_SERVER_PASSWORD = azurerm_container_registry.acr.admin_password
  }

  site_config {
    linux_fx_version = "DOCKER|${azurerm_container_registry.acr.name}.azurecr.io/static-site:latest"
    always_on        = "true" // this is also required on Linux app service plans
  }

  depends_on = [
    null_resource.build_container
  ]
}

Conclusion

Going through this exercise, we’ve built a bit of a decision matrix on which service to use:

App ServiceStorage AccountStatic Web App
Fit for purposenot really
AuthN/AuthZCan be done within the appBuilt-in OpenID Connect
Global scale✅ (via CDN)
Upgrade path to consuming API✅(DIY)✅ (built in Functions or BYO Functions)
Indicative running costs (per month) except egress traffic$20+~$0 (pay for storage), but CDN incurs cost per GB transferred$0 or $9 (premium tier, for extra features)
Tooling supportNo significant issues with either ARM or TerraformEnabling static websites in ARM is awkward (albeit possible), Terraform is fine thoughNo official way to deploy from local machine (but can be reliably worked around). Requires CI/CD with GitHub or ADO

As always, full code is on GitHub, infrastructure-as-coding.

Azure Static Web Apps – adding PR support to Azure DevOps pipeline

Last time we took a peek under the hood of Static Web Apps, we discovered a docker container that allowed us to do custom deployments. This however left us with an issue where we could create staging environments but could not quite call it a day as we could not cleanup after ourselves.

There is more to custom deployments

Further inspection of GitHub actions config revealed there’s one more action that we could potentially exploit to get full advantage of custom workflows. It is called “close”:

name: Azure Static Web Apps CI/CD
....
jobs:
  close_pull_request_job:
    ... bunch of conditions here
    action: "close" # that is our hint!

With the above in mind, we can make an educated guess on how to invoke it with docker:

docker run -it --rm \
   -e INPUT_AZURE_STATIC_WEB_APPS_API_TOKEN=<your deployment token> \
   -e DEPLOYMENT_PROVIDER=DevOps \
   -e GITHUB_WORKSPACE="/working_dir" \
   -e IS_PULL_REQUEST=true \
   -e BRANCH="TEST_BRANCH" \
   -e ENVIRONMENT_NAME="TESTENV" \
   -e PULL_REQUEST_TITLE="PR-TITLE" \
   mcr.microsoft.com/appsvc/staticappsclient:stable \
   ./bin/staticsites/StaticSitesClient close --verbose

Running this indeed closes off an environment. That’s it!

Can we build an ADO pipeline though?

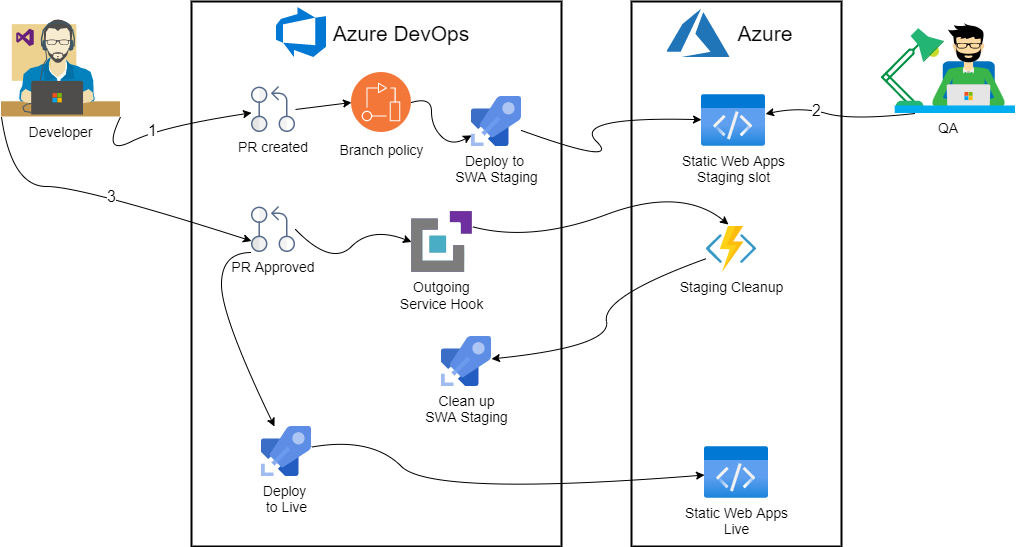
Just running docker containers is not really that useful as these actions are intended for CI/CD pipelines. Unfortunately, there’s no single config file we can edit to achieve it with Azure DevOps: we’d have to take a bit more hands on approach. Roughly the solution looks like so:

First, we’ll create a branch policy to kick off deployment to staging environment. Then we’ll use Service Hook to trigger an Azure Function on successful PR merge. Finally, stock standard Static Web Apps task will run on master branch when new commit gets pushed.

Branch policy

Creating branch policy itself is very straightforward: first we’ll need a separate pipeline definition:

pr:
  - master

pool:
  vmImage: ubuntu-latest

steps:
  - checkout: self    
  - bash: |
      docker run \
      --rm \
      -e INPUT_AZURE_STATIC_WEB_APPS_API_TOKEN=$(deployment_token)  \
      -e DEPLOYMENT_PROVIDER=DevOps \
      -e GITHUB_WORKSPACE="/working_dir" \
      -e IS_PULL_REQUEST=true \
      -e BRANCH=$(System.PullRequest.SourceBranch) \
      -e ENVIRONMENT_NAME="TESTENV" \
      -e PULL_REQUEST_TITLE="PR # $(System.PullRequest.PullRequestId)" \
      -e INPUT_APP_LOCATION="." \
      -e INPUT_API_LOCATION="./api" \
      -v ${PWD}:/working_dir \
      mcr.microsoft.com/appsvc/staticappsclient:stable \
      ./bin/staticsites/StaticSitesClient upload

In here we use a PR trigger, along with some variables to push through to Azure Static Web Apps. Apart from that, it’s a simple docker run that we have already had success with. To hook it up, we need a Build Validation check that would trigger this pipeline:

Teardown pipeline definition

Second part is a bit more complicated and requires an Azure Function to pull off. Let’s start by defining a pipeline that our function will run:

trigger: none

pool:
  vmImage: ubuntu-latest

steps:
  - script: |
      docker run --rm \
      -e INPUT_AZURE_STATIC_WEB_APPS_API_TOKEN=$(deployment_token) \
      -e DEPLOYMENT_PROVIDER=DevOps \
      -e GITHUB_WORKSPACE="/working_dir" \
      -e IS_PULL_REQUEST=true \
      -e BRANCH=$(PullRequest_SourceBranch) \
      -e ENVIRONMENT_NAME="TESTENV" \
      -e PULL_REQUEST_TITLE="PR # $(PullRequest_PullRequestId)" \
      mcr.microsoft.com/appsvc/staticappsclient:stable \
      ./bin/staticsites/StaticSitesClient close --verbose
    displayName: 'Cleanup staging environment'

One thing to note here is manual trigger – we opt out of CI/CD. Then, we make note of environment variables that our function will have to populate.

Azure Function

It really doesn’t matter what sort of function we create. In this case we opt for C# code that we can author straight from the Portal for simplicity. We also need to generate a PAT so our function can call ADO.

#r "Newtonsoft.Json"

using System.Net;
using System.Net.Http.Headers;
using System.Text;
using Microsoft.AspNetCore.Mvc;
using Microsoft.Extensions.Primitives;
using Newtonsoft.Json;

private const string personalaccesstoken = "<your PAT>";
private const string organization = "<your org>";
private const string project = "<your project>";
private const int pipelineId = <your pipeline Id>; 

public static async Task<IActionResult> Run([FromBody]HttpRequest req, ILogger log)
{
    log.LogInformation("C# HTTP trigger function processed a request.");
    string requestBody = await new StreamReader(req.Body).ReadToEndAsync();
    dynamic data = JsonConvert.DeserializeObject(requestBody);	

    log.LogInformation($"eventType: {data?.eventType}");
    log.LogInformation($"message text: {data?.message?.text}");
    log.LogInformation($"pullRequestId: {data?.resource?.pullRequestId}");
    log.LogInformation($"sourceRefName: {data?.resource?.sourceRefName}");

    try
	{
		using (HttpClient client = new HttpClient())
		{
			client.DefaultRequestHeaders.Accept.Add(new System.Net.Http.Headers.MediaTypeWithQualityHeaderValue("application/json"));
			client.DefaultRequestHeaders.Authorization = new AuthenticationHeaderValue("Basic", ToBase64(personalaccesstoken));

			string payload = @"{ 
		""variables"": {
			""System.PullRequest.SourceBranch"": {
				""isSecret"": false,
            	""value"": """ + data?.resource?.sourceRefName + @"""
			},
			""System.PullRequest.PullRequestId"": {
				""isSecret"": false,
            	""value"": "+ data?.resource?.pullRequestId + @"
			}
		}
	}";
            var url = $"https://dev.azure.com/{organization}/{project}/_apis/pipelines/{pipelineId}/runs?api-version=6.0-preview.1";
            log.LogInformation($"sending payload: {payload}");
            log.LogInformation($"api url: {url}");
			using (HttpResponseMessage response = await client.PostAsync(url, new StringContent(payload, Encoding.UTF8, "application/json")))
			{
				response.EnsureSuccessStatusCode();
				string responseBody = await response.Content.ReadAsStringAsync();
                return new OkObjectResult(responseBody);
			}
		}
	}
	catch (Exception ex)
	{
		log.LogError("Error running pipeline", ex.Message);
        return new JsonResult(ex) { StatusCode = 500 }; 
	}
}

private static string ToBase64(string input)
{
	return Convert.ToBase64String(System.Text.ASCIIEncoding.ASCII.GetBytes(string.Format("{0}:{1}", "", input)));
}

Service Hook

With all prep work done, all we have left to do is to connect PR merge event to Function call:

The function url should contain access key if that was defined. The easiest is probably to copy it straight from the Portal’s Code + Test blade:

It also may be a good idea to test connection on the second form before finishing up.

Conclusion

Once everything is connected, the pipelines should create/delete staging environments similar to what GitHub does. One possible improvement we could potentially do, would be to replace branch policy with yet another Service Hook to Function so that PR title gets correctly reflected on the Portal.

But I’ll leave it as a challenge for readers to complete.

Azure Static Web Apps – Lazy Dev Environment

Playing with Static Web Apps is lots of fun. However, setting up a list of required libraries and tools can get a little bit daunting. On top of that, removing it will likely leave a messy residue.

Use VS Code Dev containers then

So, let us assume WSL and Docker are already installed (Microsoft should consider shipping these features pre-installed, really). Then we can quickly grab VS Code and spin up a development container.

Turns out, Microsoft have already provided a very good starting point. So, all we need to do is:

  1. start a blank workspace folder, hit F1
  2. type “Add Development Container” and select the menu item
  1. type something and click “Show All Definitions”
  1. Select “Azure Static Web Apps”
  1. Press F1 once more and run “Remote-Containers: Reopen Folder in Container”

At the very minimum

To be valid, Static Web Apps require an index.html file. Let’s assume we’ve got static frontend sorted. Now we also want to add an API:

vscode ➜ /workspaces/vs-dev-containers-demo $ mkdir api && cd api
vscode ➜ /workspaces/vs-dev-containers-demo/api $ func init
vscode ➜ /workspaces/vs-dev-containers-demo/api $ func new -l C# -t HttpTrigger -n HelloWorld

nothing fancy, but now we can start everything with swa start:

vscode ➜ /workspaces/vs-dev-containers-demo $ swa start --api api

VS Code would go ahead and download recommended extensions and language packs, so this should just work.

We want better dev experience

And this is where custom tasks and launch configurations would come in handy. We want VS Code to run swa emulator for us and attach to running instance of Functions:

{
  "version": "0.2.0",
  "compounds": [
    {
      "name": "Run Static Web App with API",
      "configurations": ["Attach to .NET Functions", "Run SWA emulator"],        
      "presentation": {
        "hidden": false,
        "group": "",
        "order": 1
      }
    }
  ],
  "configurations": [
    {
      "name": "Attach to .NET Functions",
      "type": "coreclr",
      "request": "attach",
      "processId": "${command:azureFunctions.pickProcess}",
      "presentation": {
        "hidden": true,
        "group": "",
        "order": 2
      }
    },
    {
      "name": "Run SWA emulator",
      "type": "node-terminal",
      "request": "launch",      
      "cwd": "${workspaceFolder}",
      "command": "swa start . --api http://localhost:7071",
      "serverReadyAction": {
        "pattern": "Azure Static Web Apps emulator started at http://localhost:([0-9]+)",
        "uriFormat": "http://localhost:%s",
        "action": "openExternally"
      },
      "presentation": {
        "hidden": true,
        "group": "",
        "order": 3
      }
    }
  ]  
}

Save this file under .vscode/launch.json, reopen project folder and hit F5 to enjoy effect!

Finally, all code should get committed to GitHub (refrain from using ADO if you can).

Azure Static Web Apps – custom build and deployments

Despite Microsoft claims “First-class GitHub and Azure DevOps integration” with Static Web Apps, one is significantly easier to use than the other. Let’s take a quick look at how much features we’re giving up by sticking to Azure DevOps:

GitHubADO
Build/Deploy pipelinesAutomatically adds pipeline definition to the repoRequires manual pipeline setup
Azure Portal support
VS Code Extension
Staging environments and Pull Requests

Looks like a lot of functionality is missing. This however begs the question whether we can do something about it?

Turns out we can…sort of

Looking a bit further into ADO build pipeline, we notice that Microsoft has published this task on GitHub. Bingo!

The process seems to run a single script that in turn runs a docker image, something like this:

...
docker run \
    -e INPUT_AZURE_STATIC_WEB_APPS_API_TOKEN="$SWA_API_TOKEN" \
    ...
    -v "$mount_dir:$workspace" \
    mcr.microsoft.com/appsvc/staticappsclient:stable \
    ./bin/staticsites/StaticSitesClient upload

What exactly StaticSitesClient does is shrouded with mystery, but upon successful build (using Oryx) it creates two zip files: app.zip and api.zip. Then it uploads both to Blob storage and submits a request for ContentDistribution endpoint to pick the assets up.

It’s Docker – it runs anywhere

This image does not have to run at ADO or Github! We can indeed run this container locally and deploy without even committing the source code. All we need is a deployment token:

docker run -it --rm \
   -e INPUT_AZURE_STATIC_WEB_APPS_API_TOKEN=<your_deployment_token> 
   -e DEPLOYMENT_PROVIDER=DevOps \
   -e GITHUB_WORKSPACE="/working_dir"
   -e IS_PULL_REQUEST=true \
   -e BRANCH="TEST_BRANCH" \
   -e ENVIRONMENT_NAME="TESTENV" \
   -e PULL_REQUEST_TITLE="PR-TITLE" \
   -e INPUT_APP_LOCATION="." \
   -e INPUT_API_LOCATION="./api" \
   -v ${pwd}:/working_dir \
   mcr.microsoft.com/appsvc/staticappsclient:stable \
   ./bin/staticsites/StaticSitesClient upload

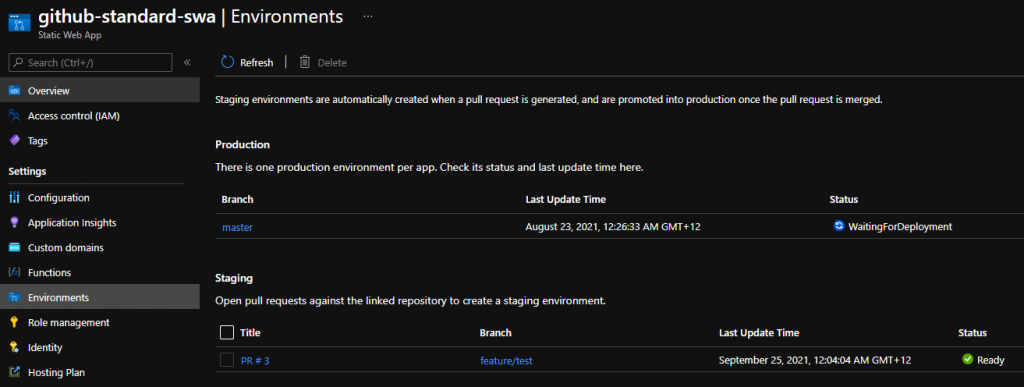
Also notice how this deployment created a staging environment:

Word of caution

Even though it seems like a pretty good little hack – this is not supported. The Portal would also bug out and refuse to display Environments correctly if the resource were created with “Other” workflow:

Portal
AZ CLI

Conclusion

Diving deep into Static Web Apps deployment is lots of fun. It may also help in situations where external source control is not available. For real production workloads, however, we’d recommend sticking with GitHub flow.

Azure Static Web Apps – when speed to market matters

The more we look at the new (GA as of May 2021) Azure Static Web Apps the more we think it makes sense to recommend this as a first step for startups and organisations looking to quickly validate their ideas. Yes, there was Blob Storage-based Static Website hosting capability (we looked at it earlier) but the newcomer is much more compelling option.

Enforcing DevOps culture

It’s easy to “just get it done” when all you need is a quick landing page or generated website. We’ve all been there – it takes a couple of clicks on the Portal to spin up required resources. Then drag-and-drop files to upload content and you’re done. Problems however strike later when the concept evolves past MVP stage. Team realises no one cared to keep track of change history and deployments are a pain.

Static Web Apps complicate things a bit by requiring you to deploy off source control. In the longer, however, benefits of version control and deployment pipeline will outweigh initial 5-minute hold up. I would point out, that the Portal makes it extremely easy to use GitHub and all demos online seem to encourage it.

ADO support is a fair bit fiddlier: deployments will work just as well, but we won’t be getting automatic staging branches support any time soon.

Integrated APIs

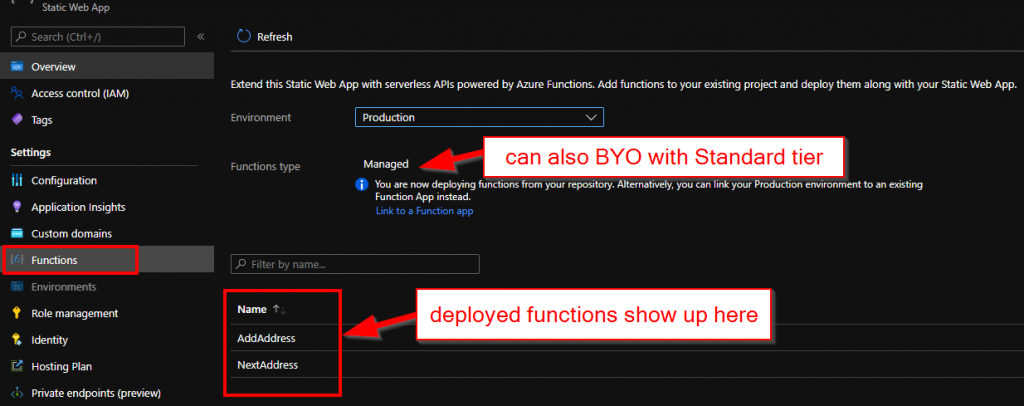
Out of the box, Static Web Apps supports Azure Functions that effectively become an API for the hosted website. There are some conventions in place but popping a Functions project under /api in the same repository would bootstrap everything like deployments, CORS and authentication context. Very neat indeed. After deployment available function show up on the portal

What would probably make experience even better if there was a way to test the API straight away.

Global CDN

One small detail that is easy to overlook is the location of the newly created web app:

upon further investigation we discover that the domain name indeed maps to azurestaticapps.trafficmanager.net, and resolving it yields geographically sensible results. In our case we got Hong Kong, which is close, but could probably be further improved with rollout to Australia.

Application Insights support

Given how Azure Functions back the APIs here, it’s no surprise that Application Insights would come bundled. All we have to do – is to create an App Insights instance and select it. That however is also a limitation – only Functions are covered. Static content itself is not.

Clear upgrade path

Free plan decent for initial stages but comes with limitations, so after a while, you may consider upgrading. Switching to Standard tier enables extra features like BYO Functions, Managed Identity and custom Auth providers. This cover heaps more use cases so application can keep evolving.